Brother International KE-436C Instruction Manual - English - Page 36
Winding the lower thread, If the thread winds onto the bobbin unevenly, loosen
 |
View all Brother International KE-436C manuals
Add to My Manuals
Save this manual to your list of manuals |
Page 36 highlights
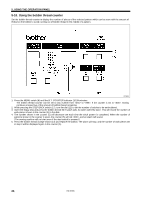
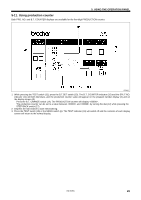
6. CORRECT USE 6-4. Winding the lower thread CAUTION Do not touch any of the moving parts or press any objects against the machine while winding the lower thread, as this may result in personal injury or damage to the machine. 1. Place the bobbin all the way onto the shaft. 2. Thread the thread as shown in the illustration at right, wind the thread around the bobbin several times in the direction of the arrow, and then press the bobbin presser (1). 3. Turn on the power switch. (The POWER indicator on the operation panel will illuminate.) 4. Depress the start switch (2) to move the feed mechanism to the sewing start. 2527Q 2712Q 5. Check that the needle is not touching the presser foot, and then while pressing the STEP BACK switch (3), depress the start switch (2) to start the machine. Keep depressing the start switch (2) until the lower thread stops being wound onto the bobbin. Release the STEP BACK switch (3) after the machine starts operating. If you release the start switch before winding is completed, depress it once more while pressing and holding the STEP BACK switch (3). 2713Q 6. The bobbin presser (1) will automatically return to its original position after a set amount of thread (80 - 90% of the bobbin capacity) has been wound on. 7. Release the foot switch (2). 8. Remove the bobbin, hook the thread onto the knife (4), and then pull the bobbin in the direction of the arrow to cut the thread. 2530Q 9. To wind more thread onto the bobbin, loosen the set screw (5) and pull the bobbin presser (1) outward. If the thread winds onto the bobbin unevenly, loosen the nut (6) and turn the bobbin winder thread tension stud (7) to adjust. * If the thread winds on as shown in A, turn the bobbin winder thread tension stud (7) clockwise; if it winds on as shown in B, turn the bobbin winder thread tension stud (7) counterclockwise. KE-436C Case A Case B 2531Q 2532Q 30
-
 1
1 -
2
-
3
-
4
-
5
-
6
-
7
-
8
-
9
-
10
-
11
-
12
-
13
-
14
-
15
-
16
-
17
-
18
-
19
-
20
-
21
-
22
-
23
-
24
-
25
-
26
-
27
-
28
-
29
-
30
-
 31
31 -
 32
32 -
 33
33 -
 34
34 -
 35
35 -
 36
36 -
 37
37 -
 38
38 -
 39
39 -
 40
40 -
 41
41 -
42
-
43
-
44
-
45
-
46
-
47
-
48
-
49
-
50
-
51
-
52
-
53
-
54
-
55
-
56
-
57
-
58
-
59
-
60
-
61
-
62
-
63
-
64
-
65
-
66
-
67
-
68
-
69
-
70
-
71
-
72
-
73
 |
 |
