Brother International KE-436C Instruction Manual - English - Page 27
Using the program R/W (Read/Write) switch, To READ a pattern to memory
 |
View all Brother International KE-436C manuals
Add to My Manuals
Save this manual to your list of manuals |
Page 27 highlights
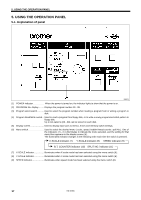
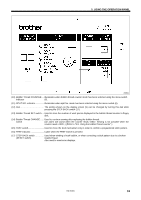
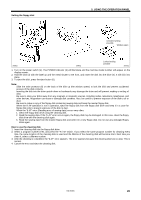
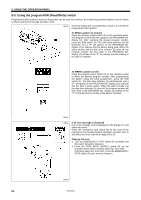
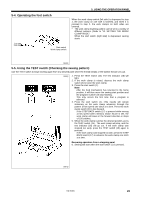
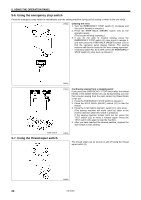
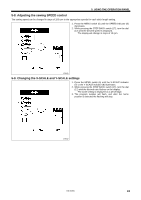
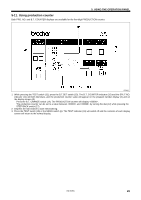
5. USING THE OPERATION PANEL 5-3. Using the program R/W (Read/Write) switch Programmed stitch patterns stored on floppy disk can be read into memory, and newly programmed patterns can be written to disk for permanent storage and later recall. 2692Q Insert the floppy disk (1) containing or which is to contain the programmed stitch pattern. To READ a pattern to memory Press the program select switch (3) on the operation panel. The program number will then appear in the PROGRAM NO. display (2). After selecting the desired program number, press the R/W switch (4). The disk drive indicator (5) will illuminate and a "P" will appear on the PROGRAM NO. display (2) to indicate that the data is being read. When the alarm sounds and the disk drive indicator (5) turns off, the program number will then flash in the PROGRAM NO. display (2) instead of the "P" to indicate that the reading of the data is complete. To WRITE a pattern to disk Press the program select switch (3) on the operation panel to select the desired program number. After programming the pattern using the stitch programmer, press the R/W switch (4). The disk drive indicator (5) will illuminate and a "P." will appear on the PROGRAM NO. display (2) to indicate that the data is being written. When the alarm sounds and the disk drive indicator (5) turns off, the program number will then flash in the PROGRAM NO. display (2) instead of the "P" to indicate that the writing of the data is complete. 2693Q 2694Q If an error message is displayed If an error message code is displayed in the display (7), and alarm will sound. Press the emergency stop switch (6) on the front of the machine to stop sewing machine operation, and then refer to and follow the error code list on page 58 to 59. Clearing the error 1. Turn the EMERGENCY STOP switch (6) clockwise and then pull it forward to release it. 2. Press the STEP BACK (RESET) switch (8) on the operation panel (when memory switch No. 0d is ON). If memory switch No. 0d is OFF, press the EMERGENCY STOP switch (6) once more to release it. 2695Q 21 KE-436C
-
 1
1 -
2
-
3
-
4
-
5
-
6
-
7
-
8
-
9
-
10
-
11
-
12
-
13
-
14
-
15
-
16
-
17
-
18
-
19
-
20
-
21
-
 22
22 -
 23
23 -
 24
24 -
 25
25 -
 26
26 -
 27
27 -
 28
28 -
 29
29 -
 30
30 -
 31
31 -
 32
32 -
33
-
34
-
35
-
36
-
37
-
38
-
39
-
40
-
41
-
42
-
43
-
44
-
45
-
46
-
47
-
48
-
49
-
50
-
51
-
52
-
53
-
54
-
55
-
56
-
57
-
58
-
59
-
60
-
61
-
62
-
63
-
64
-
65
-
66
-
67
-
68
-
69
-
70
-
71
-
72
-
73
 |
 |
