Brother International KE-436C Instruction Manual - English - Page 29
Using the emergency stop switch, 5-7. Using the thread wiper switch, Clearing the error
 |
View all Brother International KE-436C manuals
Add to My Manuals
Save this manual to your list of manuals |
Page 29 highlights
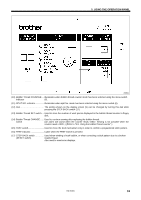
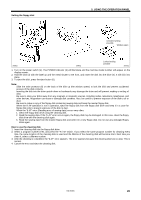
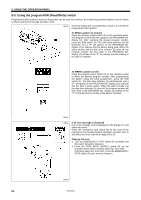
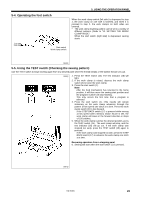
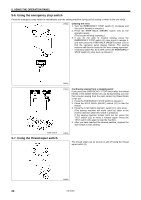
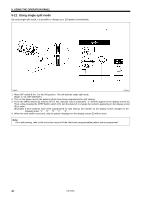
5. USING THE OPERATION PANEL 5-6. Using the emergency stop switch Press the emergency stop switch to immediately stop the sewing machine during actual sewing or when in the test mode. 2698Q Clearing the error 1. Turn the EMERGENCY STOP switch (1) clockwise and then pull it forward to release it. 2. Press the STEP BACK (RESET) switch (17) on the operation panel. (The buzzer will stop sounding.) 3. If you do not wish to resume sewing, press the EMERGENCY STOP switch (1) once more to release it, and then press the STEP BACK (RESET) switch (17) so that the operation panel display flashes. The sewing machine will then be ready for the next sewing operation. * lf memory switch No. 0d is OFF, press the EMERGENCY STOP switch (1) once more to release it. 2699Q 2700Q Continuing sewing from a stopping point lf you press the EMERGENCY STOP switch after the thread breaks or the bobbin thread runs out during sewing, you can then resume sewing from the point where the thread broke or ran out. 1. Press the EMERGENCY STOP switch to release it. 2. Press the STEP BACK (RESET) switch (17) to trim the thread. 3. Press the STEP BACK (RESET) switch (17) once more. (The sewing machine will move stitch by stitch in the reverse direction while this switch is pressed.) If the sewing machine moves back too far, press the TEST switch (15) to move it forward again. Press the TEST switch (15) again to stop the machine. 4. After you have reached the desired position, depress the start switch to start sewing. Start switch 5-7. Using the thread wiper switch 1080Q The thread wiper can be turned on and off using the thread wiper switch (1). 2608Q 23 KE-436C
-
 1
1 -
2
-
3
-
4
-
5
-
6
-
7
-
8
-
9
-
10
-
11
-
12
-
13
-
14
-
15
-
16
-
17
-
18
-
19
-
20
-
21
-
22
-
23
-
 24
24 -
 25
25 -
 26
26 -
 27
27 -
 28
28 -
 29
29 -
 30
30 -
 31
31 -
 32
32 -
 33
33 -
 34
34 -
35
-
36
-
37
-
38
-
39
-
40
-
41
-
42
-
43
-
44
-
45
-
46
-
47
-
48
-
49
-
50
-
51
-
52
-
53
-
54
-
55
-
56
-
57
-
58
-
59
-
60
-
61
-
62
-
63
-
64
-
65
-
66
-
67
-
68
-
69
-
70
-
71
-
72
-
73
 |
 |
