Brother International MFC-J6510DW Software Users Manual - English - Page 172
Scan to File, Show Save As Window
 |
UPC - 012502626626
View all Brother International MFC-J6510DW manuals
Add to My Manuals
Save this manual to your list of manuals |
Page 172 highlights
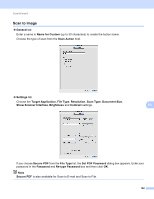
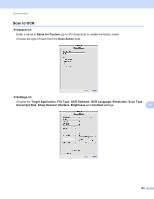
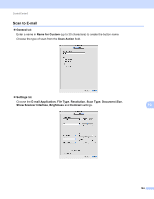
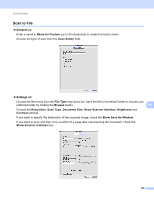
ControlCenter2 Scan to File 10 General tab Enter a name in Name for Custom (up to 30 characters) to create the button name. Choose the type of scan from the Scan Action field. Settings tab Choose the file format from the File Type drop-down list. Save the file to the default folder or choose your preferred folder by clicking the Browse button. 10 Choose the Resolution, Scan Type, Document Size, Show Scanner Interface, Brightness and Contrast settings. If you want to specify the destination of the scanned image, check the Show Save As Window. If you want to scan and then crop a portion of a page after pre-scanning the document, check the Show Scanner Interface box. 165
-
 1
1 -
2
-
3
-
4
-
5
-
6
-
7
-
8
-
9
-
10
-
11
-
12
-
13
-
14
-
15
-
16
-
17
-
18
-
19
-
20
-
21
-
22
-
23
-
24
-
25
-
26
-
27
-
28
-
29
-
30
-
31
-
32
-
33
-
34
-
35
-
36
-
37
-
38
-
39
-
40
-
41
-
42
-
43
-
44
-
45
-
46
-
47
-
48
-
49
-
50
-
51
-
52
-
53
-
54
-
55
-
56
-
57
-
58
-
59
-
60
-
61
-
62
-
63
-
64
-
65
-
66
-
67
-
68
-
69
-
70
-
71
-
72
-
73
-
74
-
75
-
76
-
77
-
78
-
79
-
80
-
81
-
82
-
83
-
84
-
85
-
86
-
87
-
88
-
89
-
90
-
91
-
92
-
93
-
94
-
95
-
96
-
97
-
98
-
99
-
100
-
101
-
102
-
103
-
104
-
105
-
106
-
107
-
108
-
109
-
110
-
111
-
112
-
113
-
114
-
115
-
116
-
117
-
118
-
119
-
120
-
121
-
122
-
123
-
124
-
125
-
126
-
127
-
128
-
129
-
130
-
131
-
132
-
133
-
134
-
135
-
136
-
137
-
138
-
139
-
140
-
141
-
142
-
143
-
144
-
145
-
146
-
147
-
148
-
149
-
150
-
151
-
152
-
153
-
154
-
155
-
156
-
157
-
158
-
159
-
160
-
161
-
162
-
163
-
164
-
165
-
166
-
 167
167 -
 168
168 -
 169
169 -
 170
170 -
 171
171 -
 172
172 -
 173
173 -
 174
174 -
 175
175 -
 176
176 -
 177
177 -
178
-
179
-
180
-
181
-
182
-
183
-
184
-
185
-
186
-
187
-
188
-
189
-
190
-
191
-
192
-
193
-
194
-
195
-
196
-
197
-
198
-
199
-
200
-
201
-
202
-
203
-
204
-
205
-
206
-
207
 |
 |
ControlCenter2
165
10
Scan to File
10
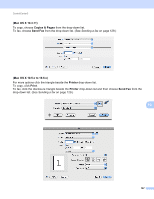
General
tab
Enter a name in
Name for Custom
(up to 30 characters) to create the button name.
Choose the type of scan from the
Scan Action
field.
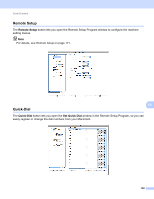
Settings
tab
Choose the file format from the
File Type
drop-down list. Save the file to the default folder or choose your
preferred folder by clicking the
Browse
button.
Choose the
Resolution
,
Scan Type
,
Document Size
,
Show Scanner Interface
,
Brightness
and
Contrast
settings.
If you want to specify the destination of the scanned image, check the
Show Save As Window
.
If you want to scan and then crop a portion of a page after pre-scanning the document, check the
Show Scanner Interface
box.