Brother International MFC-J6510DW Software Users Manual - English - Page 203
Configuring the Scan to Network Default Settings, Network, Scan to FTP/Network, Submit
 |
UPC - 012502626626
View all Brother International MFC-J6510DW manuals
Add to My Manuals
Save this manual to your list of manuals |
Page 203 highlights
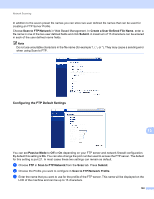
Network Scanning Configuring the Scan to Network Default Settings 13 13 a Choose Network in Scan to FTP/Network from the Scan tab. Press Submit. b Choose the Profile you want to configure in Scan to FTP/Network Profile. c Enter the name that you want to use for the Scan to Network profile. This name will be displayed on the LCD of the machine and can be up to 15 characters. d The Host Address is the domain name of the CIFS server. Enter the Host Address (for example ftp.example.com) (up to 64 characters) or the IP address (for example 192.23.56.189). 196
-
 1
1 -
2
-
3
-
4
-
5
-
6
-
7
-
8
-
9
-
10
-
11
-
12
-
13
-
14
-
15
-
16
-
17
-
18
-
19
-
20
-
21
-
22
-
23
-
24
-
25
-
26
-
27
-
28
-
29
-
30
-
31
-
32
-
33
-
34
-
35
-
36
-
37
-
38
-
39
-
40
-
41
-
42
-
43
-
44
-
45
-
46
-
47
-
48
-
49
-
50
-
51
-
52
-
53
-
54
-
55
-
56
-
57
-
58
-
59
-
60
-
61
-
62
-
63
-
64
-
65
-
66
-
67
-
68
-
69
-
70
-
71
-
72
-
73
-
74
-
75
-
76
-
77
-
78
-
79
-
80
-
81
-
82
-
83
-
84
-
85
-
86
-
87
-
88
-
89
-
90
-
91
-
92
-
93
-
94
-
95
-
96
-
97
-
98
-
99
-
100
-
101
-
102
-
103
-
104
-
105
-
106
-
107
-
108
-
109
-
110
-
111
-
112
-
113
-
114
-
115
-
116
-
117
-
118
-
119
-
120
-
121
-
122
-
123
-
124
-
125
-
126
-
127
-
128
-
129
-
130
-
131
-
132
-
133
-
134
-
135
-
136
-
137
-
138
-
139
-
140
-
141
-
142
-
143
-
144
-
145
-
146
-
147
-
148
-
149
-
150
-
151
-
152
-
153
-
154
-
155
-
156
-
157
-
158
-
159
-
160
-
161
-
162
-
163
-
164
-
165
-
166
-
167
-
168
-
169
-
170
-
171
-
172
-
173
-
174
-
175
-
176
-
177
-
178
-
179
-
180
-
181
-
182
-
183
-
184
-
185
-
186
-
187
-
188
-
189
-
190
-
191
-
192
-
193
-
194
-
195
-
196
-
197
-
 198
198 -
 199
199 -
 200
200 -
 201
201 -
 202
202 -
 203
203 -
 204
204 -
 205
205 -
 206
206 -
 207
207
 |
 |

Network Scanning
196
13
Configuring the Scan to Network Default Settings
13
a
Choose
Network
in
Scan to FTP/Network
from the
Scan
tab. Press
Submit
.
b
Choose the Profile you want to configure in
Scan to FTP/Network Profile
.
c
Enter the name that you want to use for the Scan to Network profile. This name will be displayed on the
LCD of the machine and can be up to 15 characters.
d
The Host Address is the domain name of the CIFS server. Enter the Host Address (for example
ftp.example.com) (up to 64 characters) or the IP address (for example 192.23.56.189).