Brother International NX-600 Users Manual - English - Page 150
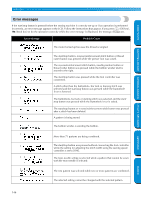
The thread tension, is incorrect., The fabric is, wrinkled., Stitches are, skipped.
 |
View all Brother International NX-600 manuals
Add to My Manuals
Save this manual to your list of manuals |
Page 150 highlights
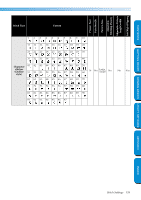
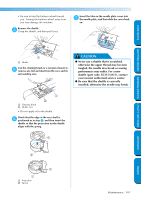
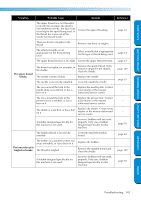
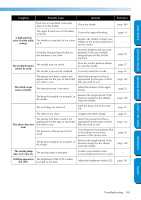
APPENDIX CONTENTS GETTING READY SEWING BASICS UTILITY STITCHES Symptom Probable Cause Remedy The upper thread was not threaded correctly. Correct the upper threading. The bobbin thread is incorrectly installed. Correctly install the bobbin thread. The thread tension is incorrect. The combination of fabric, thread and needle is not correct. The presser foot holder is incorrectly installed. Select a thread and needle that are appropriate for the type of fabric being sewn. Correctly install the presser foot holder. The thread tension is incorrect. Adjust the tension of the upper thread. A bobbin designed specifically for this machine is not used. Incorrect bobbins will not work properly. Only use a bobbin designed specifically for this machine. The upper thread was not threaded Correctly thread the upper thread correctly, or the bobbin is incorrectly and correctly install the bobbin installed. thread. The spool is incorrectly installed. Correctly install the spool. The fabric is wrinkled. The combination of fabric, thread and needle is not correct. The needle is bent or blunt. Select a thread and needle that are appropriate for the type of fabric being sewn. Replace the needle. If thin fabrics are being sewn, the stitch is too long. Shorten the stitch length or sew with stabilizer material under the fabric. The thread tension is incorrect. Adjust the tension of the upper thread. The upper thread was not threaded correctly. Correct the upper threading. Stitches are skipped. The combination of fabric, thread and needle is not correct. The needle is bent or blunt. Select a thread and needle that are appropriate for the type of fabric being sewn. Replace the needle. The needle is incorrectly installed. Correctly install the needle. Dust has accumulated under the needle plate or in the shuttle. Remove the needle plate cover and clean the shuttle. Reference page 24 page 22 page 34 page 39 page 53 page 18 page 22, page 24 page 24 page 34 page 35 page 56 page 53 page 24 page 34 page 35 page 35 page 140 APPENDIX INDEX 144
-
 1
1 -
2
-
3
-
4
-
5
-
6
-
7
-
8
-
9
-
10
-
11
-
12
-
13
-
14
-
15
-
16
-
17
-
18
-
19
-
20
-
21
-
22
-
23
-
24
-
25
-
26
-
27
-
28
-
29
-
30
-
31
-
32
-
33
-
34
-
35
-
36
-
37
-
38
-
39
-
40
-
41
-
42
-
43
-
44
-
45
-
46
-
47
-
48
-
49
-
50
-
51
-
52
-
53
-
54
-
55
-
56
-
57
-
58
-
59
-
60
-
61
-
62
-
63
-
64
-
65
-
66
-
67
-
68
-
69
-
70
-
71
-
72
-
73
-
74
-
75
-
76
-
77
-
78
-
79
-
80
-
81
-
82
-
83
-
84
-
85
-
86
-
87
-
88
-
89
-
90
-
91
-
92
-
93
-
94
-
95
-
96
-
97
-
98
-
99
-
100
-
101
-
102
-
103
-
104
-
105
-
106
-
107
-
108
-
109
-
110
-
111
-
112
-
113
-
114
-
115
-
116
-
117
-
118
-
119
-
120
-
121
-
122
-
123
-
124
-
125
-
126
-
127
-
128
-
129
-
130
-
131
-
132
-
133
-
134
-
135
-
136
-
137
-
138
-
139
-
140
-
141
-
142
-
143
-
144
-
 145
145 -
 146
146 -
 147
147 -
 148
148 -
 149
149 -
 150
150 -
 151
151 -
 152
152 -
 153
153 -
 154
154 -
 155
155 -
156
-
157
-
158
-
159
 |
 |
