Brother International NX-600 Users Manual - English - Page 64
Automatically cutting the thread, Turn on the sewing machine., Select a stitch., Press
 |
View all Brother International NX-600 manuals
Add to My Manuals
Save this manual to your list of manuals |
Page 64 highlights
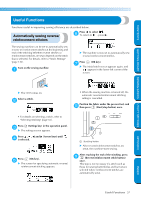
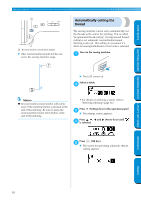
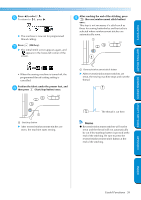
SEWING BASICS CONTENTS 1 a Reverse/reinforcement stitch button X After reverse/reinforcement stitches are sewn, the sewing machine stops. Automatically cutting the thread The sewing machine can be set to automatically cut the threads at the end of the stitching. This is called "programmed thread-cutting". If programmed threadcutting is set, automatic reverse/reinforcement stitching is also set. This setting is convenient if a stitch for sewing buttonholes or bar tacks is selected. Turn on the sewing machine. a GETTING READY SEWING BASICS UTILITY STITCHES X The LCD comes on. Select a stitch. b Memo z Reverse/reinforcement stitches will not be sewn if the start/stop button is pressed at the end of the stitching. Be sure to press the reverse/reinforcement stitch button at the end of the stitching. • For details on selecting a stitch, refer to "Selecting stitching" (page 66). Press (Settings key) in the operation panel. c X The settings screen appears. Press , , and (Arrow keys) until d is selected. APPENDIX Press (OK key). e X The screen for specifying automatic threadcutting appears. INDEX 58
-
 1
1 -
2
-
3
-
4
-
5
-
6
-
7
-
8
-
9
-
10
-
11
-
12
-
13
-
14
-
15
-
16
-
17
-
18
-
19
-
20
-
21
-
22
-
23
-
24
-
25
-
26
-
27
-
28
-
29
-
30
-
31
-
32
-
33
-
34
-
35
-
36
-
37
-
38
-
39
-
40
-
41
-
42
-
43
-
44
-
45
-
46
-
47
-
48
-
49
-
50
-
51
-
52
-
53
-
54
-
55
-
56
-
57
-
58
-
 59
59 -
 60
60 -
 61
61 -
 62
62 -
 63
63 -
 64
64 -
 65
65 -
 66
66 -
 67
67 -
 68
68 -
 69
69 -
70
-
71
-
72
-
73
-
74
-
75
-
76
-
77
-
78
-
79
-
80
-
81
-
82
-
83
-
84
-
85
-
86
-
87
-
88
-
89
-
90
-
91
-
92
-
93
-
94
-
95
-
96
-
97
-
98
-
99
-
100
-
101
-
102
-
103
-
104
-
105
-
106
-
107
-
108
-
109
-
110
-
111
-
112
-
113
-
114
-
115
-
116
-
117
-
118
-
119
-
120
-
121
-
122
-
123
-
124
-
125
-
126
-
127
-
128
-
129
-
130
-
131
-
132
-
133
-
134
-
135
-
136
-
137
-
138
-
139
-
140
-
141
-
142
-
143
-
144
-
145
-
146
-
147
-
148
-
149
-
150
-
151
-
152
-
153
-
154
-
155
-
156
-
157
-
158
-
159
 |
 |
