Brother International NX-600 Users Manual - English - Page 151
sewn correctly., The fabric does
 |
View all Brother International NX-600 manuals
Add to My Manuals
Save this manual to your list of manuals |
Page 151 highlights
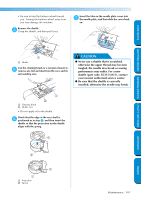
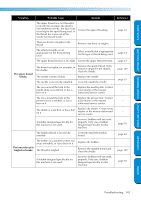
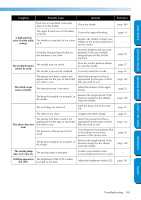
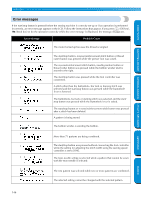
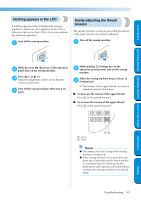
CONTENTS GETTING READY SEWING BASICS UTILITY STITCHES Symptom Probable Cause Remedy Reference Dust has accumulated in the feed dogs or in the shuttle. Clean the shuttle. page 140 A high-pitched noise is made while sewing. The upper thread was not threaded correctly. The shuttle is scratched, or has a burr on it. Correct the upper threading. Replace the shuttle.Contact your retailer or the nearest authorized service center. page 24 - A bobbin designed specifically for this machine is not used. Incorrect bobbins will not work properly. Only use a bobbin designed specifically for this machine. page 18 The needle threader The needle was not raised. cannot be used. The needle is incorrectly installed. Press the needle position button to raise the needle. Correctly install the needle. page 27 page 35 The presser foot that is used is not Attach the presser foot that is appropriate for the type of stitch that appropriate for the type of stitch you wish to sew. that you wish to sew. page 132 The stitch is not sewn correctly. The thread tension is incorrect. Adjust the tension of the upper thread. page 53 The thread is tangled, for example, in the shuttle. Remove the tangle thread. If the thread is tangled in the shuttle, clean the shuttle. page 140 The feed dogs are lowered. Slide the drop feed lever to the left. page 97 The stitch is too close. Lengthen the stitch length. page 56 The fabric does not feed. The presser foot that is used is not appropriate for the type of stitch that you wish to sew. The pressure of the presser foot is weak. Attach the presser foot that is appropriate for the type of stitch that you wish to sew. Turn the presser foot pressure dial to the right to increase the pressure of the presser foot. page 132 page 39 The thread is tangled, for example, in the shuttle. Remove the tangle thread. If the thread is tangled in the shuttle, clean the shuttle. page 140 The sewing lamp does not come on. The sewing lamp is damaged. Contact your retailer or the nearest authorized service center. - Nothing appears in The brightness of the LCD is either the LCD. too light or too dark. Adjust the brightness of the LCD. page 147 APPENDIX INDEX Troubleshooting 145
-
 1
1 -
2
-
3
-
4
-
5
-
6
-
7
-
8
-
9
-
10
-
11
-
12
-
13
-
14
-
15
-
16
-
17
-
18
-
19
-
20
-
21
-
22
-
23
-
24
-
25
-
26
-
27
-
28
-
29
-
30
-
31
-
32
-
33
-
34
-
35
-
36
-
37
-
38
-
39
-
40
-
41
-
42
-
43
-
44
-
45
-
46
-
47
-
48
-
49
-
50
-
51
-
52
-
53
-
54
-
55
-
56
-
57
-
58
-
59
-
60
-
61
-
62
-
63
-
64
-
65
-
66
-
67
-
68
-
69
-
70
-
71
-
72
-
73
-
74
-
75
-
76
-
77
-
78
-
79
-
80
-
81
-
82
-
83
-
84
-
85
-
86
-
87
-
88
-
89
-
90
-
91
-
92
-
93
-
94
-
95
-
96
-
97
-
98
-
99
-
100
-
101
-
102
-
103
-
104
-
105
-
106
-
107
-
108
-
109
-
110
-
111
-
112
-
113
-
114
-
115
-
116
-
117
-
118
-
119
-
120
-
121
-
122
-
123
-
124
-
125
-
126
-
127
-
128
-
129
-
130
-
131
-
132
-
133
-
134
-
135
-
136
-
137
-
138
-
139
-
140
-
141
-
142
-
143
-
144
-
145
-
 146
146 -
 147
147 -
 148
148 -
 149
149 -
 150
150 -
 151
151 -
 152
152 -
 153
153 -
 154
154 -
 155
155 -
 156
156 -
157
-
158
-
159
 |
 |
