Brother International NX-600 Users Manual - English - Page 57
Cutting the thread, Do not press the thread cutter button
 |
View all Brother International NX-600 manuals
Add to My Manuals
Save this manual to your list of manuals |
Page 57 highlights
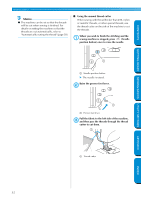
CONTENTS GETTING READY SEWING BASICS UTILITY STITCHES After 3 to 5 reverse stitches have been sewn, g release (Reverse/reinforcement stitch button). X The machine stops sewing. Press (Start/stop button), or press down h on the foot controller. At this time, if the start/stop button is held pressed, the machine sews at a low speed. X The machine starts sewing in the normal sewing direction. After sewing to the end of the stitching, the i sewing machine stops. Release the start/stop button or foot controller. 1 3 1 2 5 4 6 2 a Beginning of stitching b End of stitching ■ Sewing reinforcement stitches When sewing stitches other than straight or zigzag stitches that are secured with reverse stitching, pressing (Reverse/reinforcement stitch button) sews reinforcement stitches, 3 to 5 stitches on top of each other. Cutting the thread When you have finished sewing, cut the threads. The threads can be cut in either of two ways. ■ Using the thread cutter button When you wish to finish the stitching, press a (Thread cutter button) once. 1 a Thread cutter button X The threads are cut and the needle is raised. Raise the presser foot lever. b 1 a Presser foot lever CAUTION ● Do not press the thread cutter button after the threads have already been cut, otherwise the needle may break, the threads may become tangled or damage to the machine may occur. 1 2 a Reverse stitching b Reinforcement stitching Memo z Whether reverse stitches or reinforcement stitches are sewn depends on the stitch that is selected. For details, refer to "Stitch Settings" (page 132). Note z Do not press the thread cutter button if there is no fabric under the presser foot or while the machine is sewing, otherwise damage to the machine may occur. APPENDIX INDEX Sewing 51
-
 1
1 -
2
-
3
-
4
-
5
-
6
-
7
-
8
-
9
-
10
-
11
-
12
-
13
-
14
-
15
-
16
-
17
-
18
-
19
-
20
-
21
-
22
-
23
-
24
-
25
-
26
-
27
-
28
-
29
-
30
-
31
-
32
-
33
-
34
-
35
-
36
-
37
-
38
-
39
-
40
-
41
-
42
-
43
-
44
-
45
-
46
-
47
-
48
-
49
-
50
-
51
-
 52
52 -
 53
53 -
 54
54 -
 55
55 -
 56
56 -
 57
57 -
 58
58 -
 59
59 -
 60
60 -
 61
61 -
 62
62 -
63
-
64
-
65
-
66
-
67
-
68
-
69
-
70
-
71
-
72
-
73
-
74
-
75
-
76
-
77
-
78
-
79
-
80
-
81
-
82
-
83
-
84
-
85
-
86
-
87
-
88
-
89
-
90
-
91
-
92
-
93
-
94
-
95
-
96
-
97
-
98
-
99
-
100
-
101
-
102
-
103
-
104
-
105
-
106
-
107
-
108
-
109
-
110
-
111
-
112
-
113
-
114
-
115
-
116
-
117
-
118
-
119
-
120
-
121
-
122
-
123
-
124
-
125
-
126
-
127
-
128
-
129
-
130
-
131
-
132
-
133
-
134
-
135
-
136
-
137
-
138
-
139
-
140
-
141
-
142
-
143
-
144
-
145
-
146
-
147
-
148
-
149
-
150
-
151
-
152
-
153
-
154
-
155
-
156
-
157
-
158
-
159
 |
 |
