Brother International NX-600 Users Manual - English - Page 153
Nothing appears in the LCD, Easily adjusting the thread tension, panel, turn on the sewing machine.
 |
View all Brother International NX-600 manuals
Add to My Manuals
Save this manual to your list of manuals |
Page 153 highlights
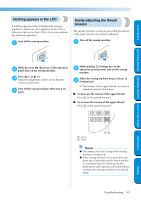
CONTENTS GETTING READY SEWING BASICS UTILITY STITCHES Nothing appears in the LCD If nothing appears in the LCD when the sewing machine is turned on, the brightness of the LCD is either too light or too dark. If this is the case, perform the following operation. Turn off the sewing machine. a Easily adjusting the thread tension The sewing machine can be set up so that the tension of the upper thread can easily be adjusted. Turn off the sewing machine. a While pressing (Back key) in the operation b panel, turn on the sewing machine. Press (-) or (+). c Adjust the brightness of the LCD so that the screens can be seen. Turn off the sewing machine, then turn it on d again. While holding (Settings key) in the b operation panel pressed, turn on the sewing machine. When the sewing machine beeps, release c (Settings key). X The tension of the upper thread can now be adjusted using the stitch keys. ■ To decrease the tension of the upper thread Press in the operation panel. ■ To increase the tension of the upper thread Press in the operation panel. APPENDIX a Loose b Tight 12 Memo z This setting does not change if the sewing machine is turned off. z If the sewing machine is set up in this way, these keys cannot be used to select stitches. To use these keys for selecting stitches, perform the same operation described above to return the sewing machine to its original setup. Troubleshooting 147 INDEX
-
 1
1 -
2
-
3
-
4
-
5
-
6
-
7
-
8
-
9
-
10
-
11
-
12
-
13
-
14
-
15
-
16
-
17
-
18
-
19
-
20
-
21
-
22
-
23
-
24
-
25
-
26
-
27
-
28
-
29
-
30
-
31
-
32
-
33
-
34
-
35
-
36
-
37
-
38
-
39
-
40
-
41
-
42
-
43
-
44
-
45
-
46
-
47
-
48
-
49
-
50
-
51
-
52
-
53
-
54
-
55
-
56
-
57
-
58
-
59
-
60
-
61
-
62
-
63
-
64
-
65
-
66
-
67
-
68
-
69
-
70
-
71
-
72
-
73
-
74
-
75
-
76
-
77
-
78
-
79
-
80
-
81
-
82
-
83
-
84
-
85
-
86
-
87
-
88
-
89
-
90
-
91
-
92
-
93
-
94
-
95
-
96
-
97
-
98
-
99
-
100
-
101
-
102
-
103
-
104
-
105
-
106
-
107
-
108
-
109
-
110
-
111
-
112
-
113
-
114
-
115
-
116
-
117
-
118
-
119
-
120
-
121
-
122
-
123
-
124
-
125
-
126
-
127
-
128
-
129
-
130
-
131
-
132
-
133
-
134
-
135
-
136
-
137
-
138
-
139
-
140
-
141
-
142
-
143
-
144
-
145
-
146
-
147
-
 148
148 -
 149
149 -
 150
150 -
 151
151 -
 152
152 -
 153
153 -
 154
154 -
 155
155 -
 156
156 -
 157
157 -
 158
158 -
159
 |
 |
