Brother International NX-600 Users Manual - English - Page 92
needle does not touch the presser foot. If, wheel toward you to check that
 |
View all Brother International NX-600 manuals
Add to My Manuals
Save this manual to your list of manuals |
Page 92 highlights
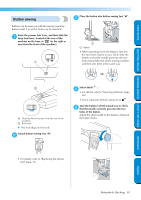
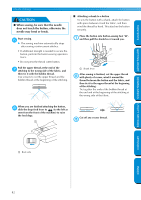
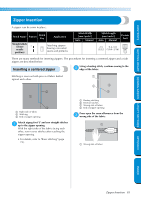
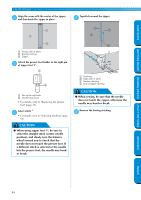
GETTING READY SEWING BASICS UTILITY STITCHES UTILITY STITCHES CONTENTS • For details, refer to "Replacing the presser foot" (page 37). Select stitch 3 . g • For details, refer to "Selecting stitching" (page 66). CAUTION ● When using zipper foot "I", be sure to select the straight stitch (center needle position), and slowly turn the balance wheel toward you to check that the needle does not touch the presser foot. If a different stitch is selected or the needle hits the presser foot, the needle may bend or break. Sew the zipper to the piece of fabric with the h extra 3 mm (1/8 inch), starting from the base of the zipper. Close the zipper, turn over the fabric, and then j baste the other side of the zipper to the fabric. 1 a Basting stitching Attach the presser foot holder to the other pin k of zipper foot "I". If the presser foot holder was attached to the right pin in step f, change it to the left pin. 1 I 2 CAUTION ● When sewing, be sure that the needle does not touch the zipper, otherwise the needle may bend or break. When you are about 5 cm (2 inch) from the i end of the zipper, stop the sewing machine with the needle lowered (in the fabric), raise the presser foot lever, and then open the zipper and continue sewing. a Pin on the left side b Needle drop point Topstitch around the zipper. l Sew reverse stitches at the end of the zipper opening and align the zipper teeth with the side of the presser foot. 2 1 3 4 5 a Right side of fabric b End of zipper opening c Reverse stitches d Beginning of stitching e Basting stitching APPENDIX INDEX 86
-
 1
1 -
2
-
3
-
4
-
5
-
6
-
7
-
8
-
9
-
10
-
11
-
12
-
13
-
14
-
15
-
16
-
17
-
18
-
19
-
20
-
21
-
22
-
23
-
24
-
25
-
26
-
27
-
28
-
29
-
30
-
31
-
32
-
33
-
34
-
35
-
36
-
37
-
38
-
39
-
40
-
41
-
42
-
43
-
44
-
45
-
46
-
47
-
48
-
49
-
50
-
51
-
52
-
53
-
54
-
55
-
56
-
57
-
58
-
59
-
60
-
61
-
62
-
63
-
64
-
65
-
66
-
67
-
68
-
69
-
70
-
71
-
72
-
73
-
74
-
75
-
76
-
77
-
78
-
79
-
80
-
81
-
82
-
83
-
84
-
85
-
86
-
 87
87 -
 88
88 -
 89
89 -
 90
90 -
 91
91 -
 92
92 -
 93
93 -
 94
94 -
 95
95 -
 96
96 -
 97
97 -
98
-
99
-
100
-
101
-
102
-
103
-
104
-
105
-
106
-
107
-
108
-
109
-
110
-
111
-
112
-
113
-
114
-
115
-
116
-
117
-
118
-
119
-
120
-
121
-
122
-
123
-
124
-
125
-
126
-
127
-
128
-
129
-
130
-
131
-
132
-
133
-
134
-
135
-
136
-
137
-
138
-
139
-
140
-
141
-
142
-
143
-
144
-
145
-
146
-
147
-
148
-
149
-
150
-
151
-
152
-
153
-
154
-
155
-
156
-
157
-
158
-
159
 |
 |
