Brother International PC-7000 Users Manual - English - Page 11
Adjusting, Screen, Contrast
 |
View all Brother International PC-7000 manuals
Add to My Manuals
Save this manual to your list of manuals |
Page 11 highlights
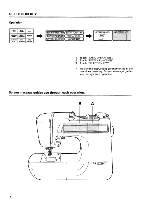
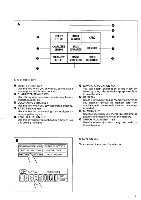
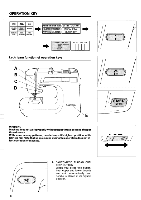
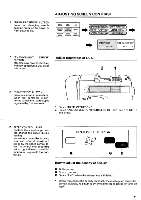
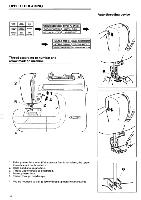
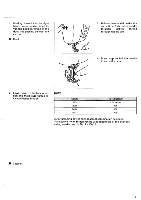
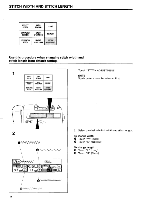
ADJUSTING SCREEN CONTRAST B. "NEEDLE POSITION" BUTTON Press for changing needle position from up to down or from down to up. UTILITY STITCH BASIC SEWING CARD CHARACTER BASIC SEWING OPERATION MEMORY DECORATIVE SEWING STITCH STITCH APPLICATION ADJUSTMENT (PREPARATION BEFORE SEWING)( EXTRA FUNCTION SWITCH FUNCTION)( USEFUL SKILL ) (PATTERN SELECTION) ADJUSTMENT BPI GHTNESS OF LCD FINE ADJUSTMENT OF STITCH C. "ENFORCEMENT STITCH" Adjust brightness of L.C.D. BUTTON Machine sew reverse stitching with low speed while you press this button. 2 1 D. "START/STOP" BUTTON Press to start or stop machine. When foot controller is connected to machine, start/stop is regulated by foot controller. 1. Touch "BASIC OPERATION". 2. Touch "ADJUSTMENT", "BRIGHTNESS OF LCD" and "NEXT" in this order. E. SPEED CONTROL LEVER Controls the speed range. You can change the speed during sewing. In case foot controller is used, you can control maximum speed by the speed control lever. The control lever should be set at right (Fastest) position for normal usage with foot controller. DENSITY OF DI SPLAY 7E" How to adjust the density of display O Dull contrast • Sharp contrast • Touch "END" when the adjustment is finished When you change the density too much, the message on screen becomes invisible, re-adjust it by switching the machine off and on again. 9
-
 1
1 -
2
-
3
-
4
-
5
-
 6
6 -
 7
7 -
 8
8 -
 9
9 -
 10
10 -
 11
11 -
 12
12 -
 13
13 -
 14
14 -
 15
15 -
 16
16 -
17
-
18
-
19
-
20
-
21
-
22
-
23
-
24
-
25
-
26
-
27
-
28
-
29
-
30
-
31
-
32
-
33
-
34
-
35
-
36
-
37
-
38
-
39
-
40
-
41
-
42
-
43
-
44
-
45
-
46
-
47
-
48
-
49
-
50
-
51
-
52
-
53
-
54
-
55
-
56
-
57
-
58
-
59
-
60
-
61
-
62
-
63
-
64
-
65
-
66
-
67
-
68
-
69
-
70
-
71
-
72
-
73
-
74
-
75
-
76
-
77
-
78
-
79
-
80
-
81
-
82
-
83
-
84
-
85
-
86
-
87
-
88
-
89
-
90
-
91
-
92
-
93
-
94
-
95
-
96
-
97
-
98
-
99
-
100
-
101
-
102
-
103
-
104
-
105
-
106
-
107
-
108
-
109
-
110
-
111
-
112
-
113
-
114
-
115
-
116
-
117
-
118
-
119
-
120
-
121
-
122
 |
 |
