Brother International PC-7000 Users Manual - English - Page 42
application
 |
View all Brother International PC-7000 manuals
Add to My Manuals
Save this manual to your list of manuals |
Page 42 highlights
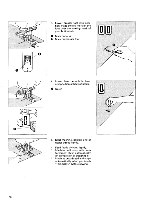
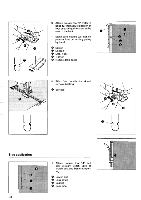
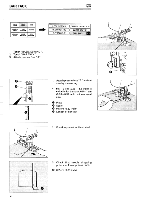
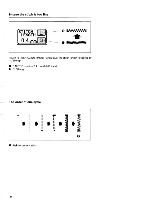
3. Attach presser foot "I" (refer to page 19) then adjust position of foot by turning the screw at the rear of the foot. Make sure needle will not hit presser foot by turning pulley by hand. 0 O Screw Loosen 0 Left / right 0 Tighten Needle drop point 4. Stitch from outside of work and remove basting. O Surface 0 0 o Side application 1. Attach presser foot "J" and i sew straight stitch until at crotch end and baste at open- ing. O Crotch end • Lock stitch • Basting O Back side 40
-
 1
1 -
2
-
3
-
4
-
5
-
6
-
7
-
8
-
9
-
10
-
11
-
12
-
13
-
14
-
15
-
16
-
17
-
18
-
19
-
20
-
21
-
22
-
23
-
24
-
25
-
26
-
27
-
28
-
29
-
30
-
31
-
32
-
33
-
34
-
35
-
36
-
 37
37 -
 38
38 -
 39
39 -
 40
40 -
 41
41 -
 42
42 -
 43
43 -
 44
44 -
 45
45 -
 46
46 -
 47
47 -
48
-
49
-
50
-
51
-
52
-
53
-
54
-
55
-
56
-
57
-
58
-
59
-
60
-
61
-
62
-
63
-
64
-
65
-
66
-
67
-
68
-
69
-
70
-
71
-
72
-
73
-
74
-
75
-
76
-
77
-
78
-
79
-
80
-
81
-
82
-
83
-
84
-
85
-
86
-
87
-
88
-
89
-
90
-
91
-
92
-
93
-
94
-
95
-
96
-
97
-
98
-
99
-
100
-
101
-
102
-
103
-
104
-
105
-
106
-
107
-
108
-
109
-
110
-
111
-
112
-
113
-
114
-
115
-
116
-
117
-
118
-
119
-
120
-
121
-
122
 |
 |

0
Side
application
3.
Attach
presser
foot
"I"
(refer
to
page
19)
then
adjust
position
of
foot
by
turning
the
screw
at
the
rear
of
the
foot.
O
0
0
Make
sure
needle
will
not
hit
presser
foot
by
turning
pulley
by
hand.
Screw
Loosen
Left
/
right
Tighten
Needle
drop
point
4.
Stitch
from
outside
of
work
and
remove
basting.
O
Surface
i
1.
Attach
presser
foot
"J"
and
sew
straight
stitch
until
at
crotch
end
and
baste
at
open-
ing.
O
Crotch
end
•
Lock
stitch
•
Basting
O
Back
side
0
0
o
40