Brother International PC-7000 Users Manual - English - Page 91
Preparation, Before, Sewing
 |
View all Brother International PC-7000 manuals
Add to My Manuals
Save this manual to your list of manuals |
Page 91 highlights
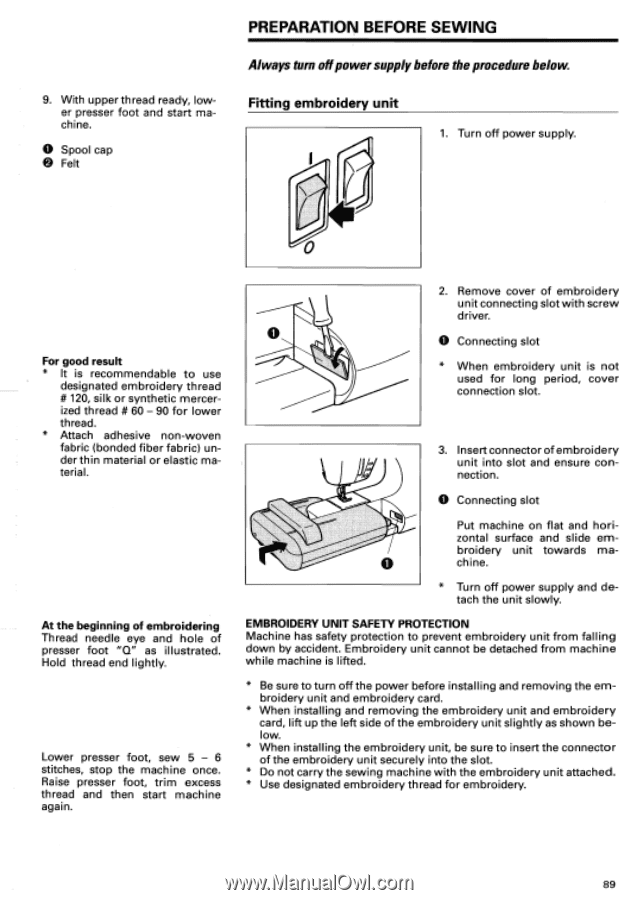
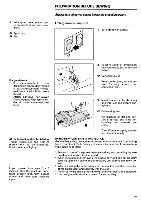
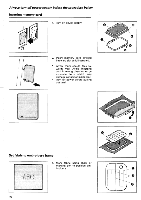
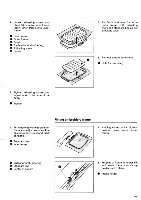
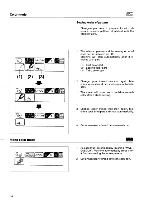
9. With upper thread ready, lower presser foot and start machine. O Spool cap • Felt PREPARATION BEFORE SEWING Always turn offpower supply before the procedure below. Fitting embroidery unit 1. Turn off power supply. For good result * It is recommendable to use designated embroidery thread # 120, silk or synthetic mercerized thread # 60 - 90 for lower thread. * Attach adhesive non-woven fabric (bonded fiber fabric) under thin material or elastic material. At the beginning of embroidering Thread needle eye and hole of presser foot "Q" as illustrated. Hold thread end lightly. Lower presser foot, sew 5 - 6 stitches, stop the machine once. Raise presser foot, trim excess thread and then start machine again. 2. Remove cover of embroidery unit connecting slot with screw driver. O Connecting slot * When embroidery unit is not used for long period, cover connection slot. 3. Insert connector of embroidery unit into slot and ensure connection. O Connecting slot Put machine on flat and horizontal surface and slide embroidery unit towards machine. * Turn off power supply and detach the unit slowly. EMBROIDERY UNIT SAFETY PROTECTION Machine has safety protection to prevent embroidery unit from falling down by accident. Embroidery unit cannot be detached from machine while machine is lifted. * Be sure to turn off the power before installing and removing the embroidery unit and embroidery card. * When installing and removing the embroidery unit and embroidery card, lift up the left side of the embroidery unit slightly as shown below. * When installing the embroidery unit, be sure to insert the connector of the embroidery unit securely into the slot. * Do not carry the sewing machine with the embroidery unit attached. * Use designated embroidery thread for embroidery. 89
-
 1
1 -
2
-
3
-
4
-
5
-
6
-
7
-
8
-
9
-
10
-
11
-
12
-
13
-
14
-
15
-
16
-
17
-
18
-
19
-
20
-
21
-
22
-
23
-
24
-
25
-
26
-
27
-
28
-
29
-
30
-
31
-
32
-
33
-
34
-
35
-
36
-
37
-
38
-
39
-
40
-
41
-
42
-
43
-
44
-
45
-
46
-
47
-
48
-
49
-
50
-
51
-
52
-
53
-
54
-
55
-
56
-
57
-
58
-
59
-
60
-
61
-
62
-
63
-
64
-
65
-
66
-
67
-
68
-
69
-
70
-
71
-
72
-
73
-
74
-
75
-
76
-
77
-
78
-
79
-
80
-
81
-
82
-
83
-
84
-
85
-
 86
86 -
 87
87 -
 88
88 -
 89
89 -
 90
90 -
 91
91 -
 92
92 -
 93
93 -
 94
94 -
 95
95 -
 96
96 -
97
-
98
-
99
-
100
-
101
-
102
-
103
-
104
-
105
-
106
-
107
-
108
-
109
-
110
-
111
-
112
-
113
-
114
-
115
-
116
-
117
-
118
-
119
-
120
-
121
-
122
 |
 |