Brother International PC-7000 Users Manual - English - Page 3
Contents
 |
View all Brother International PC-7000 manuals
Add to My Manuals
Save this manual to your list of manuals |
Page 3 highlights
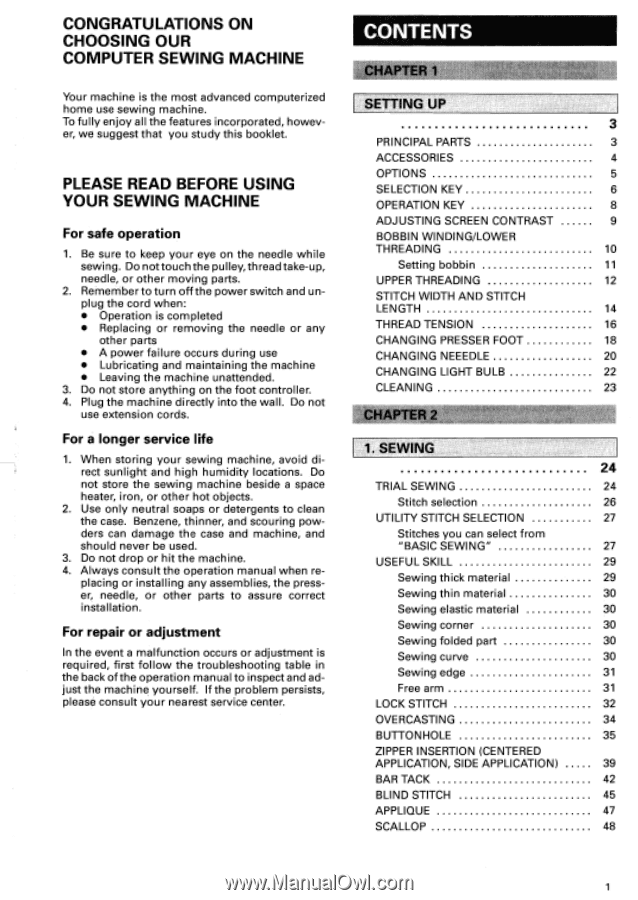
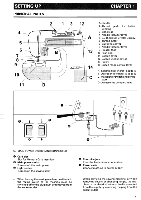
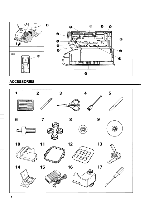
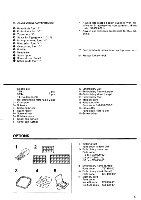
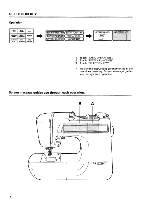
CONGRATULATIONS ON CHOOSING OUR COMPUTER SEWING MACHINE CONTENTS CHAPTER 1 Your machine is the most advanced computerized home use sewing machine. SETTING UP To fully enjoy all the features incorporated, howev- 3 er, we suggest that you study this booklet. PRINCIPAL PARTS 3 ACCESSORIES 4 OPTIONS 5 PLEASE READ BEFORE USING SELECTION KEY 6 YOUR SEWING MACHINE OPERATION KEY 8 ADJUSTING SCREEN CONTRAST 9 For safe operation BOBBIN WINDING/LOWER 1. Be sure to keep your eye on the needle while THREADING 10 sewing. Do not touch the pulley, thread take-up, Setting bobbin 11 needle, or other moving parts. UPPER THREADING 12 2. Remember to turn off the power switch and unplug the cord when: • Operation is completed STITCH WIDTH AND STITCH LENGTH 14 • Replacing or removing the needle or any THREAD TENSION 16 other parts CHANGING PRESSER FOOT 18 • A power failure occurs during use CHANGING NEEEDLE 20 • Lubricating and maintaining the machine • Leaving the machine unattended. CHANGING LIGHT BULB 22 3. Do not store anything on the foot controller. CLEANING 23 4. Plug the machine directly into the wall. Do not use extension cords. CHAPTER 2 For a longer service life 1. SEWING 1. When storing your sewing machine, avoid direct sunlight and high humidity locations. Do 24 not store the sewing machine beside a space TRIAL SEWING 24 heater, iron, or other hot objects. 2. Use only neutral soaps or detergents to clean Stitch selection 26 the case. Benzene, thinner, and scouring pow- UTILITY STITCH SELECTION 27 ders can damage the case and machine, and Stitches you can select from should never be used. "BASIC SEWING" 27 3. Do not drop or hit the machine. USEFUL SKILL 29 4. Always consult the operation manual when replacing or installing any assemblies, the press- Sewing thick material 29 er, needle, or other parts to assure correct Sewing thin material 30 installation. Sewing elastic material 30 For repair or adjustment Sewing corner 30 Sewing folded part 30 In the event a malfunction occurs or adjustment is Sewing curve 30 required, first follow the troubleshooting table in the back of the operation manual to inspect and ad- Sewing edge 31 just the machine yourself. If the problem persists, Free arm 31 please consult your nearest service center. LOCK STITCH 32 OVERCASTING 34 BUTTONHOLE 35 ZIPPER INSERTION (CENTERED APPLICATION, SIDE APPLICATION) 39 BAR TACK 42 BLIND STITCH 45 APPLIQUE 47 SCALLOP 48 1
-
 1
1 -
 2
2 -
 3
3 -
 4
4 -
 5
5 -
 6
6 -
 7
7 -
 8
8 -
 9
9 -
10
-
11
-
12
-
13
-
14
-
15
-
16
-
17
-
18
-
19
-
20
-
21
-
22
-
23
-
24
-
25
-
26
-
27
-
28
-
29
-
30
-
31
-
32
-
33
-
34
-
35
-
36
-
37
-
38
-
39
-
40
-
41
-
42
-
43
-
44
-
45
-
46
-
47
-
48
-
49
-
50
-
51
-
52
-
53
-
54
-
55
-
56
-
57
-
58
-
59
-
60
-
61
-
62
-
63
-
64
-
65
-
66
-
67
-
68
-
69
-
70
-
71
-
72
-
73
-
74
-
75
-
76
-
77
-
78
-
79
-
80
-
81
-
82
-
83
-
84
-
85
-
86
-
87
-
88
-
89
-
90
-
91
-
92
-
93
-
94
-
95
-
96
-
97
-
98
-
99
-
100
-
101
-
102
-
103
-
104
-
105
-
106
-
107
-
108
-
109
-
110
-
111
-
112
-
113
-
114
-
115
-
116
-
117
-
118
-
119
-
120
-
121
-
122
 |
 |