Brother International PE-DESIGN Ver.6 Users Manual - English - Page 119
Importing image data, Importing image data from a TWAIN, device, such as a scanner
 |
View all Brother International PE-DESIGN Ver.6 manuals
Add to My Manuals
Save this manual to your list of manuals |
Page 119 highlights
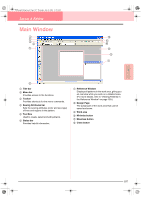
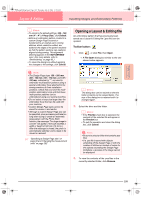
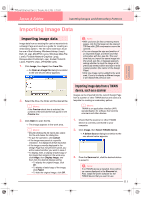
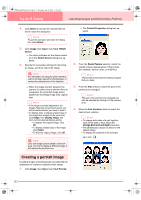
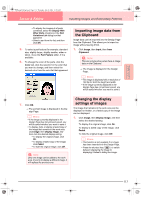
PeDesignV6Eng.book Page 111 Thursday, July 8, 2004 11:59 AM Layout & Editing Inputting Images and Embroidery Patterns Advanced Opreation Layout & Editing Importing Image Data Importing image data Image data from an existing file can be imported into a Design Page and used as a guide for creating an embroidery pattern. The file name extension must be one of the following: Windows bitmap (.bmp), Exif (.tif, .jpg), ZSoftPCX (.pcx), Windows Meta File (.wmf), Portable Network Graphics (.png), Encapsulated PostScript (.eps), Kodak PhotoCD (.pcd), FlashPix (.fpx), JPEG2000 (.j2k). 1. Click Image, then Input, then from File. → An Open an image file dialog box similar to the one shown below appears. a Note: • With .pcd and .fpx files containing many pages, only the first page can be opened. Tiff files with LZW compression cannot be opened. • You can change the size and position of an imported image, and then save that information with the .pes file. The next time that you import the same image into the saved .pes file, a message appears, asking whether to input the image at its previously saved position and size or at its original position (the center of the Design Page). • Only one image can be added to the work area. If you try to display a different image, it will replace the previous one. 2. Select the drive, the folder and the desired file. b Memo: If the Preview check box is selected, the contents of the selected file will appear in the Preview box. 3. Click Open to open the file. → The image appears in the work area. b Memo: • Double-clicking the file name also opens the file and closes the dialog box. • To quit the operation, click Cancel. • If the image was saved at a specific resolution, it is displayed at that resolution. • If the image currently displayed in the Design Page has not yet been saved, you will be asked whether you want to save it. • To display, hide, or display a faded copy of the image that remains in the work area, click Image, then Display Image, and then click the desired display setting. • To display the original image, click On. • To display a faded copy of the image, click Faded. • To hide the original image, click Off. Importing image data from a TWAIN device, such as a scanner Images can be imported into the current Design Page from a scanner or other TWAIN device and used as a template for creating an embroidery pattern. b Memo: TWAIN is an application interface (API) standardization for software that controls scanners and other devices. 1. Check that the scanner or other TWAIN device is correctly connected to your computer. 2. Click Image, then Select TWAIN device. → A Select Source dialog box similar to the one shown below appears. 3. From the Sources list, click the desired device to select it. a Note: If no TWAIN device is installed, there will be no names displayed in the Sources list. First, install the driver software for the TWAIN device that you want to use. 111
-
 1
1 -
2
-
3
-
4
-
5
-
6
-
7
-
8
-
9
-
10
-
11
-
12
-
13
-
14
-
15
-
16
-
17
-
18
-
19
-
20
-
21
-
22
-
23
-
24
-
25
-
26
-
27
-
28
-
29
-
30
-
31
-
32
-
33
-
34
-
35
-
36
-
37
-
38
-
39
-
40
-
41
-
42
-
43
-
44
-
45
-
46
-
47
-
48
-
49
-
50
-
51
-
52
-
53
-
54
-
55
-
56
-
57
-
58
-
59
-
60
-
61
-
62
-
63
-
64
-
65
-
66
-
67
-
68
-
69
-
70
-
71
-
72
-
73
-
74
-
75
-
76
-
77
-
78
-
79
-
80
-
81
-
82
-
83
-
84
-
85
-
86
-
87
-
88
-
89
-
90
-
91
-
92
-
93
-
94
-
95
-
96
-
97
-
98
-
99
-
100
-
101
-
102
-
103
-
104
-
105
-
106
-
107
-
108
-
109
-
110
-
111
-
112
-
113
-
 114
114 -
 115
115 -
 116
116 -
 117
117 -
 118
118 -
 119
119 -
 120
120 -
 121
121 -
 122
122 -
 123
123 -
 124
124 -
125
-
126
-
127
-
128
-
129
-
130
-
131
-
132
-
133
-
134
-
135
-
136
-
137
-
138
-
139
-
140
-
141
-
142
-
143
-
144
-
145
-
146
-
147
-
148
-
149
-
150
-
151
-
152
-
153
-
154
-
155
-
156
-
157
-
158
-
159
-
160
-
161
-
162
-
163
-
164
-
165
-
166
-
167
-
168
-
169
-
170
-
171
-
172
-
173
-
174
-
175
-
176
-
177
-
178
-
179
-
180
-
181
-
182
-
183
-
184
-
185
-
186
-
187
-
188
-
189
-
190
-
191
-
192
-
193
-
194
-
195
-
196
-
197
-
198
-
199
-
200
-
201
-
202
-
203
-
204
-
205
-
206
-
207
-
208
-
209
-
210
-
211
-
212
-
213
-
214
-
215
-
216
-
217
-
218
-
219
-
220
-
221
-
222
-
223
-
224
-
225
-
226
-
227
-
228
-
229
-
230
-
231
-
232
-
233
-
234
-
235
-
236
-
237
-
238
-
239
-
240
-
241
-
242
-
243
-
244
-
245
-
246
-
247
-
248
-
249
-
250
-
251
-
252
-
253
-
254
-
255
-
256
-
257
-
258
-
259
-
260
-
261
-
262
-
263
-
264
-
265
-
266
-
267
-
268
-
269
-
270
-
271
-
272
 |
 |
