Brother International PE-DESIGN Ver.6 Users Manual - English - Page 176
Setting the thread color and sew type
 |
View all Brother International PE-DESIGN Ver.6 manuals
Add to My Manuals
Save this manual to your list of manuals |
Page 176 highlights
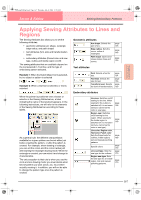
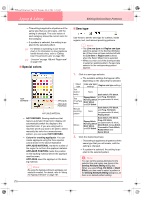
PeDesignV6Eng.book Page 168 Thursday, July 8, 2004 11:59 AM Layout & Editing Editing Embroidery Patterns Setting the thread color and sew type All patterns can be assigned at least one color and sew type. Patterns with an outline and an inside region can be assigned two different thread colors and sew types. If a gradation is set, an additional color can be added to the region. (For details on gradations, refer to "Creating a gradation" on page 179.) In addition, each character in a text pattern can be assigned individual thread colors and sew types. Patterns with an outline and a inside region: text converted from TrueType fonts, circles, fan shapes, arcs & strings, rectangles, closed broken lines, and closed curves. For these patterns, it is possible to switch on and off sewing for the outline and the regions. Patterns with only an outline: arcs, open broken lines, and open curves. For these patterns, it is still possible to switch on and off sewing for the outline. Patterns with only a region: text created with fonts provided with this software and manual punching patterns. For these two types of patterns, it is not possible to switch on and off sewing of the inside region. Manual punching patterns: You can set a color for three manual punching pattern types (block, semiautomatic block and running), but you can only set a sew type for manual punching block patterns. ■ Line sew Clicking this button switches on/off sewing for an outline. b Memo: • The Line sew button is available only when the Select Object tool is selected and no patterns are selected, when you select a pattern that has an outline (text converted from a TrueType font, circles, arcs, fan shapes, arcs & strings, rectangles, broken lines, curves), or when you click , , , or on the Tool Box to start drawing such a pattern. • When line sewing is switched off, the line is not sewn (and you cannot set its color or sew type). 1. Click the Line sew button. This button has two settings: On: The Line color button and the Line sew type selector are displayed. Off: The Line color button and the Line sew type selector are not displayed. Clicking the button switches between the two settings. Line sew Line color Line sew type → The settings are applied to all patterns that you will create with an outline, until the setting is changed. → If a pattern is selected, the settings are applied to the selected pattern. Line sewing on: Line sewing off: 2. To switch on outline sewing, click the Line sew button again. a Note: If one of the fonts included in this software (font number 1 through 35) are selected, the line sewing attributes cannot be changed. c "Color" on page 169 and "Sew type" on page 170 168
-
 1
1 -
2
-
3
-
4
-
5
-
6
-
7
-
8
-
9
-
10
-
11
-
12
-
13
-
14
-
15
-
16
-
17
-
18
-
19
-
20
-
21
-
22
-
23
-
24
-
25
-
26
-
27
-
28
-
29
-
30
-
31
-
32
-
33
-
34
-
35
-
36
-
37
-
38
-
39
-
40
-
41
-
42
-
43
-
44
-
45
-
46
-
47
-
48
-
49
-
50
-
51
-
52
-
53
-
54
-
55
-
56
-
57
-
58
-
59
-
60
-
61
-
62
-
63
-
64
-
65
-
66
-
67
-
68
-
69
-
70
-
71
-
72
-
73
-
74
-
75
-
76
-
77
-
78
-
79
-
80
-
81
-
82
-
83
-
84
-
85
-
86
-
87
-
88
-
89
-
90
-
91
-
92
-
93
-
94
-
95
-
96
-
97
-
98
-
99
-
100
-
101
-
102
-
103
-
104
-
105
-
106
-
107
-
108
-
109
-
110
-
111
-
112
-
113
-
114
-
115
-
116
-
117
-
118
-
119
-
120
-
121
-
122
-
123
-
124
-
125
-
126
-
127
-
128
-
129
-
130
-
131
-
132
-
133
-
134
-
135
-
136
-
137
-
138
-
139
-
140
-
141
-
142
-
143
-
144
-
145
-
146
-
147
-
148
-
149
-
150
-
151
-
152
-
153
-
154
-
155
-
156
-
157
-
158
-
159
-
160
-
161
-
162
-
163
-
164
-
165
-
166
-
167
-
168
-
169
-
170
-
 171
171 -
 172
172 -
 173
173 -
 174
174 -
 175
175 -
 176
176 -
 177
177 -
 178
178 -
 179
179 -
 180
180 -
 181
181 -
182
-
183
-
184
-
185
-
186
-
187
-
188
-
189
-
190
-
191
-
192
-
193
-
194
-
195
-
196
-
197
-
198
-
199
-
200
-
201
-
202
-
203
-
204
-
205
-
206
-
207
-
208
-
209
-
210
-
211
-
212
-
213
-
214
-
215
-
216
-
217
-
218
-
219
-
220
-
221
-
222
-
223
-
224
-
225
-
226
-
227
-
228
-
229
-
230
-
231
-
232
-
233
-
234
-
235
-
236
-
237
-
238
-
239
-
240
-
241
-
242
-
243
-
244
-
245
-
246
-
247
-
248
-
249
-
250
-
251
-
252
-
253
-
254
-
255
-
256
-
257
-
258
-
259
-
260
-
261
-
262
-
263
-
264
-
265
-
266
-
267
-
268
-
269
-
270
-
271
-
272
 |
 |
