Brother International PE-DESIGN Ver.6 Users Manual - English - Page 125
Image Tune
 |
View all Brother International PE-DESIGN Ver.6 manuals
Add to My Manuals
Save this manual to your list of manuals |
Page 125 highlights
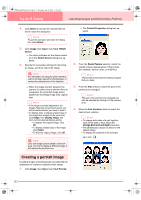
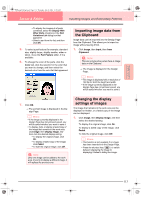
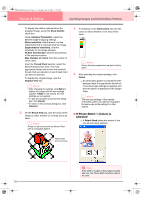
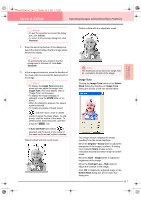
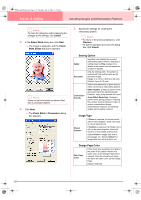
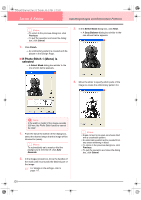
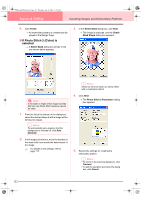
PeDesignV6Eng.book Page 117 Thursday, July 8, 2004 11:59 AM Layout & Editing Inputting Images and Embroidery Patterns Advanced Opreation Layout & Editing b Memo: • To quit the operation and close the dialog box, click Cancel. • To return to the previous dialog box, click Previous. 1. From the list at the bottom of the dialog box, select the desired shape that the image will be trimmed to (mask). b Memo: To automatically set a mask so that the background is trimmed off, click Auto Generate. 2. In the image preview box, move the handles of the mask until it surrounds the desired part of the image. b Memo: • To display the Image Tune dialog box, where you can adjust the image, click Image Tune. (For more details, refer to "Image Tune" on this page.) • To display the image enlarged (or reduced), move the ZOOM slider up (or down). • When the dialog box appears, the square mask is selected. • To create any shape of mask, select , and then move, enter or delete points to adjust the mask shape. To add points, click the outline of the mask. To delete points, select the point, and then press the Delete key. • If Auto Generate was clicked, is selected, and the points in the outline of the mask can be moved, added or deleted. Pattern edited with the round mask Pattern edited with the adjustable mask a Note: The mask size can be set in the range from 64 × 64 dots to the size of the image. Image Tune Clicking the Image Tune button in the Select Mask dialog box displays an Image Tune dialog box similar to the one shown below. The image window displays the image resulting from the current settings. Move the Original - Sharp slider to adjust the sharpness of the image's outlines. A setting more towards Sharp makes a more noticeable boundary between bright and dark areas. Move the Dark - Bright slider to adjust the brightness of the image. Move the Contrast Low - High slider to adjust the contrast of the image. Click OK to display the adjusted image in the Select Mask dialog box and to close this dialog box. 117
-
 1
1 -
2
-
3
-
4
-
5
-
6
-
7
-
8
-
9
-
10
-
11
-
12
-
13
-
14
-
15
-
16
-
17
-
18
-
19
-
20
-
21
-
22
-
23
-
24
-
25
-
26
-
27
-
28
-
29
-
30
-
31
-
32
-
33
-
34
-
35
-
36
-
37
-
38
-
39
-
40
-
41
-
42
-
43
-
44
-
45
-
46
-
47
-
48
-
49
-
50
-
51
-
52
-
53
-
54
-
55
-
56
-
57
-
58
-
59
-
60
-
61
-
62
-
63
-
64
-
65
-
66
-
67
-
68
-
69
-
70
-
71
-
72
-
73
-
74
-
75
-
76
-
77
-
78
-
79
-
80
-
81
-
82
-
83
-
84
-
85
-
86
-
87
-
88
-
89
-
90
-
91
-
92
-
93
-
94
-
95
-
96
-
97
-
98
-
99
-
100
-
101
-
102
-
103
-
104
-
105
-
106
-
107
-
108
-
109
-
110
-
111
-
112
-
113
-
114
-
115
-
116
-
117
-
118
-
119
-
 120
120 -
 121
121 -
 122
122 -
 123
123 -
 124
124 -
 125
125 -
 126
126 -
 127
127 -
 128
128 -
 129
129 -
 130
130 -
131
-
132
-
133
-
134
-
135
-
136
-
137
-
138
-
139
-
140
-
141
-
142
-
143
-
144
-
145
-
146
-
147
-
148
-
149
-
150
-
151
-
152
-
153
-
154
-
155
-
156
-
157
-
158
-
159
-
160
-
161
-
162
-
163
-
164
-
165
-
166
-
167
-
168
-
169
-
170
-
171
-
172
-
173
-
174
-
175
-
176
-
177
-
178
-
179
-
180
-
181
-
182
-
183
-
184
-
185
-
186
-
187
-
188
-
189
-
190
-
191
-
192
-
193
-
194
-
195
-
196
-
197
-
198
-
199
-
200
-
201
-
202
-
203
-
204
-
205
-
206
-
207
-
208
-
209
-
210
-
211
-
212
-
213
-
214
-
215
-
216
-
217
-
218
-
219
-
220
-
221
-
222
-
223
-
224
-
225
-
226
-
227
-
228
-
229
-
230
-
231
-
232
-
233
-
234
-
235
-
236
-
237
-
238
-
239
-
240
-
241
-
242
-
243
-
244
-
245
-
246
-
247
-
248
-
249
-
250
-
251
-
252
-
253
-
254
-
255
-
256
-
257
-
258
-
259
-
260
-
261
-
262
-
263
-
264
-
265
-
266
-
267
-
268
-
269
-
270
-
271
-
272
 |
 |
