Brother International PE-DESIGN Ver.6 Users Manual - English - Page 68
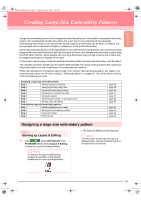
Specifying a Design size, Creating the embroidery pattern
 |
View all Brother International PE-DESIGN Ver.6 manuals
Add to My Manuals
Save this manual to your list of manuals |
Page 68 highlights
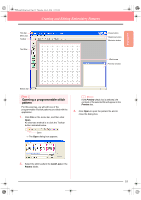
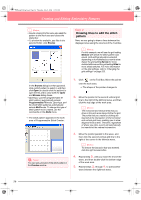
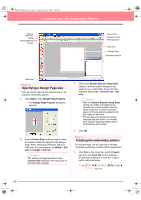
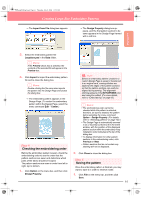
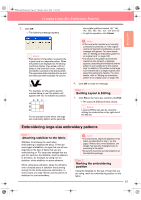
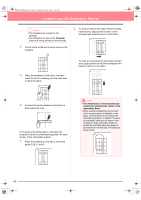
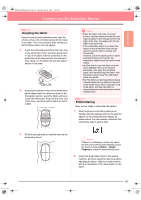
PeDesignV6Eng.book Page 60 Thursday, July 8, 2004 11:59 AM Creating Large-Size Embroidery Patterns Title bar Menu bar Toolbar Sewing Attributes bar Tool Box Close button Maximize button Minimize button Work area Design Page Reference Window Status bar Step 2 Specifying a Design Page size First, we need to specify the desired size for the complete embroidery pattern. 1. Click Option, then Design Page Property. → The Design Page Property dialog box appears. 2. Select Custom Size, and then type or select the desired width and height for the Design Page. Enter dimensions between 100 and 1000 mm. For this example, set Width to 230 mm and Height to 330 mm. b Memo: The width and height specified under Custom Size determine the exact size of the embroidery design. 3. Click in the Section Size (for Hoop Size) selector, and then select the size of the sections (your embroidery hoop). For this example, select 120 × 170 mm (130 × 180 mm). b Memo: • With the Section Size (for Hoop Size) setting, the width and height of the sections are 10 mm smaller than the actual hoop size in order to provide space for fine positioning adjustments with adjacent sections. • The preview area shows the setting changes that you make. The double lines indicate adjoining edges where embroidering will overlap. 4. Click OK. Step 3 Creating the embroidery pattern For this example, we will use one of the lace embroidery patterns provided with the application. 1. Click File on the menu bar, point to Import, and then click from File on the submenu. An alternate method is to click the Toolbar button indicated below. from File 60
-
 1
1 -
2
-
3
-
4
-
5
-
6
-
7
-
8
-
9
-
10
-
11
-
12
-
13
-
14
-
15
-
16
-
17
-
18
-
19
-
20
-
21
-
22
-
23
-
24
-
25
-
26
-
27
-
28
-
29
-
30
-
31
-
32
-
33
-
34
-
35
-
36
-
37
-
38
-
39
-
40
-
41
-
42
-
43
-
44
-
45
-
46
-
47
-
48
-
49
-
50
-
51
-
52
-
53
-
54
-
55
-
56
-
57
-
58
-
59
-
60
-
61
-
62
-
 63
63 -
 64
64 -
 65
65 -
 66
66 -
 67
67 -
 68
68 -
 69
69 -
 70
70 -
 71
71 -
 72
72 -
 73
73 -
74
-
75
-
76
-
77
-
78
-
79
-
80
-
81
-
82
-
83
-
84
-
85
-
86
-
87
-
88
-
89
-
90
-
91
-
92
-
93
-
94
-
95
-
96
-
97
-
98
-
99
-
100
-
101
-
102
-
103
-
104
-
105
-
106
-
107
-
108
-
109
-
110
-
111
-
112
-
113
-
114
-
115
-
116
-
117
-
118
-
119
-
120
-
121
-
122
-
123
-
124
-
125
-
126
-
127
-
128
-
129
-
130
-
131
-
132
-
133
-
134
-
135
-
136
-
137
-
138
-
139
-
140
-
141
-
142
-
143
-
144
-
145
-
146
-
147
-
148
-
149
-
150
-
151
-
152
-
153
-
154
-
155
-
156
-
157
-
158
-
159
-
160
-
161
-
162
-
163
-
164
-
165
-
166
-
167
-
168
-
169
-
170
-
171
-
172
-
173
-
174
-
175
-
176
-
177
-
178
-
179
-
180
-
181
-
182
-
183
-
184
-
185
-
186
-
187
-
188
-
189
-
190
-
191
-
192
-
193
-
194
-
195
-
196
-
197
-
198
-
199
-
200
-
201
-
202
-
203
-
204
-
205
-
206
-
207
-
208
-
209
-
210
-
211
-
212
-
213
-
214
-
215
-
216
-
217
-
218
-
219
-
220
-
221
-
222
-
223
-
224
-
225
-
226
-
227
-
228
-
229
-
230
-
231
-
232
-
233
-
234
-
235
-
236
-
237
-
238
-
239
-
240
-
241
-
242
-
243
-
244
-
245
-
246
-
247
-
248
-
249
-
250
-
251
-
252
-
253
-
254
-
255
-
256
-
257
-
258
-
259
-
260
-
261
-
262
-
263
-
264
-
265
-
266
-
267
-
268
-
269
-
270
-
271
-
272
 |
 |
