Brother International PE-DESIGN Ver.6 Users Manual - English - Page 71
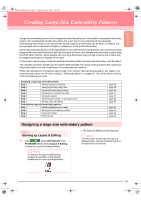
Embroidering large-size embroidery patterns
 |
View all Brother International PE-DESIGN Ver.6 manuals
Add to My Manuals
Save this manual to your list of manuals |
Page 71 highlights
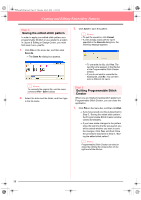
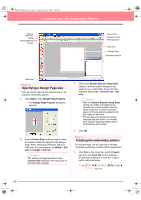
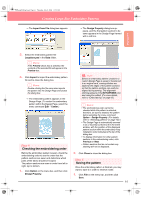
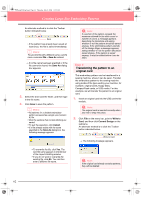
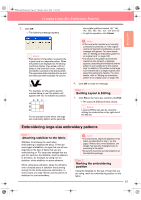
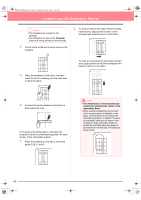
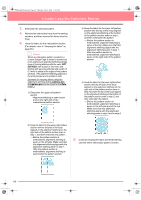
PeDesignV6Eng.book Page 63 Thursday, July 8, 2004 11:59 AM Creating Large-Size Embroidery Patterns Basic Operation 3. Click OK. → The following message appears. nine smaller patterns marked "Aa", "Ab", "Ac", "Ba", "Bb", "Bc", "Ca", "Cb" and "Cc". • To quit the operation, click Cancel. b Memo: • Each section of the pattern is saved to the original card as a separate pattern. When the patterns are displayed on the sewing machine's display, they appear with two letters in the lower-left corner, indicating that section's position in the entire pattern. The uppercase letter indicates the row and the lowercase letter indicates the column. For example, for the pattern section marked below in red, the pattern will appear with "Bc" to indicate its position. For the example shown above, the largesize embroidery pattern will be saved as a Note: • If the card writer module is not correctly connected or powered, or if the original card is not inserted or is defective, an error message will appear. For more details, refer to "Writing an embroidery pattern to an original card" on page 195. • If a section of the pattern exceeds the maximum size allowed, a message appears, describing the limitations and the pattern is not transferred to the original card. In addition, if the pattern is too large to be transferred to a single original card, select the sections to transfer. For more details, refer to "Writing an embroidery pattern to an original card" on page 195. 4. Click OK to close the message. Step 7 Quitting Layout & Editing 1. Click File on the menu bar, and then click Exit. → The Layout & Editing window closes. b Memo: Layout & Editing can also be closed by clicking the close button on the right end of the title bar. Embroidering large-size embroidery patterns Step 1 Attaching stabilizer to the fabric Stabilizer must always be used when embroidering to stabilize the fabric. There are many types of stabilizer; the type that you will use depends on the type of fabric that you are embroidering on. For large-size designs that are split into sections, the stabilizer must be adhered to the fabric, for example, by using iron-on stabilizer, sticky stabilizer or spray adhesive. When using spray adhesive, spray the adhesive onto a hooped piece of stabilizer that is strong enough for the entire large-size embroidery. In some cases, you may need to use two pieces of stabilizer for your embroidery. a Note: • For best results, attach the stabilizer to the fabric (as described in Step 1 on this page). Without the correct stabilizer, the design may become misaligned due to puckering in the fabric. • Be sure to check the recommendations on the stabilizer package. Step 2 Marking the embroidering position Using the template for the size of hoop that you are using, mark the embroidering position on the fabric. 63
-
 1
1 -
2
-
3
-
4
-
5
-
6
-
7
-
8
-
9
-
10
-
11
-
12
-
13
-
14
-
15
-
16
-
17
-
18
-
19
-
20
-
21
-
22
-
23
-
24
-
25
-
26
-
27
-
28
-
29
-
30
-
31
-
32
-
33
-
34
-
35
-
36
-
37
-
38
-
39
-
40
-
41
-
42
-
43
-
44
-
45
-
46
-
47
-
48
-
49
-
50
-
51
-
52
-
53
-
54
-
55
-
56
-
57
-
58
-
59
-
60
-
61
-
62
-
63
-
64
-
65
-
 66
66 -
 67
67 -
 68
68 -
 69
69 -
 70
70 -
 71
71 -
 72
72 -
 73
73 -
 74
74 -
 75
75 -
 76
76 -
77
-
78
-
79
-
80
-
81
-
82
-
83
-
84
-
85
-
86
-
87
-
88
-
89
-
90
-
91
-
92
-
93
-
94
-
95
-
96
-
97
-
98
-
99
-
100
-
101
-
102
-
103
-
104
-
105
-
106
-
107
-
108
-
109
-
110
-
111
-
112
-
113
-
114
-
115
-
116
-
117
-
118
-
119
-
120
-
121
-
122
-
123
-
124
-
125
-
126
-
127
-
128
-
129
-
130
-
131
-
132
-
133
-
134
-
135
-
136
-
137
-
138
-
139
-
140
-
141
-
142
-
143
-
144
-
145
-
146
-
147
-
148
-
149
-
150
-
151
-
152
-
153
-
154
-
155
-
156
-
157
-
158
-
159
-
160
-
161
-
162
-
163
-
164
-
165
-
166
-
167
-
168
-
169
-
170
-
171
-
172
-
173
-
174
-
175
-
176
-
177
-
178
-
179
-
180
-
181
-
182
-
183
-
184
-
185
-
186
-
187
-
188
-
189
-
190
-
191
-
192
-
193
-
194
-
195
-
196
-
197
-
198
-
199
-
200
-
201
-
202
-
203
-
204
-
205
-
206
-
207
-
208
-
209
-
210
-
211
-
212
-
213
-
214
-
215
-
216
-
217
-
218
-
219
-
220
-
221
-
222
-
223
-
224
-
225
-
226
-
227
-
228
-
229
-
230
-
231
-
232
-
233
-
234
-
235
-
236
-
237
-
238
-
239
-
240
-
241
-
242
-
243
-
244
-
245
-
246
-
247
-
248
-
249
-
250
-
251
-
252
-
253
-
254
-
255
-
256
-
257
-
258
-
259
-
260
-
261
-
262
-
263
-
264
-
265
-
266
-
267
-
268
-
269
-
270
-
271
-
272
 |
 |
