Brother International PE-DESIGN Ver.6 Users Manual - English - Page 196
Toolbar button
 |
View all Brother International PE-DESIGN Ver.6 manuals
Add to My Manuals
Save this manual to your list of manuals |
Page 196 highlights
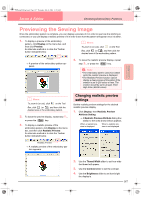
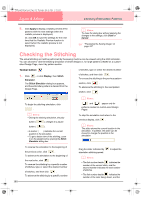
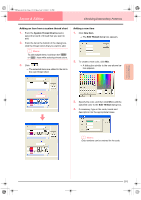
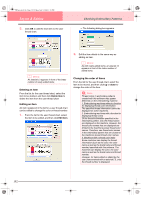
PeDesignV6Eng.book Page 188 Thursday, July 8, 2004 11:59 AM Layout & Editing Checking Embroidery Patterns 5. Click Apply to display a realistic preview of the patterns with the new settings (when the realistic preview is displayed). Or, click OK to save the settings for the next time that the Realistic Preview function is select (when the realistic preview is not displayed). b Memo: To close the dialog box without applying the changes to the settings, click Close or Cancel. c "Previewing the Sewing Image" on page 187 Checking the Stitching The actual stitching as it will be performed by the sewing machine can be viewed using the stitch simulator. You can choose to view the stitching simulation of whole designs or, for large patterns created on a customsized Design Page, view it by pattern section. Toolbar button: 1. Click , or click Display, then Stitch Simulator. The Stitch Simulator dialog box appears, and the embroidery pattern is cleared from the Design Page. of stitches, type or select the desired number of stitches, and then click . To reverse the stitching to the previous pattern section, click . To advance the stitching to the next pattern section, click . To begin the stitching simulation, click . b Memo: • During the stitching simulation, the play button ( ) changes to a pause button ( ). • A marker ( ) indicates the current position in the simulation. • To get a better view of the stitching, zoom in on the design before opening the Stitch Simulator dialog box. b Memo: and appear only for patterns created on custom-sized Design Pages. To stop the simulation and return to the previous display, click . b Memo: The slider shows the current location in the simulation. In addition, the slider can be moved to change the position in the simulation. 188 To reverse the simulation to the beginning of the previous color, click . To advance the simulation to the beginning of the next color, click . To reverse the stitching by a specific number of stitches, type or select the desired number of stitches, and then click . To advance the stitching by a specific number Drag the slider indicated by simulation stitching speed. to adjust the b Memo: • The first number beside indicates the number of the current stitch, and the second number indicates the total number of stitches. • The first number beside indicates the number of the color being drawn, and the
-
 1
1 -
2
-
3
-
4
-
5
-
6
-
7
-
8
-
9
-
10
-
11
-
12
-
13
-
14
-
15
-
16
-
17
-
18
-
19
-
20
-
21
-
22
-
23
-
24
-
25
-
26
-
27
-
28
-
29
-
30
-
31
-
32
-
33
-
34
-
35
-
36
-
37
-
38
-
39
-
40
-
41
-
42
-
43
-
44
-
45
-
46
-
47
-
48
-
49
-
50
-
51
-
52
-
53
-
54
-
55
-
56
-
57
-
58
-
59
-
60
-
61
-
62
-
63
-
64
-
65
-
66
-
67
-
68
-
69
-
70
-
71
-
72
-
73
-
74
-
75
-
76
-
77
-
78
-
79
-
80
-
81
-
82
-
83
-
84
-
85
-
86
-
87
-
88
-
89
-
90
-
91
-
92
-
93
-
94
-
95
-
96
-
97
-
98
-
99
-
100
-
101
-
102
-
103
-
104
-
105
-
106
-
107
-
108
-
109
-
110
-
111
-
112
-
113
-
114
-
115
-
116
-
117
-
118
-
119
-
120
-
121
-
122
-
123
-
124
-
125
-
126
-
127
-
128
-
129
-
130
-
131
-
132
-
133
-
134
-
135
-
136
-
137
-
138
-
139
-
140
-
141
-
142
-
143
-
144
-
145
-
146
-
147
-
148
-
149
-
150
-
151
-
152
-
153
-
154
-
155
-
156
-
157
-
158
-
159
-
160
-
161
-
162
-
163
-
164
-
165
-
166
-
167
-
168
-
169
-
170
-
171
-
172
-
173
-
174
-
175
-
176
-
177
-
178
-
179
-
180
-
181
-
182
-
183
-
184
-
185
-
186
-
187
-
188
-
189
-
190
-
 191
191 -
 192
192 -
 193
193 -
 194
194 -
 195
195 -
 196
196 -
 197
197 -
 198
198 -
 199
199 -
 200
200 -
 201
201 -
202
-
203
-
204
-
205
-
206
-
207
-
208
-
209
-
210
-
211
-
212
-
213
-
214
-
215
-
216
-
217
-
218
-
219
-
220
-
221
-
222
-
223
-
224
-
225
-
226
-
227
-
228
-
229
-
230
-
231
-
232
-
233
-
234
-
235
-
236
-
237
-
238
-
239
-
240
-
241
-
242
-
243
-
244
-
245
-
246
-
247
-
248
-
249
-
250
-
251
-
252
-
253
-
254
-
255
-
256
-
257
-
258
-
259
-
260
-
261
-
262
-
263
-
264
-
265
-
266
-
267
-
268
-
269
-
270
-
271
-
272
 |
 |
