Brother International PE-DESIGN Ver.6 Users Manual - English - Page 149
Moving stitch points, Inserting stitch points and feeds, Deleting stitch points, Editing entry/exit
 |
View all Brother International PE-DESIGN Ver.6 manuals
Add to My Manuals
Save this manual to your list of manuals |
Page 149 highlights
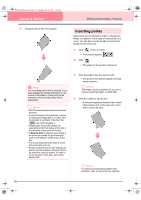
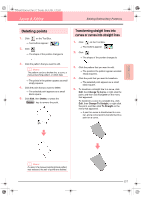
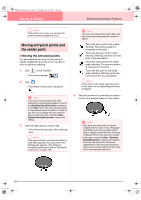
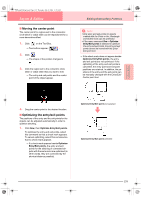
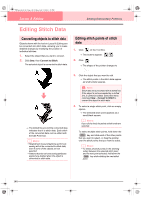
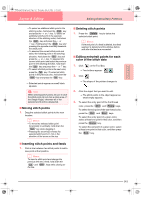
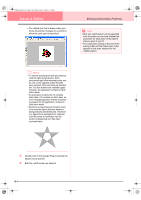
Advanced Opreation Layout & Editing PeDesignV6Eng.book Page 141 Thursday, July 8, 2004 11:59 AM Layout & Editing Editing Embroidery Patterns • To select an additional stitch point in the stitching order, hold down the Shift key and press the → or ↓ key. To select an additional stitch point in the opposite direction of the stitching order, hold down the Shift key and press the ← or ↑ key. Holding down the Shift key and pressing the opposite arrow key deselects the stitch point. • To deselect the current stitch point and select the following point in the stitching direction, hold down the Ctrl key and press the → or ↓ key. To deselect the current stitch point and select the previous point in the stitching direction, hold down the Ctrl key and press the ← or ↑ key. • To select all stitch points in the next color, press the Tab key. To select all stitch points in the previous color, hold down the Shift key and press the Tab key. → Selected points appear as small black squares. a Note When selecting stitch points, be sure to click the stitch point (do not click a blank area of the Design Page), otherwise all of the selected points will be deselected. ■ Moving stitch points 1. Drag the selected stitch points to the new location. b Memo: • To move the selected stitch point horizontally or vertically, hold down the Shift key while dragging it. • Pressing the arrow keys moves the selected stitch point 0.1 mm in the direction of the arrow on the key. ■ Inserting stitch points and feeds 1. Click a line between two stitch points to add a new point at that position. b Memo: To insert a stitch point and change the previous line into a feed, hold down the Ctrl and Shift keys while clicking on the line. ■ Deleting stitch points 1. Press the Delete key to delete the selected stitch point. b Memo: If the end point of a feed is deleted, that feed segment is deleted and the stitches before and after the feed are connected. ■ Editing entry/exit points for each color of the stitch data 1. Click on the Tool Box. → Two buttons appear: . 2. Click . → The shape of the pointer changes to . 3. Click the object that you want to edit. → The stitch points in the object appear as small empty squares. 4. To select the entry point of the first thread color, press the Ctrl and Home keys. To select the exit point of the last thread color, press the Ctrl and End keys. To select the entry point of a given color, select at least one point in that color, and then press the Home key. To select the exit point of a given color, select at least one point in that color, and then press the End key. 141
-
 1
1 -
2
-
3
-
4
-
5
-
6
-
7
-
8
-
9
-
10
-
11
-
12
-
13
-
14
-
15
-
16
-
17
-
18
-
19
-
20
-
21
-
22
-
23
-
24
-
25
-
26
-
27
-
28
-
29
-
30
-
31
-
32
-
33
-
34
-
35
-
36
-
37
-
38
-
39
-
40
-
41
-
42
-
43
-
44
-
45
-
46
-
47
-
48
-
49
-
50
-
51
-
52
-
53
-
54
-
55
-
56
-
57
-
58
-
59
-
60
-
61
-
62
-
63
-
64
-
65
-
66
-
67
-
68
-
69
-
70
-
71
-
72
-
73
-
74
-
75
-
76
-
77
-
78
-
79
-
80
-
81
-
82
-
83
-
84
-
85
-
86
-
87
-
88
-
89
-
90
-
91
-
92
-
93
-
94
-
95
-
96
-
97
-
98
-
99
-
100
-
101
-
102
-
103
-
104
-
105
-
106
-
107
-
108
-
109
-
110
-
111
-
112
-
113
-
114
-
115
-
116
-
117
-
118
-
119
-
120
-
121
-
122
-
123
-
124
-
125
-
126
-
127
-
128
-
129
-
130
-
131
-
132
-
133
-
134
-
135
-
136
-
137
-
138
-
139
-
140
-
141
-
142
-
143
-
 144
144 -
 145
145 -
 146
146 -
 147
147 -
 148
148 -
 149
149 -
 150
150 -
 151
151 -
 152
152 -
 153
153 -
 154
154 -
155
-
156
-
157
-
158
-
159
-
160
-
161
-
162
-
163
-
164
-
165
-
166
-
167
-
168
-
169
-
170
-
171
-
172
-
173
-
174
-
175
-
176
-
177
-
178
-
179
-
180
-
181
-
182
-
183
-
184
-
185
-
186
-
187
-
188
-
189
-
190
-
191
-
192
-
193
-
194
-
195
-
196
-
197
-
198
-
199
-
200
-
201
-
202
-
203
-
204
-
205
-
206
-
207
-
208
-
209
-
210
-
211
-
212
-
213
-
214
-
215
-
216
-
217
-
218
-
219
-
220
-
221
-
222
-
223
-
224
-
225
-
226
-
227
-
228
-
229
-
230
-
231
-
232
-
233
-
234
-
235
-
236
-
237
-
238
-
239
-
240
-
241
-
242
-
243
-
244
-
245
-
246
-
247
-
248
-
249
-
250
-
251
-
252
-
253
-
254
-
255
-
256
-
257
-
258
-
259
-
260
-
261
-
262
-
263
-
264
-
265
-
266
-
267
-
268
-
269
-
270
-
271
-
272
 |
 |
