Brother International PE-DESIGN Ver.6 Users Manual - English - Page 219
Fill/Stamp mode, Motif mode
 |
View all Brother International PE-DESIGN Ver.6 manuals
Add to My Manuals
Save this manual to your list of manuals |
Page 219 highlights
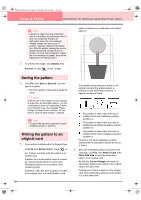
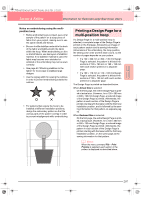
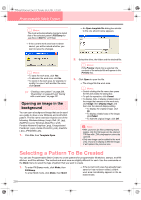
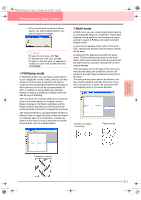
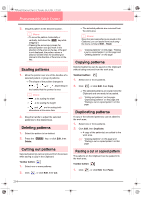
PeDesignV6Eng.book Page 211 Thursday, July 8, 2004 11:59 AM Programmable Stitch Creator → If the current work area has not been saved, you will be asked whether you want to save the changes. b Memo: • To save the work area, click Yes. • To abandon the work area, click No. • To return to the work area, for example, to modify it or save it with another file name, click Cancel. ■ Fill/Stamp mode In Fill/Stamp mode, you can make a stitch pattern out of a single line or sets of lines, and you can then choose to fill the areas enclosed by the lines to create an embossing/engraving effect. Both types of stitch patterns can be set as a programmable fill stitch in addition to being applied as individual stamps to regions of patterns in Design Center as well as Layout & Editing. The Line tool in the Tool Box allows you to draw the lines of a fill stitch pattern or a stamp, and the Region (engrave), the Region (emboss) and the Region (reset) tools allow you to fill and edit the enclosed areas of the stitch or stamp that you draw. The sewing method for a programmable fill stitch is different from the regular fill stitch, where the thread is constantly sewn in a set direction. Instead, the pattern will be sewn in such a way that the needle drops directly over the created pattern. ■ Motif mode In Motif mode, you can create original stitch patterns by changing the shape of a single line. These stitch patterns can be applied in line sewing and region sewing in Layout & Editing, and region sewing in Design Center. A green arrow appears at the center of the work area, showing the direction that the pattern (stitch) will be sewn. A single pink line appears along with the green arrow. This line indicates the base for the motif stitch, which can be altered by inserting points with the Edit Point tool, and then moving them to form original designs. The blue square at the left edge of the work area indicates the start point of that line and the red square at the right edge indicates the end point of the stitch. The start and end points cannot be deleted, and they must be aligned vertically. Therefore, if you move one point up or down, the other point will automatically move in the same direction. Example of a pattern Line sewing Region sewing Advanced Opreation Programmable Stitch Creator Example of a pattern 211
-
 1
1 -
2
-
3
-
4
-
5
-
6
-
7
-
8
-
9
-
10
-
11
-
12
-
13
-
14
-
15
-
16
-
17
-
18
-
19
-
20
-
21
-
22
-
23
-
24
-
25
-
26
-
27
-
28
-
29
-
30
-
31
-
32
-
33
-
34
-
35
-
36
-
37
-
38
-
39
-
40
-
41
-
42
-
43
-
44
-
45
-
46
-
47
-
48
-
49
-
50
-
51
-
52
-
53
-
54
-
55
-
56
-
57
-
58
-
59
-
60
-
61
-
62
-
63
-
64
-
65
-
66
-
67
-
68
-
69
-
70
-
71
-
72
-
73
-
74
-
75
-
76
-
77
-
78
-
79
-
80
-
81
-
82
-
83
-
84
-
85
-
86
-
87
-
88
-
89
-
90
-
91
-
92
-
93
-
94
-
95
-
96
-
97
-
98
-
99
-
100
-
101
-
102
-
103
-
104
-
105
-
106
-
107
-
108
-
109
-
110
-
111
-
112
-
113
-
114
-
115
-
116
-
117
-
118
-
119
-
120
-
121
-
122
-
123
-
124
-
125
-
126
-
127
-
128
-
129
-
130
-
131
-
132
-
133
-
134
-
135
-
136
-
137
-
138
-
139
-
140
-
141
-
142
-
143
-
144
-
145
-
146
-
147
-
148
-
149
-
150
-
151
-
152
-
153
-
154
-
155
-
156
-
157
-
158
-
159
-
160
-
161
-
162
-
163
-
164
-
165
-
166
-
167
-
168
-
169
-
170
-
171
-
172
-
173
-
174
-
175
-
176
-
177
-
178
-
179
-
180
-
181
-
182
-
183
-
184
-
185
-
186
-
187
-
188
-
189
-
190
-
191
-
192
-
193
-
194
-
195
-
196
-
197
-
198
-
199
-
200
-
201
-
202
-
203
-
204
-
205
-
206
-
207
-
208
-
209
-
210
-
211
-
212
-
213
-
 214
214 -
 215
215 -
 216
216 -
 217
217 -
 218
218 -
 219
219 -
 220
220 -
 221
221 -
 222
222 -
 223
223 -
 224
224 -
225
-
226
-
227
-
228
-
229
-
230
-
231
-
232
-
233
-
234
-
235
-
236
-
237
-
238
-
239
-
240
-
241
-
242
-
243
-
244
-
245
-
246
-
247
-
248
-
249
-
250
-
251
-
252
-
253
-
254
-
255
-
256
-
257
-
258
-
259
-
260
-
261
-
262
-
263
-
264
-
265
-
266
-
267
-
268
-
269
-
270
-
271
-
272
 |
 |
