Brother International PE-DESIGN Ver.6 Users Manual - English - Page 32
Step 7, Step 8
 |
View all Brother International PE-DESIGN Ver.6 manuals
Add to My Manuals
Save this manual to your list of manuals |
Page 32 highlights
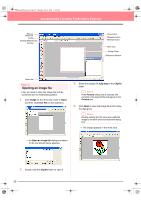
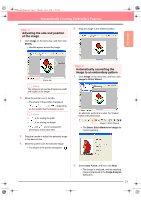
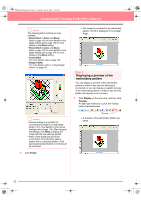
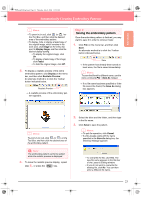
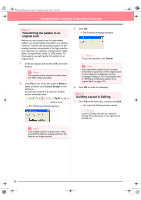
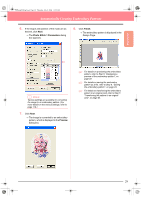
PeDesignV6Eng.book Page 24 Thursday, July 8, 2004 11:59 AM Automatically Creating Embroidery Patterns Step 7 Transferring the pattern to an original card Before you can actually sew the embroidery pattern, you must transfer the pattern to a sewing machine. Transfer the embroidery pattern to the sewing machine using media of the type used by your machine, for example, original cards, floppy disks, CompactFlash cards, or USB media. For this example, we will transfer the pattern to an original card. 1. Insert an original card into the USB card writer module. a Note: The original card is inserted correctly when you hear it snap into place. 2. Click File on the menu bar, point to Write to Card, and then click Current Design on the submenu. An alternate method is to click the Toolbar button indicated below. Write to Card → The following message appears. 3. Click OK. → The following message appears. b Memo: To quit the operation, click Cancel. a Note: If the card writer module is not correctly connected or powered, or if the original card is not inserted or is defective, an error message will appear. For more details, refer to "Writing an embroidery pattern to an original card" on page 195. 4. Click OK to close the message. Step 8 Quitting Layout & Editing 1. Click File on the menu bar, and then click Exit. → The Layout & Editing window closes. b Memo: Layout & Editing can also be closed by clicking the close button on the right end of the title bar. a Note: If the original card is not brand new, make sure that the patterns already stored on the card are no longer needed. 24
-
 1
1 -
2
-
3
-
4
-
5
-
6
-
7
-
8
-
9
-
10
-
11
-
12
-
13
-
14
-
15
-
16
-
17
-
18
-
19
-
20
-
21
-
22
-
23
-
24
-
25
-
26
-
 27
27 -
 28
28 -
 29
29 -
 30
30 -
 31
31 -
 32
32 -
 33
33 -
 34
34 -
 35
35 -
 36
36 -
 37
37 -
38
-
39
-
40
-
41
-
42
-
43
-
44
-
45
-
46
-
47
-
48
-
49
-
50
-
51
-
52
-
53
-
54
-
55
-
56
-
57
-
58
-
59
-
60
-
61
-
62
-
63
-
64
-
65
-
66
-
67
-
68
-
69
-
70
-
71
-
72
-
73
-
74
-
75
-
76
-
77
-
78
-
79
-
80
-
81
-
82
-
83
-
84
-
85
-
86
-
87
-
88
-
89
-
90
-
91
-
92
-
93
-
94
-
95
-
96
-
97
-
98
-
99
-
100
-
101
-
102
-
103
-
104
-
105
-
106
-
107
-
108
-
109
-
110
-
111
-
112
-
113
-
114
-
115
-
116
-
117
-
118
-
119
-
120
-
121
-
122
-
123
-
124
-
125
-
126
-
127
-
128
-
129
-
130
-
131
-
132
-
133
-
134
-
135
-
136
-
137
-
138
-
139
-
140
-
141
-
142
-
143
-
144
-
145
-
146
-
147
-
148
-
149
-
150
-
151
-
152
-
153
-
154
-
155
-
156
-
157
-
158
-
159
-
160
-
161
-
162
-
163
-
164
-
165
-
166
-
167
-
168
-
169
-
170
-
171
-
172
-
173
-
174
-
175
-
176
-
177
-
178
-
179
-
180
-
181
-
182
-
183
-
184
-
185
-
186
-
187
-
188
-
189
-
190
-
191
-
192
-
193
-
194
-
195
-
196
-
197
-
198
-
199
-
200
-
201
-
202
-
203
-
204
-
205
-
206
-
207
-
208
-
209
-
210
-
211
-
212
-
213
-
214
-
215
-
216
-
217
-
218
-
219
-
220
-
221
-
222
-
223
-
224
-
225
-
226
-
227
-
228
-
229
-
230
-
231
-
232
-
233
-
234
-
235
-
236
-
237
-
238
-
239
-
240
-
241
-
242
-
243
-
244
-
245
-
246
-
247
-
248
-
249
-
250
-
251
-
252
-
253
-
254
-
255
-
256
-
257
-
258
-
259
-
260
-
261
-
262
-
263
-
264
-
265
-
266
-
267
-
268
-
269
-
270
-
271
-
272
 |
 |
