Brother International PE-DESIGN Ver.6 Users Manual - English - Page 209
Checking the print image, Printing
 |
View all Brother International PE-DESIGN Ver.6 manuals
Add to My Manuals
Save this manual to your list of manuals |
Page 209 highlights
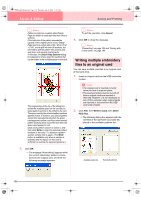
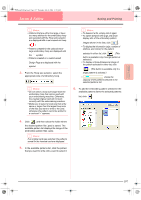
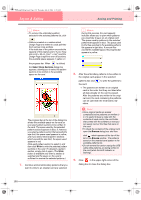
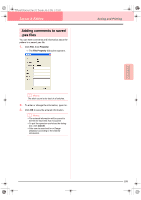
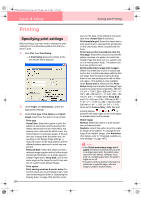
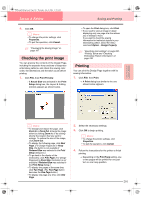
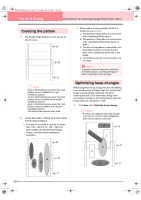
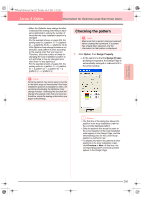
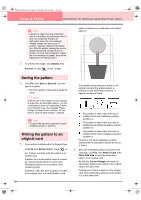
PeDesignV6Eng.book Page 201 Thursday, July 8, 2004 11:59 AM Layout & Editing Saving and Printing 4. Click OK. b Memo: • To change the printer settings, click Properties. • To quit the operation, click Cancel. c "Previewing the Sewing Image" on page 187 Checking the print image You can preview the contents of the Design Page, including the separate hoop sections of large-size embroidery patterns, and check the sewing color order, the dimensions and the stitch count before printing. 1. Click File, then Print Preview. → If Actual Size was selected in the Print Setup dialog box, the Layout & Editing window appears as shown below. • To open the Print dialog box, click Print. • If you need to view an image in detail, displaying only one page at a time allows you to enlarge it more. If you want to check the sewing information for individual objects in your embroidery pattern, select the menu command Option - Design Property. c "Specifying print settings" on page 200, "Printing" below and "Checking Embroidery Pattern Information" on page 189 Printing You can print the Design Page together with its sewing information. 1. Click File, then Print. → A Print dialog box similar to the one shown below appears. Advanced Opreation Layout & Editing b Memo: • To enlarge and reduce the page, click Zoom In or Zoom Out. Enlarge the image either by clicking Zoom In, or by clicking directly the location that you want to enlarge. To reduce the size of the image, click Zoom Out. • To display the following page, click Next Page. (For Design Pages set to Hoop Size, this button is not available if Reduced Size was selected in the Print Setup dialog box.) • To go back to the display of the embroidery, click Prev Page. (For Design Pages set to Hoop Size, this button is not available if Reduced Size was selected in the Print Setup dialog.) • To display two pages at the same time, click Two Page. (The Two Page button becomes the One Page button.) • To display one page at a time, click One Page. 2. Select the necessary settings. 3. Click OK to begin printing. b Memo: • To change the printer settings, click Properties. • To quit the operation, click Cancel. 4. Follow the instructions for the printer to finish printing. → Depending on the Print Type setting, one or two pages will be printed for one pattern or one hoop position. 201
-
 1
1 -
2
-
3
-
4
-
5
-
6
-
7
-
8
-
9
-
10
-
11
-
12
-
13
-
14
-
15
-
16
-
17
-
18
-
19
-
20
-
21
-
22
-
23
-
24
-
25
-
26
-
27
-
28
-
29
-
30
-
31
-
32
-
33
-
34
-
35
-
36
-
37
-
38
-
39
-
40
-
41
-
42
-
43
-
44
-
45
-
46
-
47
-
48
-
49
-
50
-
51
-
52
-
53
-
54
-
55
-
56
-
57
-
58
-
59
-
60
-
61
-
62
-
63
-
64
-
65
-
66
-
67
-
68
-
69
-
70
-
71
-
72
-
73
-
74
-
75
-
76
-
77
-
78
-
79
-
80
-
81
-
82
-
83
-
84
-
85
-
86
-
87
-
88
-
89
-
90
-
91
-
92
-
93
-
94
-
95
-
96
-
97
-
98
-
99
-
100
-
101
-
102
-
103
-
104
-
105
-
106
-
107
-
108
-
109
-
110
-
111
-
112
-
113
-
114
-
115
-
116
-
117
-
118
-
119
-
120
-
121
-
122
-
123
-
124
-
125
-
126
-
127
-
128
-
129
-
130
-
131
-
132
-
133
-
134
-
135
-
136
-
137
-
138
-
139
-
140
-
141
-
142
-
143
-
144
-
145
-
146
-
147
-
148
-
149
-
150
-
151
-
152
-
153
-
154
-
155
-
156
-
157
-
158
-
159
-
160
-
161
-
162
-
163
-
164
-
165
-
166
-
167
-
168
-
169
-
170
-
171
-
172
-
173
-
174
-
175
-
176
-
177
-
178
-
179
-
180
-
181
-
182
-
183
-
184
-
185
-
186
-
187
-
188
-
189
-
190
-
191
-
192
-
193
-
194
-
195
-
196
-
197
-
198
-
199
-
200
-
201
-
202
-
203
-
 204
204 -
 205
205 -
 206
206 -
 207
207 -
 208
208 -
 209
209 -
 210
210 -
 211
211 -
 212
212 -
 213
213 -
 214
214 -
215
-
216
-
217
-
218
-
219
-
220
-
221
-
222
-
223
-
224
-
225
-
226
-
227
-
228
-
229
-
230
-
231
-
232
-
233
-
234
-
235
-
236
-
237
-
238
-
239
-
240
-
241
-
242
-
243
-
244
-
245
-
246
-
247
-
248
-
249
-
250
-
251
-
252
-
253
-
254
-
255
-
256
-
257
-
258
-
259
-
260
-
261
-
262
-
263
-
264
-
265
-
266
-
267
-
268
-
269
-
270
-
271
-
272
 |
 |
