Brother International VX-1120 Users Manual - English - Page 10
maquina, coser
 |
View all Brother International VX-1120 manuals
Add to My Manuals
Save this manual to your list of manuals |
Page 10 highlights
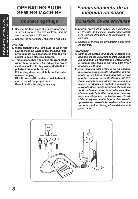
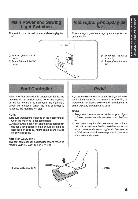
el3SO0 3O vNinoVIN ns VOZONOO 3NIHOVIN ONIM3S ElnoA oNimoNN OPERATING YOUR SEWING MACHINE ecting Plugs 1. Connect the three-prong plug into the machine. It is located between the foot controller and the power supply pli,g on the cord. 2. Connect the power supply plug into a wall outlet. CAUTION 1. When changing the light bulb or when the sewing machine is not in use, the power supply plug must be disconnected from the wall socket to avoid electrical hazards. 2. This appliance has a polarized plug (one blade wider than the other). To reduce the risk of electric shock, this plug is intended to fit in a polarized outlet only one way. If the plug does not fit fully in the outlet, reverse the plug. If it still does not fit, contact a qualified electrician to install the proper outlet. Do not modify the plug in any way. Funcionamiento de la maquina de coser Conexion de los enchufes 1. Conecte el enchute de tres clayitas a ;.a maquina. Enelcord0n, se encuentra ubicado entre elpedal y el enchufe destinado a la alimentaci0n de corriente. 2. Conecte el enchufe de alimentation a una toma de corriente. ATENCION: 1. Cuando se cambia una aguja, la canilla o la bombilla de luz, o cuando se deja la maquina sin funcionar, se recomienda siempre retirar el enchufe de la toma de corriente para evitar choques electricos. 2. Esta maquina esta provista de un enchufe polarizado para corriente alternativa (un enchufe con un borne mas ancho que el otro) para las zonas con corriente electrica de 120V. Como medida de seguridad, existe una sofa manera de adaptar ese enchufe a una toma de corricntc. Sino pucde introducir el enchufe a fondo en la toma de corriente, intente cambiar el enchufe de lado. Si el enchufe no se introduceaim,pongaseencontactoconun electricista para que le cambie la toma de corriente, que debe ser obsoleta. No se descuide nunca de esta medida de seguridad del enchufe polarizado. '"N 0 0 .01 3
-
 1
1 -
2
-
3
-
4
-
 5
5 -
 6
6 -
 7
7 -
 8
8 -
 9
9 -
 10
10 -
 11
11 -
 12
12 -
 13
13 -
 14
14 -
 15
15 -
16
-
17
-
18
-
19
-
20
-
21
-
22
-
23
-
24
-
25
-
26
-
27
-
28
-
29
-
30
-
31
-
32
-
33
-
34
-
35
-
36
-
37
-
38
-
39
-
40
-
41
-
42
-
43
-
44
-
45
-
46
-
47
-
48
-
49
-
50
-
51
-
52
-
53
-
54
-
55
-
56
-
57
-
58
-
59
-
60
-
61
-
62
-
63
-
64
 |
 |
