Brother International VX-1120 Users Manual - English - Page 39
Single
 |
View all Brother International VX-1120 manuals
Add to My Manuals
Save this manual to your list of manuals |
Page 39 highlights
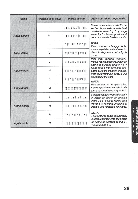
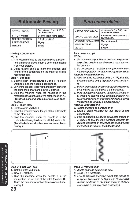
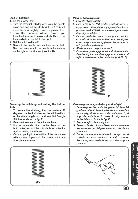
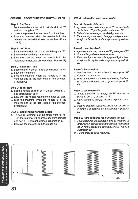
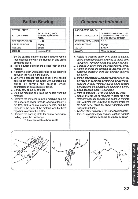
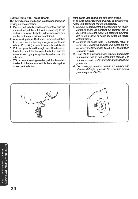
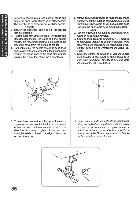
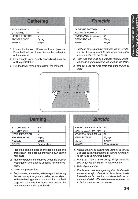
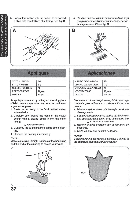
et, .4" STITCH LENGTH STITCH WIDTH NEEDLE POSITION PRESSER FOOT NEEDLE OTHER 0 Set according to the distance between the holes. L or R Zigzag Single Darning Plate 1. Set the darning plate on the needle plate over the feed dogs as shown in the illustration and press down into place. 2. Place a button between the presser foot and the material. 3. Adjust the stitch width according to the distance between the holes in the button. 4. Lower the presser foot and check if the needle enters both holes of the button without hitting the button by turning the balance wheel counterclockwise a couple of times. 5. Slowly sew about 10 stitches. 6. Stop the machine and raise the needle from the material. 7. Remove the material from the machine and cut the upper and lower threads leaving at least 10 cm (41. With a normal sewing needle, pull the threads to the back of the material and tie them together to secure the button. 8. Remove the darning plate for normal sewing by pulling up on the front edge. 0 Front edge slot on darning plate ... !al LARGO DE PUNTADA 0 Debe definirse de acuerdo con ANCHO DE PUNTADA la distancia existente entre los distintos agujeros del botOn. POSICIONDELA AGUJA L 6 R PRENSATELAS Zigzag AGUJA Simp'o OTROS Placa de zurcir 1. Instate la placa de zurcir en la placa de agujas, sobre los alimentadores, tat como se indica en!a ilustracion, y presione pars que quede trabada. 2. Coloque unboton entre elprensatelasy eltejido. 3. Ajuste el ancho de puntada de acuerdo con !a distancia existente entre los distintos agujeros del boton. 4. Baje elprensatelas y, girandola ruedecilla unpar de veces en el sentido contrario al de las manecillas de un reloj, verifique que la aguja penetra por cada uno de los agujeros sin picar el bot6n. 5. Cosa despacio unas 10 puntadas. 6. Pare la maquina y levante la aguja del tejido. 7. Retire el tejido de la maquina y carte los hilos inferiory superior dejando que sobre un minimo de 10cm(4). Conuna aguja decosernormal, tire los hilos por el reties del tejido y anudelos para asegurar el botOn. 8. Quitelaplaca dezurcirlevantandolapane delantera, para poder seguir con una costura normal. 0 Ranura delantera de la placa de zurcir BUTTONHOLE AND BUTTON SEWING 32
-
 1
1 -
2
-
3
-
4
-
5
-
6
-
7
-
8
-
9
-
10
-
11
-
12
-
13
-
14
-
15
-
16
-
17
-
18
-
19
-
20
-
21
-
22
-
23
-
24
-
25
-
26
-
27
-
28
-
29
-
30
-
31
-
32
-
33
-
 34
34 -
 35
35 -
 36
36 -
 37
37 -
 38
38 -
 39
39 -
 40
40 -
 41
41 -
 42
42 -
 43
43 -
 44
44 -
45
-
46
-
47
-
48
-
49
-
50
-
51
-
52
-
53
-
54
-
55
-
56
-
57
-
58
-
59
-
60
-
61
-
62
-
63
-
64
 |
 |
