Brother International VX-1120 Users Manual - English - Page 38
Illustration
 |
View all Brother International VX-1120 manuals
Add to My Manuals
Save this manual to your list of manuals |
Page 38 highlights
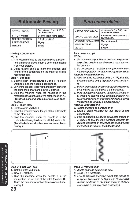
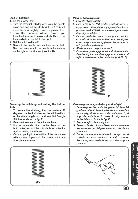
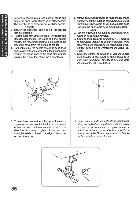
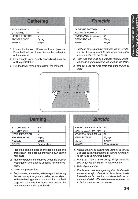
OPTIONAL PROCEDURE FOR BUTTONHOLES Step A: Bar Tack 1. Set the needle position at "L..", stitch width at "5" and stitch length at "0". 2. Lower the presser foot and sew 3 to 4 stitches. 3. Stop the machine when the needle is in the material and at the left side of the stitches. (Position A) Step B: Left Row 1. Set the stitch width at "2" and stitch length at "F". 2. Sew the desired length in reverse. 3. Stop the machine when the needle is in tne material at the left side of the stitches.(PositionB) Step C: Final Bar Tack 1. Set the stitch width at "5" and stitch length at "0". 2. Sew 3 to 4 stitches. 3. Stop the machine when the needle is in the material and at the right side of the stitches. (Position C) Step D: Right Row 1. Set the needle position at "R", stitch width at "2" and stitch length at "F". 2. Sew until the needle reaches the other bar tack. 3. Stop the machine when the needle is in the material and at the right side of the stitches. (Position D) Step E: Securing Buttonhole Stitch 1. To secure stitching, set the stitch width to "0". Turn the material 90 degrees counterclockwise and sew 5 - 6 straight stitches. (Illustration E) 2. Remove the material from the machine. Metodo alternativo para coser ojales Paso A: Remate delantero 1. Ajuste is posicion de la aguja en "L", elancho de puntada en "5" y el largo de puntada en "0". 2. Bale elprensatelas y cosa 3 6 4 puntadas. 3. Pare la maquina cuando la aguja esta picada en el tejido a la izquierda de las puntadas (posiciOn A). Paso B: Lado izquierdo 1. Ajusteelancho depuntadaen "2"yellargoen "F". 2. Cosa el largo deseado hacia atras. 3. Pare la maquina cuando la aguja este picada en el tejido a la izquierda de las puntadas (posiciOn B). Paso C: Remate final 1. Ajusteelancho depuntadaen "5"yellargoen "0". 2. Cosa 3 6 4 puntadas. 3. Pare la maquina cuando la aguja este picada en el tejido a la derecha de las puntadas (posici6n C). Paso D: Lado derecho 1. Ajustela posickin de la aguja en "R", elancho de puntada en "2" y el largo en "F". 2. Cosa hasta que la aguja alcance elprimerrema- te. 3. Pare la maquina cuando la aguja esta picada en el tejido a la derecha de las puntadas (posicion D). Paso E: Para asegurar las puntadas del ojai 1. Para asegurar las puntadas, gire el tejido de 90 grados en elsentido contrario aldelas manecillas deunrelojycosa 56 6puntadas rectas (veasela ilustraciOn E). 2. Retire el tejido de la maquina. B C S3N0_1_08 30 Vtin_LSO0 A S37Vr0 ONIM2S Noiine 0NV 3-loHNo_une --- (E) 31
-
 1
1 -
2
-
3
-
4
-
5
-
6
-
7
-
8
-
9
-
10
-
11
-
12
-
13
-
14
-
15
-
16
-
17
-
18
-
19
-
20
-
21
-
22
-
23
-
24
-
25
-
26
-
27
-
28
-
29
-
30
-
31
-
32
-
 33
33 -
 34
34 -
 35
35 -
 36
36 -
 37
37 -
 38
38 -
 39
39 -
 40
40 -
 41
41 -
 42
42 -
 43
43 -
44
-
45
-
46
-
47
-
48
-
49
-
50
-
51
-
52
-
53
-
54
-
55
-
56
-
57
-
58
-
59
-
60
-
61
-
62
-
63
-
64
 |
 |
