Brother International VX-1120 Users Manual - English - Page 18
presionando
 |
View all Brother International VX-1120 manuals
Add to My Manuals
Save this manual to your list of manuals |
Page 18 highlights
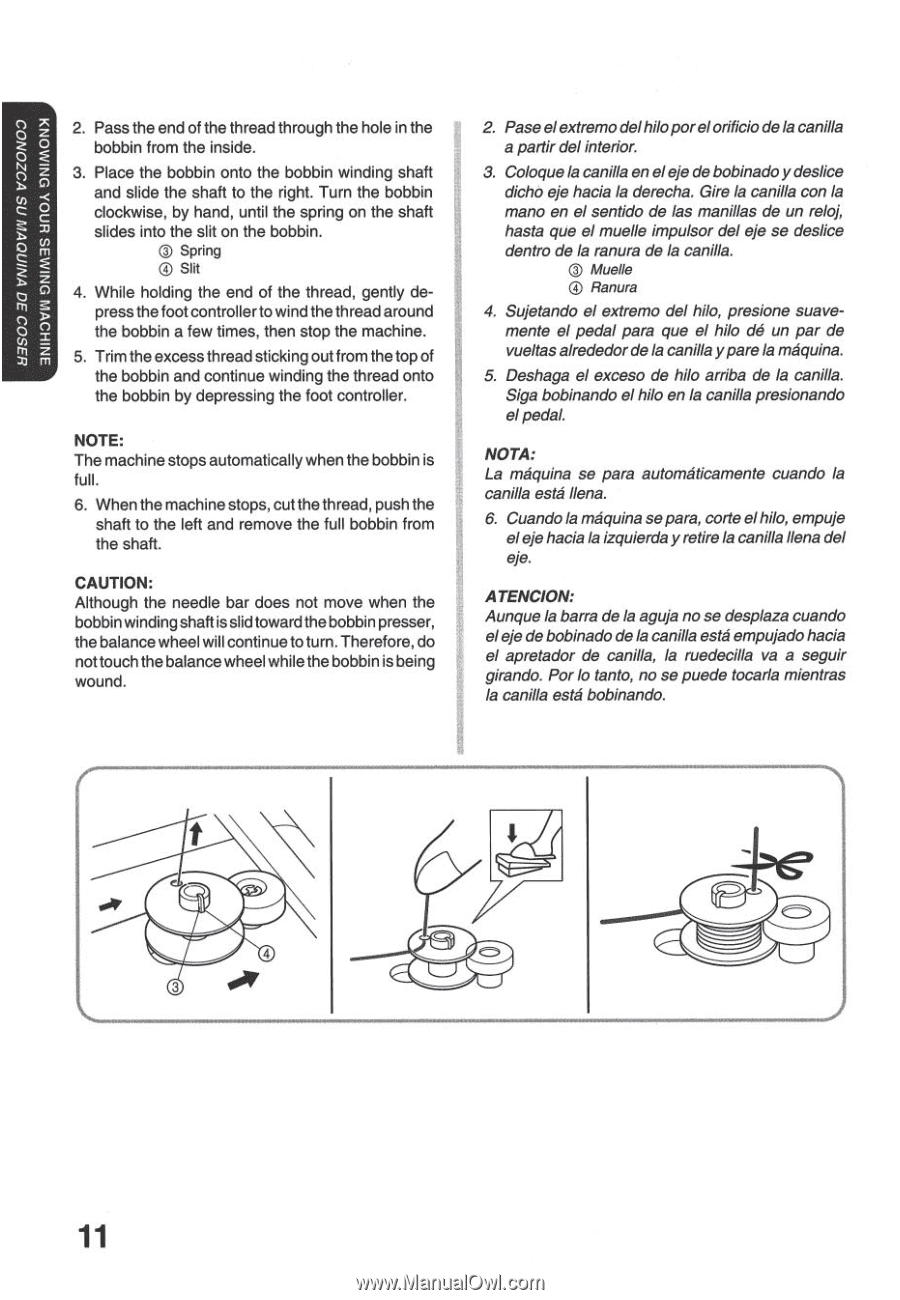
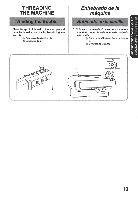
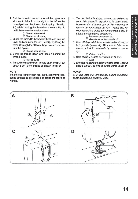
83S00 30 vNinorm I1S VOZON00 3NII-IOVIN ONIM3S Eno'', ONIANONN 2. Pass the end of the thread through the hole in the bobbin from the inside. 3. Place the bobbin onto the bobbin winding shaft and slide the shaft to the right. Turn the bobbin clockwise, by hand, until the spring on the shaft slides into the slit on the bobbin. ® Spring ® Slit 4. While holding the end of the thread, gently depress the foot controller to wind the thread around the bobbin a few times, then stop the machine. 5. Trim the excess thread sticking out from the top of the bobbin and continue winding the thread onto the bobbin by depressing the foot controller. NOTE: The machine stops automatically when the bobbin is full. 6. When the machine stops, cut the thread, push the shaft to the left and remove the full bobbin from the shaft. CAUTION: Although the needle bar does not move when the bobbin winding shaft s slid toward the bobbin presser, the balance wheel will continue to turn. Therefore, do not touch the balance wheel while the bobbin is being wound. 2. Pase elextremo delhiloporelorificio dela canilla a partir del interior. 3. ColoqueIa canilla eneleje de bobinadoydeslice dicho eje hacia la derecha. Gire Ia canilla con la mano en el sentido de las manillas de un reloj, hasta que el muelle impulsor del eje se deslice dentro de la ranura de la canilla. C) Muelle ® Ranura 4. Sujetando el extremo del hilo, presione suavemente el pedal para que el hilo de un par de vueltasalrededor dela canilla ypare la maquina. 5. Deshaga el exceso de hilo arriba de la canilla. Siga bobinando el hilo en la canilla presionando el pedal. NOTA: La maquina se pars automaticamente cuando la canilla este Ilene. 6. CuandoIa maquina separa, come elhilo, empuje elejehacia la izquierda yretirela canilla Ilene del eje. ATENCION: Aunque la barra de la aguja no se desplaza cuando eleje de bobinado dela canilla este empujadohacia el apretador de canilla, la ruedecilla va a seguir girando. Por lo tanto, no se puede tocarla mientras la canilla este bobinando. 4 3 11
-
 1
1 -
2
-
3
-
4
-
5
-
6
-
7
-
8
-
9
-
10
-
11
-
12
-
 13
13 -
 14
14 -
 15
15 -
 16
16 -
 17
17 -
 18
18 -
 19
19 -
 20
20 -
 21
21 -
 22
22 -
 23
23 -
24
-
25
-
26
-
27
-
28
-
29
-
30
-
31
-
32
-
33
-
34
-
35
-
36
-
37
-
38
-
39
-
40
-
41
-
42
-
43
-
44
-
45
-
46
-
47
-
48
-
49
-
50
-
51
-
52
-
53
-
54
-
55
-
56
-
57
-
58
-
59
-
60
-
61
-
62
-
63
-
64
 |
 |