Brother International VX-1120 Users Manual - English - Page 14
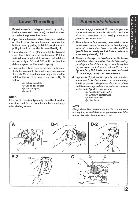
Steadying
 |
View all Brother International VX-1120 manuals
Add to My Manuals
Save this manual to your list of manuals |
Page 14 highlights
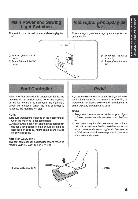
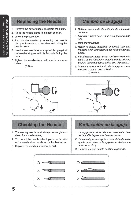
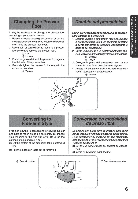
1,13S00 3O tmllnoviN nS VOZONOO DNIHOVIN ONINOS anoA ONIMONN Steadying the Machine When the sewing machine is placed on an uneven surface, turn the rubber cushion on the front lefthand side of the base plate to adjust its height until the sewing machine is stable. VARIOUS CONTROLS Length Knob The stitch length is regulated by turning this kncb. The numbers above the knob represent the stitch length in millimeters (mm). The larger numbers set a longer stitch length. When the knob is set to 0, thematerial isnot fed. This setting is used for sewing on a button. The F area is used for making a Satin Stitch (a close zigzag stitch), which can be used in making buttonholes and decorative stitches. The position needed for making the Satin Stitch varies according to the material and thread being used. To determine the exact knob position, you should first test the length settings on a scrap of fabric to observe the feeding of the material. Para estabilizar la maquina Si se instala la maquina de coser en una superficie desigual,puede ajustarsu allure girando elcojinete de goma que se encuentra en la parte anterior izquierda de la placa de base hasta que la maquina quede estable. Distintos mandos Selector de largo de puntada Este botcn permite ajustar ellargo de puntada. Los numeros marcados arriba representan el largo de la puntada en milimetros (mm). Los nOmeros mas altos dan una puntada mas large. El ajuste "0" no alimenta e/ tejido. Sirve pars coser botones. La zona F se usa pars realizar puntadas de realce (puntadas zigzag muy cerradas) que pueden servir para ojales o decoracion. La posicion exacta necesaria para realizarpuntadas de realce varia dependiendo del tejido a hiloutilizados. Para determinerla posicionmasadecuada delboton, convieneprimero probar la puntada y los ajustes de largo en un pedazo de tele para ver comp se alimenta el material. F 3 7
-
 1
1 -
2
-
3
-
4
-
5
-
6
-
7
-
8
-
 9
9 -
 10
10 -
 11
11 -
 12
12 -
 13
13 -
 14
14 -
 15
15 -
 16
16 -
 17
17 -
 18
18 -
 19
19 -
20
-
21
-
22
-
23
-
24
-
25
-
26
-
27
-
28
-
29
-
30
-
31
-
32
-
33
-
34
-
35
-
36
-
37
-
38
-
39
-
40
-
41
-
42
-
43
-
44
-
45
-
46
-
47
-
48
-
49
-
50
-
51
-
52
-
53
-
54
-
55
-
56
-
57
-
58
-
59
-
60
-
61
-
62
-
63
-
64
 |
 |
