Brother International VX-1120 Users Manual - English - Page 49
Monogramming, Embroidering, Monogramas, bordados
 |
View all Brother International VX-1120 manuals
Add to My Manuals
Save this manual to your list of manuals |
Page 49 highlights
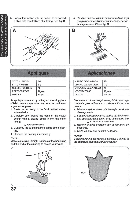
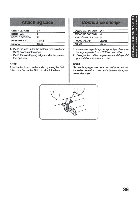
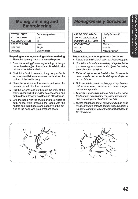
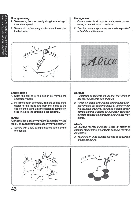
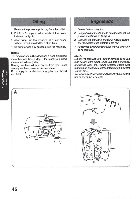
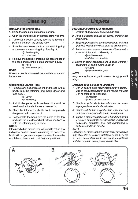
USING ATTACHMENTS AND t0PLICATIONS USO DEACCESORIOS Y. APLICACIONES Monogramming and Embroidering STITCH LENGTH STITCH WIDTH NEEDLE POSITION PRESSER FOOT NEEDLE OTHERS Set at any position. 0-5 M None Single Darning plate Preparing for monogramming and embroidering 1. Place the darning plate on the needle plate. 2. Draw the lettering (for monogramming) or design (for embroidering) on the surface of the fabric with delible ink or tailor's chalk. 3. Stretch the fabric in an embroidery hoop as firmly as possible with the underside of the fabric on the bottom of the inside hoop. 4. Place the work under the needle and lower the presser bar with the foot removed. 5. Pull the lower thread up through the work at the starting position by turning the balance wheel and make a few stitches to hold the end of the thread. 6. Grip the hoop with the thumb and forefingers of both hands while pressing the fabric with the middle and third fingers and supporting the outside of the hoop with your smaller fingers. Monogramas y bordados LARGO DE PUNTADA ANCHO DE PUNTADA POSICIONDELA AGUJA PRENSATELAS AGUJA OTROS Cualquier posicion 0-5 M Retirado Simple Placa de zurcir PreparaciOn para monogramas y bordados 1. Instatelaplace dezurcirsobrelaplace deagujas. 2. Con jaboncillo o tinta indeleble, dibuje las tetras (para monogramas) o elmotivo (pare bordados) en el derecho del tejido. 3. Estire el tejido en el bastidor tan firmemente como pueda con el reties del tejido abajo del circulo interior. 4. Coloque la tele debajo de la aguja ybaje la barra del prensatelas, aunque no hays ningtin prensatelas puesto. 5. Girando la ruedecilla, pase el hilo inferior por el tejido donde quiera empezary cosa unas puntadas para asegurar el extremo del hilo. 6. Sujete elbastidor con elpulgar e fndice de cada mano. presione el tejido con los dedos medios y anularesyaguante fosexteriores delbastidorcon los meniques. 1 42
-
 1
1 -
2
-
3
-
4
-
5
-
6
-
7
-
8
-
9
-
10
-
11
-
12
-
13
-
14
-
15
-
16
-
17
-
18
-
19
-
20
-
21
-
22
-
23
-
24
-
25
-
26
-
27
-
28
-
29
-
30
-
31
-
32
-
33
-
34
-
35
-
36
-
37
-
38
-
39
-
40
-
41
-
42
-
43
-
 44
44 -
 45
45 -
 46
46 -
 47
47 -
 48
48 -
 49
49 -
 50
50 -
 51
51 -
 52
52 -
 53
53 -
 54
54 -
55
-
56
-
57
-
58
-
59
-
60
-
61
-
62
-
63
-
64
 |
 |
