Brother International VX-1120 Users Manual - English - Page 36
prensatelas
 |
View all Brother International VX-1120 manuals
Add to My Manuals
Save this manual to your list of manuals |
Page 36 highlights
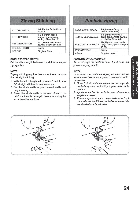
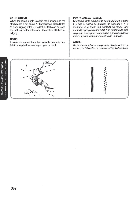
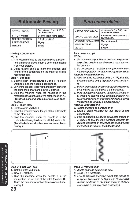
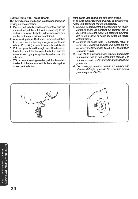
STITCH LENGTH STITCH WIDTH NEEDLE POSITION PRESSER FOOT NEEDLE Set between 0 and 1 (F) for the Satin Stitch. See the instructions below. R (right position) Zigzag Single Making a buttonhole NOTE: 1. It is recommended to practice making a button- hole on a scrap piece of fabric before attempting it on your project. 2. Using tailor's chalk to mark the position and length of the buttonhole on the material is also recommended. Step A: Bar Tack 1. Set the stitch length between 0 and 1 (F), stitch width to 5 and the needle position to R. 2. Lower the presser foot over the top right corner of the buttonhole mark and sew 3-6 stitches. 3. Stop the machine when the needle is in the material on the right side of the stitch (position A). (Turn the balance wheel counterclockwise if necessary.) Step B: Right Row 1. Set the stitch width to 2. 2. Sew the predetermined length of the buttonhole to the other end. 3. Stop the machine when the needle is in the material on the right side of the stitch (position B). (Turn the balance wheel counterclockwise if necessary.) LARGO DE PUNTADA Ajustar entre 0 y 1 (F) para puntada de realce. ANCHO DE PUNTADA Veanse las instrucciones a continuacion. POSICIONDELA AGUJA R (a la derecha). PRENSATELAS Zigzag AGUJA Simple Para coser un ojal NOTA: 1. Se recomienda practicer la costura de ojales en unpedazo de tele antes dehacerlo realmente en las prendas. 2. Se recomienda tambien usar jaboncillo para mercerlaposicionyeltame& delojaleneltejido. Paso A: Remate delantero 1. Ajusteellargo depuntada entre0y 1(F), elancho de las puntadas en 5 y la posicien de la aguja en R. 2. Bajeelprensatelasenelbordesuperiorizquierdo de la marca del ojal y cosa 3 a 6 puntadas. 3. Pare la maquina cuando la aguja este picada en el tejido a la derecha de la puntada (posicion A). (Girela ruedecilla en elsentido contrarioaldelas manecillas de un reloj si es necesario.) Paso B: Lado derecho 1. Ajuste el ancho de puntada en 2. 2. Cosa el largo marcado del ojal hasta ha otra extremidad. 3. Pare la maquina cuando la aguja este picada en el tejido a la derecha de la puntada (posicien B). (Girela ruedecilla en elsentido contrarioaldelas manecillas de un reloj si es necesario.) S3N0i013 30 VIOUS00 A S37tTO ONINOS Nonni] I:INV 3-ioHNonne Step C: Final Bar Tack 1. Set the stitch width to 5. 2. Sew 3-6 stitches. 3. Stop the machine when the needle is in the material on the left side of the stitch (position C). (Turn the balance wheel conterclockwise if necessary.) 29 B Paso C: Remate final 1. Ajuste el ancho de puntada en 5. 2. Cosa 3 a 6 puntadas. 3. Pare la maquina cuando la aguja esta picada en el tejido a la izquierda de la puntada (posicion C). (Girela ruedecilla enelsentido contrarioaldelas manecillas de un reloj si es necesario.)
-
 1
1 -
2
-
3
-
4
-
5
-
6
-
7
-
8
-
9
-
10
-
11
-
12
-
13
-
14
-
15
-
16
-
17
-
18
-
19
-
20
-
21
-
22
-
23
-
24
-
25
-
26
-
27
-
28
-
29
-
30
-
 31
31 -
 32
32 -
 33
33 -
 34
34 -
 35
35 -
 36
36 -
 37
37 -
 38
38 -
 39
39 -
 40
40 -
 41
41 -
42
-
43
-
44
-
45
-
46
-
47
-
48
-
49
-
50
-
51
-
52
-
53
-
54
-
55
-
56
-
57
-
58
-
59
-
60
-
61
-
62
-
63
-
64
 |
 |
