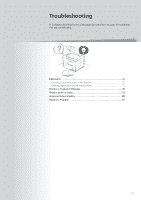
Canon FAXPHONE L100 FAXPHONE L100 Basic Operation Guide - Page 74
Canon FAXPHONE L100 Manual
 |
View all Canon FAXPHONE L100 manuals
Add to My Manuals
Save this manual to your list of manuals |
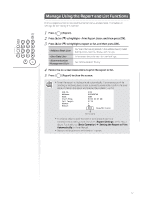
Page 74 highlights
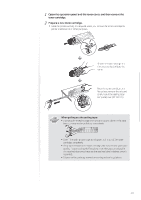
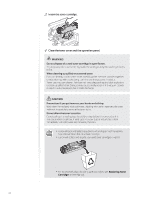
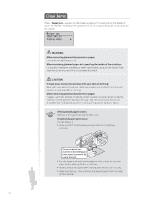
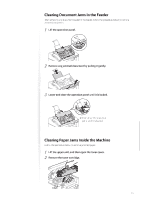
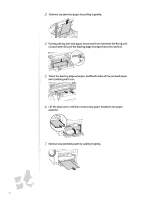
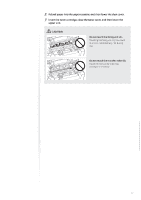
Clear Jams When appears on the display, a paper jam has occurred in the feeder or inside the machine. To remove the jammed document or paper, follow the instructions on the display. Paper jam. Press [ ] to display steps. WARNING When removing jammed documents or paper: Use caution to avoid paper cuts. When removing jammed paper or inspecting the inside of the machine: Do not allow necklaces, bracelets, or other metal objects to touch the inside of the machine, as this may result in burns or electrical shock. CAUTION If loose toner comes into contact with your skin or clothing: Wash with cold water. Do not wash with warm water, as this will set the toner and cause it to stain your skin or clothing. When removing jammed documents or paper: If paper is jammed, remove it carefully so that no pieces of paper remain inside the machine according to the displayed message. Also, do not put your hand in an area other than indicated areas, as this may result in personal injuries or burns. IMPORTANT If the jammed paper is torn: Remove all torn pieces to avoid further jams. If repeated paper jams occur: Do the following: • Make sure that the following packing material is completely removed. This part (a plastic part attached to the end of paper) is also a packing material. Be sure to remove it. • Fan the paper stack and tap the edge on a flat surface to align the paper before loading it into the machine. • Make sure that the paper meets the requirements for use (→ p.18). • Make sure that you have removed all scraps of paper from the inside of the machine. 74
-
 1
1 -
2
-
3
-
4
-
5
-
6
-
7
-
8
-
9
-
10
-
11
-
12
-
13
-
14
-
15
-
16
-
17
-
18
-
19
-
20
-
21
-
22
-
23
-
24
-
25
-
26
-
27
-
28
-
29
-
30
-
31
-
32
-
33
-
34
-
35
-
36
-
37
-
38
-
39
-
40
-
41
-
42
-
43
-
44
-
45
-
46
-
47
-
48
-
49
-
50
-
51
-
52
-
53
-
54
-
55
-
56
-
57
-
58
-
59
-
60
-
61
-
62
-
63
-
64
-
65
-
66
-
67
-
68
-
 69
69 -
 70
70 -
 71
71 -
 72
72 -
 73
73 -
 74
74 -
 75
75 -
 76
76 -
 77
77 -
 78
78 -
 79
79 -
80
-
81
-
82
-
83
-
84
-
85
-
86
-
87
-
88
-
89
-
90
-
91
-
92
-
93
-
94
-
95
-
96
 |
 |