Canon PIXMA MP950 MP950 User's Guide - Page 18
Switches to Photo Index Sheet mode. See - no power
 |
View all Canon PIXMA MP950 manuals
Add to My Manuals
Save this manual to your list of manuals |
Page 18 highlights
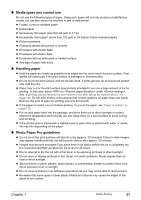
(6) [Menu] Used to display menus. (7) [Settings] Use to configure the page size, media type, and image correction settings. (8) [Back] Allows you to return to the previous screen. (9) [Search] Looks up target photos in the memory card using the shooting date as the search key. See "Searching for Photos with the Shooting Date (Search)" on page 51. (10) [Trimming] Use to crop the photo that is displayed. See "Printing a Specified Area (Trimming)" on page 52. (11) [Photo Index Sheet] Switches to Photo Index Sheet mode. See "Printing by Using the Photo Index Sheet" on page 57. (12) [COPY] Switches the machine to Copy mode. (13) [SCAN] Switches the machine to Scan mode. This button is used when the machine is connected to a computer. (Refer to the Scan Guide.) (14) [PHOTO/FILM] Switches the machine to Photo/film mode. (15) [MEMORY CARD] Switches the machine to Memory card mode. (16) [OK] Finalizes your selection for the menu or setting item. Restores the machine to normal operation after a printing error was resolved, or if paper jams are cleared. (17 Scroll through menu selections, and increase or decrease the number of copies. You can use these buttons when and [ ] are displayed on the LCD. (18) Power Lamp Lights or flashes green to indicate whether power is ON/OFF. (19) [Black] Starts black & white copying, or photo scanning. (20) [Color] Starts color copying, photo printing, or scanning. (21) [Stop/Reset] Cancels operations. If this button is pressed during printing, the machine aborts printing. 16 Before Printing Chapter 1
-
 1
1 -
2
-
3
-
4
-
5
-
6
-
7
-
8
-
9
-
10
-
11
-
12
-
 13
13 -
 14
14 -
 15
15 -
 16
16 -
 17
17 -
 18
18 -
 19
19 -
 20
20 -
 21
21 -
 22
22 -
 23
23 -
24
-
25
-
26
-
27
-
28
-
29
-
30
-
31
-
32
-
33
-
34
-
35
-
36
-
37
-
38
-
39
-
40
-
41
-
42
-
43
-
44
-
45
-
46
-
47
-
48
-
49
-
50
-
51
-
52
-
53
-
54
-
55
-
56
-
57
-
58
-
59
-
60
-
61
-
62
-
63
-
64
-
65
-
66
-
67
-
68
-
69
-
70
-
71
-
72
-
73
-
74
-
75
-
76
-
77
-
78
-
79
-
80
-
81
-
82
-
83
-
84
-
85
-
86
-
87
-
88
-
89
-
90
-
91
-
92
-
93
-
94
-
95
-
96
-
97
-
98
-
99
-
100
-
101
-
102
-
103
-
104
-
105
-
106
-
107
-
108
-
109
-
110
-
111
-
112
-
113
-
114
-
115
-
116
-
117
-
118
-
119
-
120
-
121
-
122
-
123
-
124
-
125
-
126
-
127
-
128
-
129
-
130
-
131
-
132
-
133
-
134
-
135
-
136
-
137
-
138
-
139
-
140
-
141
-
142
-
143
-
144
-
145
-
146
-
147
-
148
-
149
-
150
-
151
-
152
-
153
-
154
-
155
-
156
-
157
-
158
-
159
-
160
-
161
-
162
-
163
-
164
-
165
-
166
-
167
-
168
 |
 |
