Canon PowerShot A200 Software Starter Guide DC SD Ver.10 - Page 48
Merging Panoramic Images with PhotoStitch - camera user guide
 |
View all Canon PowerShot A200 manuals
Add to My Manuals
Save this manual to your list of manuals |
Page 48 highlights
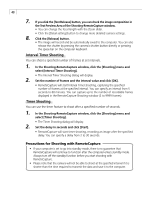
44 Merging Panoramic Images with PhotoStitch To Merge Images Registered in ZoomBrowser EX You can merge a series of overlapping images into a single, seamless panorama. 1. Select the images in the Browser Display Area, click the [Edit] menu and select [PhotoStitch] to start the program. 2. Follow the instructions in the guidance window to merge the images. • Please refer to the PhotoStitch Help menu for more details. • Images shot in Stitch Assist mode with a wide converter, teleconverter or close- up lens cannot be merged accurately. Follow the instructions to merge the images. Images Shot in Stitch Assist Mode PhotoStitch automatically arranges images shot with the camera's Stitch Assist mode in their correct order and orientation, making it easy to merge them. Stitch Assist mode images appear in the Camera window as shown below. Stitch Assist mode images have a green stitch mark. Click the stitch mark to start PhotoStitch and merge the image series. Please see the Camera User Guide to learn how to shoot in Stitch Assist mode.
-
 1
1 -
2
-
3
-
4
-
5
-
6
-
7
-
8
-
9
-
10
-
11
-
12
-
13
-
14
-
15
-
16
-
17
-
18
-
19
-
20
-
21
-
22
-
23
-
24
-
25
-
26
-
27
-
28
-
29
-
30
-
31
-
32
-
33
-
34
-
35
-
36
-
37
-
38
-
39
-
40
-
41
-
42
-
 43
43 -
 44
44 -
 45
45 -
 46
46 -
 47
47 -
 48
48 -
 49
49 -
 50
50 -
 51
51 -
 52
52 -
 53
53 -
54
-
55
-
56
-
57
-
58
-
59
-
60
-
61
-
62
-
63
-
64
-
65
-
66
-
67
-
68
-
69
-
70
-
71
-
72
-
73
-
74
-
75
-
76
-
77
-
78
-
79
-
80
-
81
-
82
-
83
-
84
-
85
-
86
-
87
-
88
-
89
-
90
-
91
-
92
-
93
-
94
 |
 |
