Canon PowerShot ELPH 300 HS PowerShot ELPH 300 HS / IXUS 220 HS Camera User Gu - Page 19
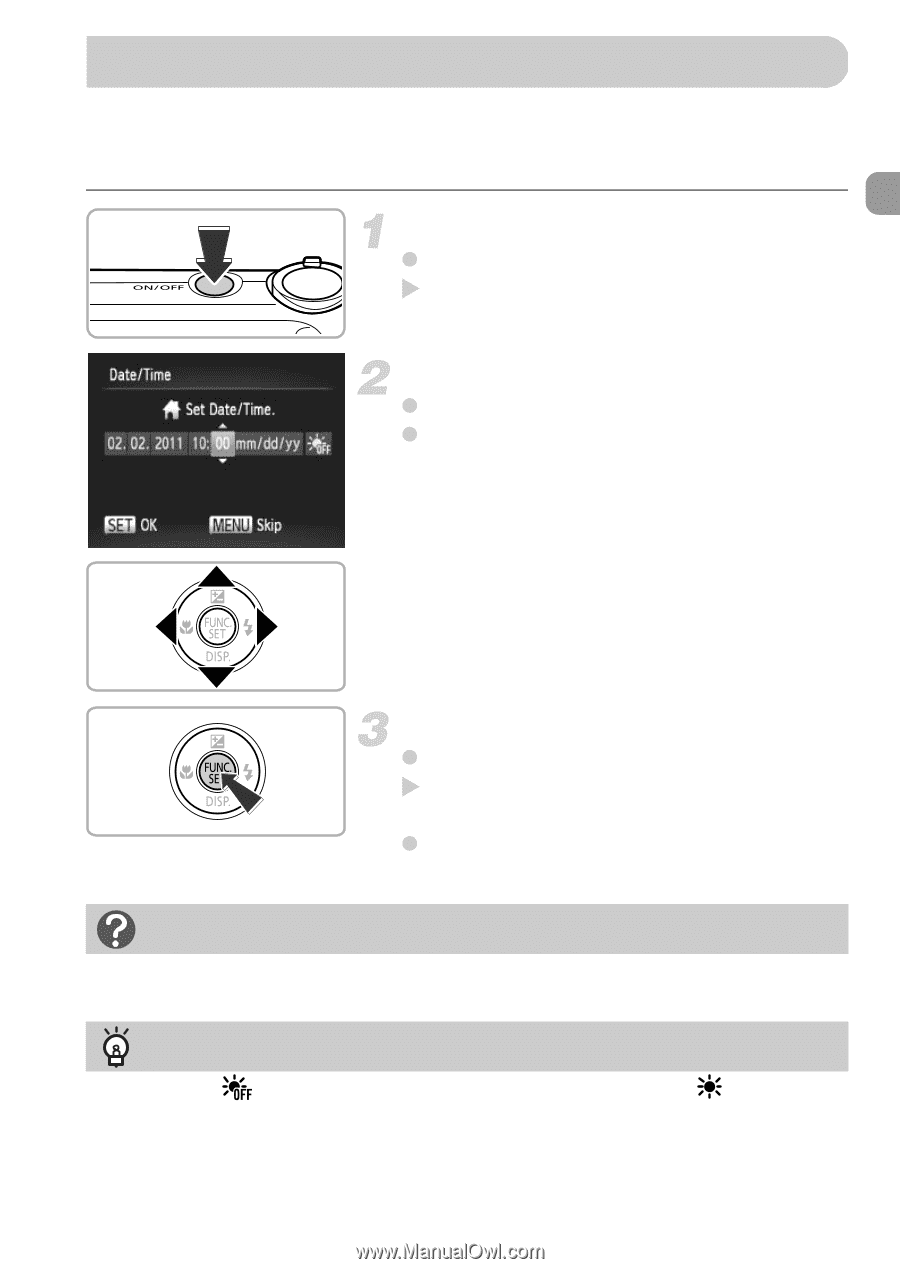
Setting the Date and Time
 |
View all Canon PowerShot ELPH 300 HS manuals
Add to My Manuals
Save this manual to your list of manuals |
Page 19 highlights
Setting the Date and Time The Date/Time settings screen will appear the first time the camera is turned on. Since the dates and times recorded into your images are based on these settings, be sure to set them. Turn on the camera. z Press the power button. X The Date/Time screen will appear. Set the date and time. z Press the qr buttons to choose an option. z Press the op buttons to set a value. Complete the setting. z Press the m button. X Once the date and time have been set, the Date/Time screen will close. z Pressing the power button will turn off the camera. Reappearing Date/Time screen Set the correct date and time. If you have not set the date and time, the Date/Time screen will appear each time you turn on the camera. Daylight saving time settings If you choose in Step 2 and press the op buttons to choose the time to daylight saving (1 hour ahead). , you will set 19
-
 1
1 -
2
-
3
-
4
-
5
-
6
-
7
-
8
-
9
-
10
-
11
-
12
-
13
-
 14
14 -
 15
15 -
 16
16 -
 17
17 -
 18
18 -
 19
19 -
 20
20 -
 21
21 -
 22
22 -
 23
23 -
 24
24 -
25
-
26
-
27
-
28
-
29
-
30
-
31
-
32
-
33
-
34
-
35
-
36
-
37
-
38
-
39
-
40
-
41
-
42
-
43
-
44
-
45
-
46
-
47
-
48
-
49
-
50
-
51
-
52
-
53
-
54
-
55
-
56
-
57
-
58
-
59
-
60
-
61
-
62
-
63
-
64
-
65
-
66
-
67
-
68
-
69
-
70
-
71
-
72
-
73
-
74
-
75
-
76
-
77
-
78
-
79
-
80
-
81
-
82
-
83
-
84
-
85
-
86
-
87
-
88
-
89
-
90
-
91
-
92
-
93
-
94
-
95
-
96
-
97
-
98
-
99
-
100
-
101
-
102
-
103
-
104
-
105
-
106
-
107
-
108
-
109
-
110
-
111
-
112
-
113
-
114
-
115
-
116
-
117
-
118
-
119
-
120
-
121
-
122
-
123
-
124
-
125
-
126
-
127
-
128
-
129
-
130
-
131
-
132
-
133
-
134
-
135
-
136
-
137
-
138
-
139
-
140
-
141
-
142
-
143
-
144
-
145
-
146
-
147
-
148
-
149
-
150
-
151
-
152
-
153
-
154
-
155
-
156
-
157
-
158
-
159
-
160
-
161
-
162
-
163
-
164
-
165
-
166
-
167
-
168
-
169
-
170
-
171
-
172
-
173
-
174
-
175
-
176
-
177
-
178
-
179
-
180
-
181
-
182
-
183
-
184
-
185
-
186
-
187
-
188
-
189
-
190
-
191
-
192
-
193
-
194
-
195
-
196
-
197
-
198
-
199
-
200
-
201
-
202
-
203
-
204
-
205
-
206
-
207
-
208
-
209
-
210
-
211
-
212
 |
 |