Canon PowerShot ELPH 300 HS PowerShot ELPH 300 HS / IXUS 220 HS Camera User Gu - Page 58
Using the Self-Timer - release date
 |
View all Canon PowerShot ELPH 300 HS manuals
Add to My Manuals
Save this manual to your list of manuals |
Page 58 highlights
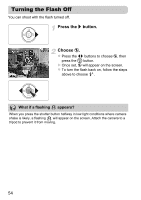
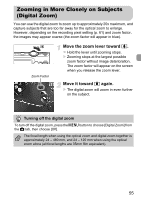
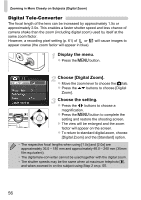
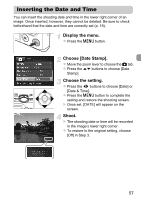
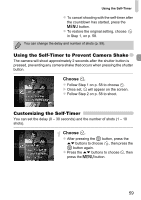
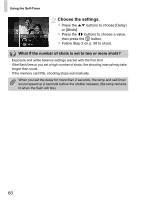
Using the Self-Timer You can insert and print the shooting date in images which do not have an embedded date and time as follows. However, if you do this for images with an embedded date and time, the date and time may be printed twice. • Use the DPOF print settings (p. 159) to print. • Use the included software to print. Refer to the Software Guide for details. • Print using printer functions (p. 151). Using the Self-Timer The self-timer can be used to shoot a group photo that includes the photographer. The camera will shoot approximately 10 seconds after the shutter button is pressed. Choose Ò. z After pressing the m button, press the op buttons to choose , then press the m button again. z Press the op buttons to choose Ò, then press the m button. X Once set, Ò will appear on the screen. Shoot. z Press the shutter button halfway to focus on the subject, then press it fully. X When the self-timer starts, the lamp blinks and the self-timer sound plays. X Two seconds before the shutter releases, the lamp and sound speed up (the lamp remains lit when the flash will fire). 58
-
 1
1 -
2
-
3
-
4
-
5
-
6
-
7
-
8
-
9
-
10
-
11
-
12
-
13
-
14
-
15
-
16
-
17
-
18
-
19
-
20
-
21
-
22
-
23
-
24
-
25
-
26
-
27
-
28
-
29
-
30
-
31
-
32
-
33
-
34
-
35
-
36
-
37
-
38
-
39
-
40
-
41
-
42
-
43
-
44
-
45
-
46
-
47
-
48
-
49
-
50
-
51
-
52
-
 53
53 -
 54
54 -
 55
55 -
 56
56 -
 57
57 -
 58
58 -
 59
59 -
 60
60 -
 61
61 -
 62
62 -
 63
63 -
64
-
65
-
66
-
67
-
68
-
69
-
70
-
71
-
72
-
73
-
74
-
75
-
76
-
77
-
78
-
79
-
80
-
81
-
82
-
83
-
84
-
85
-
86
-
87
-
88
-
89
-
90
-
91
-
92
-
93
-
94
-
95
-
96
-
97
-
98
-
99
-
100
-
101
-
102
-
103
-
104
-
105
-
106
-
107
-
108
-
109
-
110
-
111
-
112
-
113
-
114
-
115
-
116
-
117
-
118
-
119
-
120
-
121
-
122
-
123
-
124
-
125
-
126
-
127
-
128
-
129
-
130
-
131
-
132
-
133
-
134
-
135
-
136
-
137
-
138
-
139
-
140
-
141
-
142
-
143
-
144
-
145
-
146
-
147
-
148
-
149
-
150
-
151
-
152
-
153
-
154
-
155
-
156
-
157
-
158
-
159
-
160
-
161
-
162
-
163
-
164
-
165
-
166
-
167
-
168
-
169
-
170
-
171
-
172
-
173
-
174
-
175
-
176
-
177
-
178
-
179
-
180
-
181
-
182
-
183
-
184
-
185
-
186
-
187
-
188
-
189
-
190
-
191
-
192
-
193
-
194
-
195
-
196
-
197
-
198
-
199
-
200
-
201
-
202
-
203
-
204
-
205
-
206
-
207
-
208
-
209
-
210
-
211
-
212
 |
 |
