Canon PowerShot ELPH 300 HS PowerShot ELPH 300 HS / IXUS 220 HS Camera User Gu - Page 89
Correcting the Brightness and Shooting, i-Contrast
 |
View all Canon PowerShot ELPH 300 HS manuals
Add to My Manuals
Save this manual to your list of manuals |
Page 89 highlights
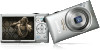
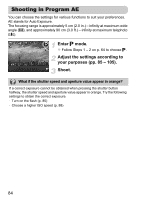
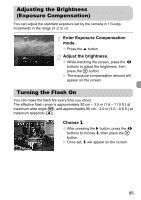
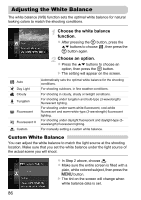
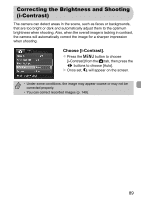
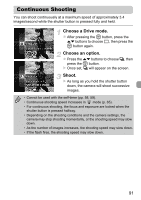
Correcting the Brightness and Shooting (i-Contrast) The camera can detect areas in the scene, such as faces or backgrounds, that are too bright or dark and automatically adjust them to the optimum brightness when shooting. Also, when the overall image is lacking in contrast, the camera will automatically correct the image for a sharper impression when shooting. Choose [i-Contrast]. z Press the n button to choose [i-Contrast] from the 4 tab, then press the qr buttons to choose [Auto]. X Once set, @ will appear on the screen. • Under some conditions, the image may appear coarse or may not be corrected properly. • You can correct recorded images (p. 149). 89
-
 1
1 -
2
-
3
-
4
-
5
-
6
-
7
-
8
-
9
-
10
-
11
-
12
-
13
-
14
-
15
-
16
-
17
-
18
-
19
-
20
-
21
-
22
-
23
-
24
-
25
-
26
-
27
-
28
-
29
-
30
-
31
-
32
-
33
-
34
-
35
-
36
-
37
-
38
-
39
-
40
-
41
-
42
-
43
-
44
-
45
-
46
-
47
-
48
-
49
-
50
-
51
-
52
-
53
-
54
-
55
-
56
-
57
-
58
-
59
-
60
-
61
-
62
-
63
-
64
-
65
-
66
-
67
-
68
-
69
-
70
-
71
-
72
-
73
-
74
-
75
-
76
-
77
-
78
-
79
-
80
-
81
-
82
-
83
-
 84
84 -
 85
85 -
 86
86 -
 87
87 -
 88
88 -
 89
89 -
 90
90 -
 91
91 -
 92
92 -
 93
93 -
 94
94 -
95
-
96
-
97
-
98
-
99
-
100
-
101
-
102
-
103
-
104
-
105
-
106
-
107
-
108
-
109
-
110
-
111
-
112
-
113
-
114
-
115
-
116
-
117
-
118
-
119
-
120
-
121
-
122
-
123
-
124
-
125
-
126
-
127
-
128
-
129
-
130
-
131
-
132
-
133
-
134
-
135
-
136
-
137
-
138
-
139
-
140
-
141
-
142
-
143
-
144
-
145
-
146
-
147
-
148
-
149
-
150
-
151
-
152
-
153
-
154
-
155
-
156
-
157
-
158
-
159
-
160
-
161
-
162
-
163
-
164
-
165
-
166
-
167
-
168
-
169
-
170
-
171
-
172
-
173
-
174
-
175
-
176
-
177
-
178
-
179
-
180
-
181
-
182
-
183
-
184
-
185
-
186
-
187
-
188
-
189
-
190
-
191
-
192
-
193
-
194
-
195
-
196
-
197
-
198
-
199
-
200
-
201
-
202
-
203
-
204
-
205
-
206
-
207
-
208
-
209
-
210
-
211
-
212
 |
 |

89
The camera can detect areas in the scene, such as faces or backgrounds,
that are too bright or dark and automatically adjust them to the optimum
brightness when shooting. Also, when the overall image is lacking in contrast,
the camera will automatically correct the image for a sharper impression
when shooting.
Choose [i-Contrast].
Press the
n
button to choose
[i-Contrast] from the
4
tab, then press the
qr
buttons to choose [Auto].
Once set,
@
will appear on the screen.
Correcting the Brightness and Shooting
(i-Contrast)
•
Under some conditions, the image may appear coarse or may not be
corrected properly.
•
You can correct recorded images (p. 149).