Canon imageFORMULA DR-2010M Workgroup Scanner User Manual - Page 103
Removing/Attaching the Retard Roller
 |
View all Canon imageFORMULA DR-2010M Workgroup Scanner manuals
Add to My Manuals
Save this manual to your list of manuals |
Page 103 highlights
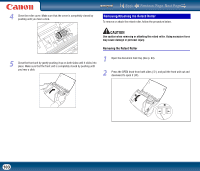
4 Close the roller cover. Make sure that the cover is completely closed by pushing until you hear a click. Contents Back Previous Page Next Page Removing/Attaching the Retard Roller To remove or attach the retard roller, follow the procedure below. CAUTION Use caution when removing or attaching the retard roller. Using excessive force may cause damage or personal injury. Removing the Retard Roller 5 Close the front unit by gently pushing it up on both sides until it clicks into place. Make sure that the front unit is completely closed by pushing until you hear a click. 1 Open the document feed tray (See p. 23). 2 Press the OPEN knob from both sides (c), and pull the front unit out and downward to open it (d). d c 103
-
 1
1 -
2
-
3
-
4
-
5
-
6
-
7
-
8
-
9
-
10
-
11
-
12
-
13
-
14
-
15
-
16
-
17
-
18
-
19
-
20
-
21
-
22
-
23
-
24
-
25
-
26
-
27
-
28
-
29
-
30
-
31
-
32
-
33
-
34
-
35
-
36
-
37
-
38
-
39
-
40
-
41
-
42
-
43
-
44
-
45
-
46
-
47
-
48
-
49
-
50
-
51
-
52
-
53
-
54
-
55
-
56
-
57
-
58
-
59
-
60
-
61
-
62
-
63
-
64
-
65
-
66
-
67
-
68
-
69
-
70
-
71
-
72
-
73
-
74
-
75
-
76
-
77
-
78
-
79
-
80
-
81
-
82
-
83
-
84
-
85
-
86
-
87
-
88
-
89
-
90
-
91
-
92
-
93
-
94
-
95
-
96
-
97
-
 98
98 -
 99
99 -
 100
100 -
 101
101 -
 102
102 -
 103
103 -
 104
104 -
 105
105 -
 106
106 -
 107
107 -
 108
108 -
109
-
110
-
111
-
112
-
113
-
114
-
115
-
116
-
117
-
118
 |
 |

Back
Previous Page
Next Page
Contents
103
4
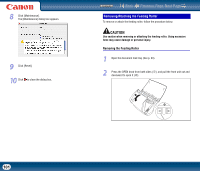
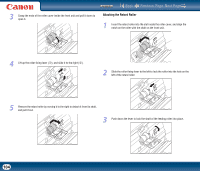
Close the roller cover. Make sure that the cover is completely closed by
pushing until you hear a click.
5
Close the front unit by gently pushing it up on both sides until it clicks into
place. Make sure that the front unit is completely closed by pushing until
you hear a click.
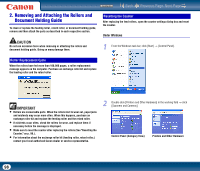
To remove or attach the retard roller, follow the procedure below.
CAUTION
Use caution when removing or attaching the retard roller. Using excessive force
may cause damage or personal injury.
Removing the Retard Roller
1
Open the document feed tray (See p. 23).
2
Press the OPEN knob from both sides (
), and pull the front unit out and
downward to open it (
).
Removing/Attaching the Retard Roller