Canon imageFORMULA DR-2010M Workgroup Scanner User Manual - Page 40
Scan First, Operation Flow, Print], Send to application], When Using PaperPort only for Windows
 |
View all Canon imageFORMULA DR-2010M Workgroup Scanner manuals
Add to My Manuals
Save this manual to your list of manuals |
Page 40 highlights
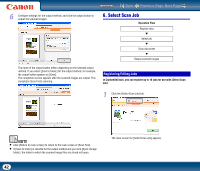
[[Print] [Send to application] Contents Back Previous Page Next Page Print scanned images to a specified printer. When this method is selected, you must specify the printer to which images will be printed. Open scanned images with a specified application. When this method is selected, you must click the [Browse] button and specify the executable file for an application that can open the image file. In addition, configure settings for the image file to be saved. 5. Scan First Operation Flow Scan document ▼ Select output method ▼ Configure output settings ▼ Output scanned images 1 Place the document in the scanner. 2 Click the [Scan First] tab. When Using PaperPort (only for Windows) • The PaperPort application supplied with this unit uses the [Documents] folder by default. When sending the image file to PaperPort and specifying the save destination, be sure to specify the [Documents] folder or a folder within the [Documents] folder. Specifying any other folder may result in an error. • If you want to specify a folder other than the [Documents] folder, use [Folder Manager] in PaperPort to register that folder beforehand. • In Windows Vista, the documents folder and pictures folder are located on the same level in the folder hierarchy. As a result, be sure to register the pictures folder using [Folder Manager] in PaperPort if you want to specify that folder. The main screen for [Scan First] appears. 40
-
 1
1 -
2
-
3
-
4
-
5
-
6
-
7
-
8
-
9
-
10
-
11
-
12
-
13
-
14
-
15
-
16
-
17
-
18
-
19
-
20
-
21
-
22
-
23
-
24
-
25
-
26
-
27
-
28
-
29
-
30
-
31
-
32
-
33
-
34
-
 35
35 -
 36
36 -
 37
37 -
 38
38 -
 39
39 -
 40
40 -
 41
41 -
 42
42 -
 43
43 -
 44
44 -
 45
45 -
46
-
47
-
48
-
49
-
50
-
51
-
52
-
53
-
54
-
55
-
56
-
57
-
58
-
59
-
60
-
61
-
62
-
63
-
64
-
65
-
66
-
67
-
68
-
69
-
70
-
71
-
72
-
73
-
74
-
75
-
76
-
77
-
78
-
79
-
80
-
81
-
82
-
83
-
84
-
85
-
86
-
87
-
88
-
89
-
90
-
91
-
92
-
93
-
94
-
95
-
96
-
97
-
98
-
99
-
100
-
101
-
102
-
103
-
104
-
105
-
106
-
107
-
108
-
109
-
110
-
111
-
112
-
113
-
114
-
115
-
116
-
117
-
118
 |
 |
