Canon imageFORMULA DR-2010M Workgroup Scanner User Manual - Page 91
Prescan
 |
View all Canon imageFORMULA DR-2010M Workgroup Scanner manuals
Add to My Manuals
Save this manual to your list of manuals |
Page 91 highlights
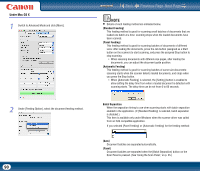
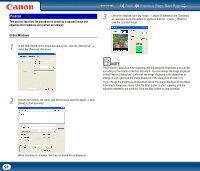
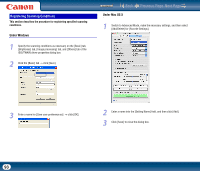
Prescan This section describes the procedure for checking a scanned image and adjusting the brightness and contrast accordingly. Contents Back Previous Page Next Page 3 Check the displayed preview image → adjust [Brightness] and [Contrast] as necessary using the sliders or up/down buttons → click (Start) to save the scanned image. Under Windows 1 In the ISIS/TWAIN driver properties dialog box, click the [Others] tab → select the [Prescan] check box. 2 Specify the location, file name, and file format to save the image → click [Save] to start scanning. NOTE The [Prescan] dialog box is for scanning after adjusting the brightness and contrast according to the results of the first document. You can enlarge the image displayed in the [Prescan] dialog box. (Left-click the image displayed in the dialog box to enlarge it, and right-click the image displayed in the dialog box to reduce it.) If you change the brightness and contrast values, the image displayed in the dialog box reflects these new values. Click the Start button to start scanning with the adjusted brightness and contrast. Click the Stop button to stop scanning. When scanning is complete, the Prescan dialog box is displayed. 91
-
 1
1 -
2
-
3
-
4
-
5
-
6
-
7
-
8
-
9
-
10
-
11
-
12
-
13
-
14
-
15
-
16
-
17
-
18
-
19
-
20
-
21
-
22
-
23
-
24
-
25
-
26
-
27
-
28
-
29
-
30
-
31
-
32
-
33
-
34
-
35
-
36
-
37
-
38
-
39
-
40
-
41
-
42
-
43
-
44
-
45
-
46
-
47
-
48
-
49
-
50
-
51
-
52
-
53
-
54
-
55
-
56
-
57
-
58
-
59
-
60
-
61
-
62
-
63
-
64
-
65
-
66
-
67
-
68
-
69
-
70
-
71
-
72
-
73
-
74
-
75
-
76
-
77
-
78
-
79
-
80
-
81
-
82
-
83
-
84
-
85
-
 86
86 -
 87
87 -
 88
88 -
 89
89 -
 90
90 -
 91
91 -
 92
92 -
 93
93 -
 94
94 -
 95
95 -
 96
96 -
97
-
98
-
99
-
100
-
101
-
102
-
103
-
104
-
105
-
106
-
107
-
108
-
109
-
110
-
111
-
112
-
113
-
114
-
115
-
116
-
117
-
118
 |
 |
