Cisco 7965G User Guide - Page 66
Personal Address Book, Submit, Phones, Select, Fast Dial, > Personal Directory, Personal Fast Dials
 |
UPC - 882658140464
View all Cisco 7965G manuals
Add to My Manuals
Save this manual to your list of manuals |
Page 66 highlights
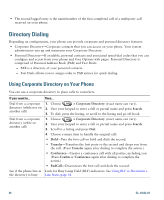
If you want to... Then... Add a new PAB entry 1. Access Personal Directory, then choose Personal Address Book. 2. Access the Search page by choosing Submit. (You do not need to input search information first.) 3. Press New. 4. Use your phone keypad to enter a name and email information. 5. Choose Phones and use the keypad to enter phone numbers. Be sure to include any necessary access codes such as a 9 or 1. 6. Choose Submit to add the entry to the database. Assign a Fast Dial code to a PAB entry 1. Search for a PAB entry. 2. Highlight the listing and press Select. 3. Press Fast Dial. 4. Highlight the number that you want to dial and press Select. 5. Highlight the Fast Dial code that you want to assign to the number and press Select. Add a new Fast Dial code (not using a PAB entry) 1. Choose > Personal Directory > Personal Fast Dials. 2. Press Fast Dial. 3. Highlight a Fast Dial code that is unassigned and press Select. 4. Press Assign. 5. Enter a phone number. 6. Press Update. Search for Fast Dial 1. Choose > Personal Directory > Personal Fast Dials. codes 2. You can choose Previous or Next to move through listings. 3. Highlight the listing that you want and press Select. Place a call using a Fast Dial code 1. Search for a Fast Dial code. 2. Highlight the listing you want and press Select. 3. Press Dial. 4. Choose OK to complete the action. Delete a Fast Dial code 1. Search for a Fast Dial code. 2. Highlight the listing you want and press Select. 3. Press Remove. Log out of Personal Directory 1. Choose > Personal Directory (exact name can vary). 2. Choose Logout. 58 OL-14622-01
-
 1
1 -
2
-
3
-
4
-
5
-
6
-
7
-
8
-
9
-
10
-
11
-
12
-
13
-
14
-
15
-
16
-
17
-
18
-
19
-
20
-
21
-
22
-
23
-
24
-
25
-
26
-
27
-
28
-
29
-
30
-
31
-
32
-
33
-
34
-
35
-
36
-
37
-
38
-
39
-
40
-
41
-
42
-
43
-
44
-
45
-
46
-
47
-
48
-
49
-
50
-
51
-
52
-
53
-
54
-
55
-
56
-
57
-
58
-
59
-
60
-
 61
61 -
 62
62 -
 63
63 -
 64
64 -
 65
65 -
 66
66 -
 67
67 -
 68
68 -
 69
69 -
 70
70 -
 71
71 -
72
-
73
-
74
-
75
-
76
-
77
-
78
-
79
-
80
-
81
-
82
-
83
-
84
-
85
-
86
-
87
-
88
-
89
-
90
-
91
-
92
-
93
-
94
-
95
 |
 |
