Cisco CP-7961G-GE Administration Guide - Page 66
Adjusting the Placement of the Cisco Unified IP Phone
 |
View all Cisco CP-7961G-GE manuals
Add to My Manuals
Save this manual to your list of manuals |
Page 66 highlights
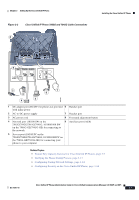
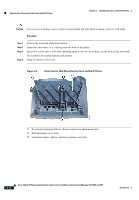
Adjusting the Placement of the Cisco Unified IP Phone Chapter 3 Setting Up the Cisco Unified IP Phone Procedure Step 1 Step 2 Step 3 Step 4 Step 5 From Cisco Unified Communications Manager Administration, choose Device > Device Settings > Phone Button Template. Click the Add New button. From the drop-down list, choose a template and click Copy. Rename the new template. Update the template to 56 Directory Numbers for Cisco Unified IP Phone 7975G, or 54 Directory Numbers for Cisco Unified IP Phones 7965G and 7962G. Refer to Cisco Unified Communications Manager Administration Guide and Cisco Unified Communications Manager System Guide for more information on creating and modifying templates. Note You can also attach two Cisco Unified IP Phone Expansion Modules 7915s or two Cisco Unified IP Phone Expansion Modules 7916s, to provide 48 additional lines or speed-dial and feature buttons. Related Topic Configuring Softkey Templates, page 5-24 Adjusting the Placement of the Cisco Unified IP Phone The Cisco Unified IP Phone includes an adjustable footstand. When placing the phone on a desktop surface, you can adjust the tilt height to several different angles in 7.5 degree increments from flat to 60 degrees. You can also mount these phones to the wall by using the footstand or by using the optional locking wall mount kit. Adjusting Cisco Unified IP Phone Placement on the Desktop You can adjust the footstand adjustment plate on the Cisco Unified IP Phone to the height that provides optimum viewing of the phone screen. See Figure 3-4 for more information. Procedure Step 1 Step 2 Push in the footstand adjustment button. Adjust the footstand to desired height. Securing the Phone with a Cable Lock You can secure the Cisco Unified IP Phone 7962G and 7942G to a desktop by using a laptop cable lock. The lock connects to the security slot on the back of the phone, and the cable can be secured to a desktop. 3-10 Cisco Unified IP Phone Administration Guide for Cisco Unified Communications Manager 8.0 (SCCP and SIP) OL-21011-01
-
 1
1 -
2
-
3
-
4
-
5
-
6
-
7
-
8
-
9
-
10
-
11
-
12
-
13
-
14
-
15
-
16
-
17
-
18
-
19
-
20
-
21
-
22
-
23
-
24
-
25
-
26
-
27
-
28
-
29
-
30
-
31
-
32
-
33
-
34
-
35
-
36
-
37
-
38
-
39
-
40
-
41
-
42
-
43
-
44
-
45
-
46
-
47
-
48
-
49
-
50
-
51
-
52
-
53
-
54
-
55
-
56
-
57
-
58
-
59
-
60
-
 61
61 -
 62
62 -
 63
63 -
 64
64 -
 65
65 -
 66
66 -
 67
67 -
 68
68 -
 69
69 -
 70
70 -
 71
71 -
72
-
73
-
74
-
75
-
76
-
77
-
78
-
79
-
80
-
81
-
82
-
83
-
84
-
85
-
86
-
87
-
88
-
89
-
90
-
91
-
92
-
93
-
94
-
95
-
96
-
97
-
98
-
99
-
100
-
101
-
102
-
103
-
104
-
105
-
106
-
107
-
108
-
109
-
110
-
111
-
112
-
113
-
114
-
115
-
116
-
117
-
118
-
119
-
120
-
121
-
122
-
123
-
124
-
125
-
126
-
127
-
128
-
129
-
130
-
131
-
132
-
133
-
134
-
135
-
136
-
137
-
138
-
139
-
140
-
141
-
142
-
143
-
144
-
145
-
146
-
147
-
148
-
149
-
150
-
151
-
152
-
153
-
154
-
155
-
156
-
157
-
158
-
159
-
160
-
161
-
162
-
163
-
164
-
165
-
166
-
167
-
168
-
169
-
170
-
171
-
172
-
173
-
174
-
175
-
176
-
177
-
178
-
179
-
180
-
181
-
182
-
183
-
184
-
185
-
186
-
187
-
188
-
189
-
190
-
191
-
192
-
193
-
194
-
195
-
196
-
197
-
198
-
199
-
200
-
201
-
202
-
203
-
204
-
205
-
206
-
207
-
208
-
209
-
210
-
211
-
212
-
213
-
214
-
215
-
216
-
217
-
218
-
219
-
220
-
221
-
222
-
223
-
224
-
225
-
226
-
227
-
228
-
229
-
230
-
231
-
232
-
233
-
234
-
235
-
236
-
237
-
238
-
239
-
240
-
241
 |
 |
