DIRECTV R10 System Manual - Page 149
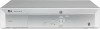
Satellite In 2., Dual Tuner, Satellite In 1, RF In., RF Out., Channel 3/4 switch., S-Video Output.
 |
View all DIRECTV R10 manuals
Add to My Manuals
Save this manual to your list of manuals |
Page 149 highlights
Back Panel Reference 3. Satellite In 2. If you have a Dual LNB satellite dish, you can connect the second satellite cable from your wall to the Satellite In 2 jack. Connecting both Satellite In 1 and Satellite In 2, and completing the required steps in Satellite Dish Guided Setup, allows you to record two programs at the same time (see Dual Tuner on page 5). 4. Satellite In 1. Connect the satellite cable from your wall to the Satellite In 1 jack. You will not be able to watch DIRECTV® channels if you do not make this connection. 5. RF In. If you have an antenna or cable with no cable box, and your TV has only one input, connect the existing Coaxial RF cable (the one coming out of the wall) to the DVR using this jack. If your TV has multiple inputs, you can ignore this jack and connect your antenna or cable directly to your TV instead. This RF In jack is designated "Standby Pass-Thru Only," meaning that you will NOT be able to you to use DIRECTV and DVR functions while watching antenna or cable channels, even if you connect your antenna or cable to this jack on the DVR. 6. RF Out. If your TV has only one input (RF In), connect a Coaxial RF cable (not supplied) from this jack to your TV's RF In. The RF In jack on your TV may not be labeled "RF In;" it may be labeled "VHF/UHF In" or "Antenna/Cable In." A 7. Channel 3/4 switch. If you use the RF Out jack, set the output to channel 3 or 4 using this switch. To get the best picture, select the channel that is not occupied by a local broadcast channel. For example, if there is a local broadcast station on channel 4, select channel 3 for the output on the DVR. You need to set your television to this channel (3 or 4) in order to view the signal coming from the RF Out jack. 8. S-Video Output. S-Video provides a higher quality picture than Composite Video (see number 10). If you use the S-Video Output, you must connect a separate cable for audio (either the red and white ends of a Composite A/V cable, or an Optical Digital 139
-
 1
1 -
2
-
3
-
4
-
5
-
6
-
7
-
8
-
9
-
10
-
11
-
12
-
13
-
14
-
15
-
16
-
17
-
18
-
19
-
20
-
21
-
22
-
23
-
24
-
25
-
26
-
27
-
28
-
29
-
30
-
31
-
32
-
33
-
34
-
35
-
36
-
37
-
38
-
39
-
40
-
41
-
42
-
43
-
44
-
45
-
46
-
47
-
48
-
49
-
50
-
51
-
52
-
53
-
54
-
55
-
56
-
57
-
58
-
59
-
60
-
61
-
62
-
63
-
64
-
65
-
66
-
67
-
68
-
69
-
70
-
71
-
72
-
73
-
74
-
75
-
76
-
77
-
78
-
79
-
80
-
81
-
82
-
83
-
84
-
85
-
86
-
87
-
88
-
89
-
90
-
91
-
92
-
93
-
94
-
95
-
96
-
97
-
98
-
99
-
100
-
101
-
102
-
103
-
104
-
105
-
106
-
107
-
108
-
109
-
110
-
111
-
112
-
113
-
114
-
115
-
116
-
117
-
118
-
119
-
120
-
121
-
122
-
123
-
124
-
125
-
126
-
127
-
128
-
129
-
130
-
131
-
132
-
133
-
134
-
135
-
136
-
137
-
138
-
139
-
140
-
141
-
142
-
143
-
 144
144 -
 145
145 -
 146
146 -
 147
147 -
 148
148 -
 149
149 -
 150
150 -
 151
151 -
 152
152 -
 153
153 -
 154
154 -
155
-
156
-
157
-
158
-
159
-
160
-
161
-
162
-
163
-
164
-
165
 |
 |
