DIRECTV R10 System Manual - Page 33
Confirming Setup, Satellite Info.
 |
View all DIRECTV R10 manuals
Add to My Manuals
Save this manual to your list of manuals |
Page 33 highlights
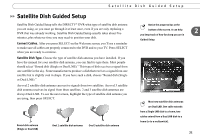
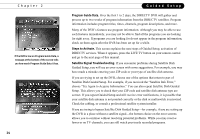
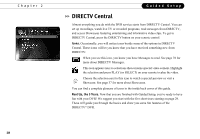
Satellite Dish Guided Setup You can check signal strength while you adjust the position of your satellite dish antenna. The signal strength meter on this screen provides audio feedback-a tone that becomes higher pitched as the signal gets stronger. You may be able to turn the volume on your TV up so you can hear the tone while you adjust your satellite dish antenna. Alternatively, you might have someone watching the signal strength meter and then reporting through a cell 2 phone or walkie-talkie to the person who is adjusting the satellite dish antenna. • To change the currently selected transponder, use the UP arrow to highlight the transponder number. Press the RIGHT or LEFT arrow to change the transponder. It is best if each transponder has a signal strength above 60. • If you have connected both Satellite In jacks, the signal strength for each connection is shown. You should have a good signal on all transponders for both connections. If you have a 2 or 3 satellite dish antenna, you should check the signal strength from transponders on each satellite. • To change the selected satellite, press the UP arrow until the satellite number is highlighted. Press the RIGHT or LEFT arrow to change the satellite. When you have finished, select "Done Testing Signal Strength." If you cannot acquire a good satellite signal, see Satellite Signal Troubleshooting on the next page. Confirming Setup, Satellite Info. At each of the next two screens there is a short wait while the DVR confirms your setup, then gathers a list of channels from the satellite. 23
-
 1
1 -
2
-
3
-
4
-
5
-
6
-
7
-
8
-
9
-
10
-
11
-
12
-
13
-
14
-
15
-
16
-
17
-
18
-
19
-
20
-
21
-
22
-
23
-
24
-
25
-
26
-
27
-
 28
28 -
 29
29 -
 30
30 -
 31
31 -
 32
32 -
 33
33 -
 34
34 -
 35
35 -
 36
36 -
 37
37 -
 38
38 -
39
-
40
-
41
-
42
-
43
-
44
-
45
-
46
-
47
-
48
-
49
-
50
-
51
-
52
-
53
-
54
-
55
-
56
-
57
-
58
-
59
-
60
-
61
-
62
-
63
-
64
-
65
-
66
-
67
-
68
-
69
-
70
-
71
-
72
-
73
-
74
-
75
-
76
-
77
-
78
-
79
-
80
-
81
-
82
-
83
-
84
-
85
-
86
-
87
-
88
-
89
-
90
-
91
-
92
-
93
-
94
-
95
-
96
-
97
-
98
-
99
-
100
-
101
-
102
-
103
-
104
-
105
-
106
-
107
-
108
-
109
-
110
-
111
-
112
-
113
-
114
-
115
-
116
-
117
-
118
-
119
-
120
-
121
-
122
-
123
-
124
-
125
-
126
-
127
-
128
-
129
-
130
-
131
-
132
-
133
-
134
-
135
-
136
-
137
-
138
-
139
-
140
-
141
-
142
-
143
-
144
-
145
-
146
-
147
-
148
-
149
-
150
-
151
-
152
-
153
-
154
-
155
-
156
-
157
-
158
-
159
-
160
-
161
-
162
-
163
-
164
-
165
 |
 |
