Dell 944 All In One Inkjet Printer User's Guide
Dell 944 All In One Inkjet Printer Manual
 |
View all Dell 944 All In One Inkjet Printer manuals
Add to My Manuals
Save this manual to your list of manuals |
Dell 944 All In One Inkjet Printer manual content summary:
- Dell 944 All In One Inkjet Printer | User's Guide - Page 1
All-In-One Printer 944 User's Guide Click the links to the left for information on the features and operation of your printer. For information on other documentation included with your printer, see Finding Information. To order ink or supplies from Dell: 1. Double-click the icon on your desktop - Dell 944 All In One Inkjet Printer | User's Guide - Page 2
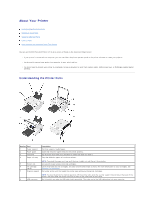
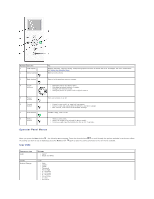
ink cartridges. 6 Ink cartridge Carrier that holds two ink cartridges, one color and the other black or photo. For more information on your cartridges, see carrier Replacing Ink Cartridges. 7 Scanner support Part under printer unit that keeps the printer open while you change ink cartridges - Dell 944 All In One Inkjet Printer | User's Guide - Page 3
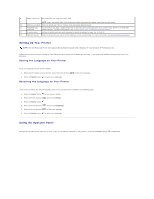
Panel. Setting Up Your Printer NOTE: The Dell Photo AIO Printer 944 supports Microsoft® Windows® 2000, Windows XP, and Windows XP Professional x64. Follow the instructions on your Setting Up Your Printer poster to install the hardware and software. If you encounter problems during setup, see Setup - Dell 944 All In One Inkjet Printer | User's Guide - Page 4
in progress. l Cancel a copy job (using only the printer), and eject a page. l Exit a menu, and return to the default settings. Initiate a copy, scan, or fax. l Select a menu item. l Select an image to be printed (in Photo mode). l Initiate a paper feed by holding the button for 3 seconds. Operator - Dell 944 All In One Inkjet Printer | User's Guide - Page 5
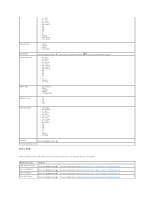
l A4 lL l 2L l Hagaki l 10 x 15 cm l 13 x 18 cm Copy Quality l Draft l Normal l Photo l Automatic* Brightness Blank Paper Size Press the Select button l 3 x 5 in. l 3½ x 5 in. l 4 x 6 in. l 10 x 15 cm l 5 USB memory key is inserted into the printer, the following options are available. Photo - Dell 944 All In One Inkjet Printer | User's Guide - Page 6
items. Photo menu item Color Photo Size Quality Brightness Paper Size Paper Type Crop Rotate 90 Degrees Preview Red Eye Reduction Off* to adjust the image for cropping. The Scan submenu is only available if the printer is connected to a computer or a network adapter. If you choose Scan as the mode - Dell 944 All In One Inkjet Printer | User's Guide - Page 7
paper. 2. Center the paper on the paper support. 3. Adjust the paper guides so both are resting against the edges of the paper. NOTE: Do not pull on both paper guides simultaneously. When one paper guide is moved, the other adjusts accordingly. NOTE: Do not force paper into the printer. The paper - Dell 944 All In One Inkjet Printer | User's Guide - Page 8
Type drop-down menu. 5. Click OK. To turn off the automatic paper type sensor for all print jobs: 1. In Windows XP, click Start® Control Panel® Printers and Other Hardware® Printers and Faxes. In Windows 2000, click Start® Settings® Printers. 2. Right-click the Dell Photo AIO Printer 944 icon. - Dell 944 All In One Inkjet Printer | User's Guide - Page 9
3. Click Printing Preferences. 4. Click the Print Setup tab. 5. Select the paper type from the Media Type drop-down menu. 6. Click OK. - Dell 944 All In One Inkjet Printer | User's Guide - Page 10
Contacting Dell Warranty and Return Policy Dell Technical Support Policy Technician-assisted technical support requires the cooperation and participation of the customer in the troubleshooting process and provides for restoration of the Operating System, application software and hardware drivers to - Dell 944 All In One Inkjet Printer | User's Guide - Page 11
used to endorse or promote products derived from this software without specific prior written permission. THIS SOFTWARE IS PROVIDED BY THE AUTHOR "AS IS" AND (INCLUDING, BUT NOT LIMITED TO, PROCUREMENT OF SUBSTITUTE GOODS OR SERVICES; LOSS OF USE, DATA, OR PROFITS; OR BUSINESS INTERRUPTION) - Dell 944 All In One Inkjet Printer | User's Guide - Page 12
Operator Panel Copying Photos Using Your Computer Changing Copy Settings Copying Documents Using the Operator Panel 1. Turn on your printer. 2. Load the paper. For more information, see Loading Paper. 3. Open the top cover. 4. Place the document you want to copy face down on the scanner glass. Make - Dell 944 All In One Inkjet Printer | User's Guide - Page 13
Programs® Dell Printers® Dell Photo AIO Printer 944® Dell All-In-One Center. The Dell All-In-One Center opens. 7. Select the number of copies (1-99) and color setting from the Copy drop-down menus. 8. Click See More Copy Settings to: ¡ Choose a copy quality. ¡ Select the blank paper size. ¡ Select - Dell 944 All In One Inkjet Printer | User's Guide - Page 14
printer. 5. Close the top cover. 6. Click Start® Programs or All Programs® Dell Printers® Dell Photo AIO Printer 944® Dell All-In-One Center. The Dell All-In-One Copy Settings to: ¡ Choose a copy quality. ¡ Select the blank paper size. ¡ Select the original document size. ¡ Lighten or darken your - Dell 944 All In One Inkjet Printer | User's Guide - Page 15
Click Start® Programs or All Programs® Dell Printers® Dell Photo AIO Printer 944® Dell All-In-One Center. The Dell All-In-One Center opens. 2. Select a copy quantity and color. 3. Click See More Copy Settings to: ¡ Choose a copy quality. ¡ Select the blank paper size. ¡ Select the original document - Dell 944 All In One Inkjet Printer | User's Guide - Page 16
Faxing Installing Microsoft Fax Console in Windows XP Configuring Microsoft Fax Console (Windows XP) or Fax Service Management (Windows 2000) Faxing a Paper Document Using the Operator Panel Faxing a Paper Document Using Your Computer Faxing Electronic Documents Receiving a Fax Using Fax Console or - Dell 944 All In One Inkjet Printer | User's Guide - Page 17
the Dell Photo AIO Printer 944 to print the received fax. NOTE: Your printer must Paper Document Using Your Computer 1. Turn on your printer and computer, and make sure they are connected. Make sure your computer modem is connected to an active analog phone line. If you have DSL broadband service - Dell 944 All In One Inkjet Printer | User's Guide - Page 18
or All Programs® Dell Printers® Dell Photo AIO Printer 944® Dell All-In-One Center. The Dell All-In-One Center opens. 4. In the Dell All-In-One Center you can printer list, select Fax. 3. Click Print, and then follow the instructions on the screen. Receiving a Fax Using Fax Console or Fax Service - Dell 944 All In One Inkjet Printer | User's Guide - Page 19
l Sent Items - faxes successfully sent 4. Click the folder of your choice. 5. Click the fax in the right pane for which you want to view the status, and then click Preferences or Properties. 6. Click the General tab, and view the Status line. 7. Click Close when you are finished. Changing the Fax - Dell 944 All In One Inkjet Printer | User's Guide - Page 20
, and repair information l Downloads - Drivers l Reference - Printer documentation and product specifications l How to use Windows XP l Documentation for my printer Windows XP Help and Support Center 1. Click Start® Help and Support. 2. Type a word or phrase that describes your problem, and - Dell 944 All In One Inkjet Printer | User's Guide - Page 21
that you have the freedom to distribute copies of free software (and charge for this service if you wish), that you receive source code or can any problems introduced by others will not reflect on the original authors' reputations. Finally, any free program is threatened constantly by software - Dell 944 All In One Inkjet Printer | User's Guide - Page 22
1 and 2 above provided that you also do one of the following: a. Accompany it with the complete body of this License. 10. The Free Software Foundation may publish revised and/or new versions of , but may differ in detail to address new problems or concerns. Each version is given a distinguishing - Dell 944 All In One Inkjet Printer | User's Guide - Page 23
software which is copyrighted by the Free Software Foundation, write to the Free Software Foundation; we sometimes make exceptions for this. Our decision will be guided PROGRAM PROVE DEFECTIVE, YOU ASSUME THE COST OF ALL NECESSARY SERVICING, REPAIR OR CORRECTION. 13. IN NO EVENT UNLESS REQUIRED BY - Dell 944 All In One Inkjet Printer | User's Guide - Page 24
that you have the freedom to distribute copies of free software (and charge for this service if you wish); that you receive source code or can author's reputation will not be affected by problems that might be introduced by others. Finally, software patents pose a constant threat to the existence - Dell 944 All In One Inkjet Printer | User's Guide - Page 25
modifications or work under the terms of Section 1 above, provided that you also meet all of these conditions: a. The modified work must itself be a software library. b. You must cause the files modified to carry prominent notices stating that you changed the files and the date of any change. c. You - Dell 944 All In One Inkjet Printer | User's Guide - Page 26
. Also, you must do one of these things: a. Accompany differ in detail to address new problems or concerns. Each version is given software which is copyrighted by the Free Software Foundation, write to the Free Software Foundation; we sometimes make exceptions for this. Our decision will be guided - Dell 944 All In One Inkjet Printer | User's Guide - Page 27
YOU ASSUME THE COST OF ALL NECESSARY SERVICING, REPAIR OR CORRECTION. 16. IN NO EVENT UNLESS REQUIRED BY LOSSES SUSTAINED BY YOU OR THIRD PARTIES OR A FAILURE OF THE LIBRARY TO OPERATE WITH ANY OTHER SOFTWARE), EVEN IF SUCH HOLDER OR OTHER PARTY HAS BEEN ADVISED OF THE POSSIBILITY OF SUCH DAMAGES. - Dell 944 All In One Inkjet Printer | User's Guide - Page 28
disclaimers in the referenced licenses for additional details. To obtain source code files for the Dell modified GNU licensed software, launch the Drivers and Utilities CD that shipped with your printer and click Contact Dell, or refer to the "Contacting Dell" section of your Owner's Manual. - Dell 944 All In One Inkjet Printer | User's Guide - Page 29
your Owner's Manual. Dell recommends Dell ink cartridges for your printer. Dell does not provide warranty coverage for problems caused by using accessories, parts, or components not supplied by Dell. 1. Turn on your printer. 2. Lift the printer unit, and position the scanner support between the tabs - Dell 944 All In One Inkjet Printer | User's Guide - Page 30
new ink cartridges. Make sure the black or photo ink cartridge is secure in the left ink cartridge carrier, and the color ink cartridge is secure in the right ink cartridge carrier. 8. Snap each lid closed. 9. Lift the printer unit, and hold the scanner support up while lowering the printer unit - Dell 944 All In One Inkjet Printer | User's Guide - Page 31
. To align the ink cartridges: 1. Load plain paper. For more information, see Loading Paper. 2. In Windows XP, click Start® Control Panel® Printers and Other Hardware® Printers and Faxes. In Windows 2000, click Start® Settings® Printers. 3. Right-click the Dell Photo AIO Printer 944 icon. 4. Click - Dell 944 All In One Inkjet Printer | User's Guide - Page 32
and Other Hardware® Printers and Faxes. In Windows 2000, click Start® Settings® Printers. 3. Right-click the Dell Photo AIO Printer 944 icon. 4. Click Printing Preferences. The Printing Preferences dialog box opens. 5. Click the Maintenance tab. 6. Click Clean Print Cartridges. 7. If the print - Dell 944 All In One Inkjet Printer | User's Guide - Page 33
computer and printer, and make sure they are connected. 2. Load paper with the print side facing up. For more information, see Loading Paper. 3. Paper. 2. It is recommended that you use a color cartridge and a photo cartridge for printing photos. For more information, see Replacing Ink Cartridges - Dell 944 All In One Inkjet Printer | User's Guide - Page 34
make sure the print side is facing up. For more information, see Loading Paper. 2. It is recommended that you use a color cartridge and a photo cartridge for printing photos. For more information, see Replacing Ink Cartridges. 3. With your document open, click File® Print. 4. To customize your print - Dell 944 All In One Inkjet Printer | User's Guide - Page 35
, select the print quality/speed, paper size, black and white or color Camera Your printer supports PictBridge-compatible cameras. 1. Insert one end of printer. 3. Turn on your digital camera. Refer to the instructions to store photos. The Dell Photo AIO Printer 944 supports the following memory cards - Dell 944 All In One Inkjet Printer | User's Guide - Page 36
High Speed USB 2.0 Memory Key, Part Number 311-4340 l DELL - 64 MB High Speed USB 2.0 Memory Key, Part Number 311-4339 When you insert a memory card or USB memory key, the Photo Mode menu is displayed. NOTE: Do not insert more than one memory card or USB memory key at a time. Viewing - Dell 944 All In One Inkjet Printer | User's Guide - Page 37
the Start button to preview the image. 10. Press the Start button to print. Rotating Photos 1. Insert a memory card or USB memory key into the printer. 2. Press the up or down Arrow buttons to highlight View Photos or Print, and then press the Select button . 3. Press the up or down Arrow - Dell 944 All In One Inkjet Printer | User's Guide - Page 38
memory card or USB key until you turn it off. To turn Automatic Image Enhancement off: 1. Insert a memory card or USB memory key into the printer. 2. Press the Menu button . 3. Press the up or down Arrow buttons until you see Auto Image Enhance. 4. Press the left or right Arrow buttons until - Dell 944 All In One Inkjet Printer | User's Guide - Page 39
services. Using shielded cables ensures that you maintain the appropriate EMC classification for the intended environment. Cables are available from Dell at www.dell.com. Most Dell devices are classified for Class B environments. However, the inclusion of certain options can change the rating - Dell 944 All In One Inkjet Printer | User's Guide - Page 40
cards themselves. If any one of the labels carries a Class A rating, your entire device is considered to with the manufacturer's instruction manual, may cause interference with 944 l Company name: Dell Inc. One Dell Way Round Rock, Texas 78682 USA 512-338-4400 IC Notice (Canada Only) Most Dell - Dell 944 All In One Inkjet Printer | User's Guide - Page 41
be required to take adequate measures. If the FCC or ICES information on the label indicates a Class B rating, the following Class B statement applies to your device: This Dell device is classified for use in a typical Class B domestic environment. A "Declaration of Conformity" in accordance with - Dell 944 All In One Inkjet Printer | User's Guide - Page 42
Most Dell devices are classified by the Voluntary Control Council for Interference (VCCI) as Class B information technology equipment (ITE). However, the inclusion of certain options can change the rating of some configurations to Class A. ITE, including devices, expansion cards, printers, input/ - Dell 944 All In One Inkjet Printer | User's Guide - Page 43
The equipment should draw power from a socket with an attached protection circuit (a 3-prong socket). All equipment that works together (computer, monitor, printer, and so on) should have the same power supply source. The phasing conductor of the room's electrical installation should have a reserve - Dell 944 All In One Inkjet Printer | User's Guide - Page 44
One Dell Way Round Rock, TX 78682 Dell Computer de México, S.A. de C.V. Paseo de la Reforma 2620 - 11° Piso Col. Lomas Altas 11950 México, D.F. Dell Computer de México, S.A. de C.V. al Cuidado de Kuehne & Nagel de México S. de R.L. Avenida Soles No. 55 Col. Peñon de los Baños 15520 México, D.F. 944 - Dell 944 All In One Inkjet Printer | User's Guide - Page 45
the product or on a start-up screen is certified to comply with Environmental Protection Agency (EPA) ENERGY STAR® requirements as configured when shipped by Dell. You can also help reduce electricity usage and its side effects by turning off your product when it is not in use for extended periods - Dell 944 All In One Inkjet Printer | User's Guide - Page 46
by clicking Start® Programs or All Programs® Dell Printers® Dell Photo AIO Printer 944® Dell All-In-One Center. The Dell All-In-One Center opens. NOTE: You can also open the Dell All-In-One Center from the operator panel on your printer. When your printer is in Scan mode, press the Start button - Dell 944 All In One Inkjet Printer | User's Guide - Page 47
by clicking Start® Programs or All Programs® Dell Printers® Dell Photo AIO Printer 944® Dell All-In-One Center. The Dell All-In-One Center opens. NOTE: You can also open the Dell All-In-One Center from the operator panel on your printer. When your printer is in Scan mode, press the Start button - Dell 944 All In One Inkjet Printer | User's Guide - Page 48
computer must have the printer software installed. Use the Drivers and Utilities CD to install the printer software. 1. Turn on your printer and external network adapter, until you find the one you want to send your photo or document to, and then . NOTE: If your printer is connected locally, the - Dell 944 All In One Inkjet Printer | User's Guide - Page 49
Computer 1. Click Start® Programs or All Programs® Dell Printers® Dell Photo AIO Printer 944® Dell All-In-One Center. The Dell All-In-One Center opens. 2. In the Productivity Tools section, click Save an image on my computer. 3. Follow the instructions on your screen. E-mailing a Scanned Image or - Dell 944 All In One Inkjet Printer | User's Guide - Page 50
5. Click Start® Programs or All Programs® Dell Printers® Dell Photo AIO Printer 944® Dell All-In-One Center. The Dell All-In-One Center opens. 6. Click Preview Now. 7. In the Productivity Tools section, select Enlarge or reduce an image. 8. Follow the instructions on the screen to select the size of - Dell 944 All In One Inkjet Printer | User's Guide - Page 51
troubleshooting and maintenance information. l Preview images you want to print or copy. l Manage photos (copy them to folders, print them, perform creative copying). To access the Dell All-In-One Center: Click Start® Programs or All Programs® Dell Printers® Dell Photo AIO Printer 944® Dell All - Dell 944 All In One Inkjet Printer | User's Guide - Page 52
opens. To access Printing Preferences when a document is not open: 1. In Windows XP, click Start® Settings® Start® Control Panel® Printers and Other Hardware® Printers and Faxes. In Windows 2000, click Start® Settings® Printers. 2. Right-click the printer icon, and then select Printing Preferences. - Dell 944 All In One Inkjet Printer | User's Guide - Page 53
- Allows you to set the paper type manually, or have the printer sensor detect the paper type automatically. Paper Size - Select the size and type of paper. Print in black and white - Print your color images in black and white to save the ink in your color ink cartridge. Advanced NOTE: You cannot - Dell 944 All In One Inkjet Printer | User's Guide - Page 54
® Dell Printers® Dell Photo AIO Printer 944® Uninstall Dell Photo AIO Printer 944. 2. Follow the instructions on the screen. 3. Restart your computer. 4. Insert the Drivers and Utilities CD, and then follow the instructions on the screen. If the installation screen does not appear: a. In Windows XP - Dell 944 All In One Inkjet Printer | User's Guide - Page 55
c. When the printer software installation screen appears, click Personal Installation or Network Installation. d. Follow the instructions on your screen to complete the installation. - Dell 944 All In One Inkjet Printer | User's Guide - Page 56
and Requirements Rated AC Input Rated Frequency Minimum AC input Maximum AC input Maximum input current Average power consumption Standby mode Operational mode 100-240 VAC 50/60 Hz 100 VAC 240 VAC 1.6 A 15 W 25 W Print and Scan Mode Capabilities Your Dell Photo AIO Printer 944 can scan - Dell 944 All In One Inkjet Printer | User's Guide - Page 57
will cause a paper jam. See Paper Problems. l You load the leading edge of the banner paper into the printer against the right side of the paper support. l The banner paper is centered between the left and right edge guides. l You use banner paper designed for inkjet printers. 10 envelopes l The - Dell 944 All In One Inkjet Printer | User's Guide - Page 58
transparencies are centered on the paper support, in between the left and right paper guides. NOTE: You can load a single transparency into the paper support without removing plain paper. l You select Normal or Photo print quality. Cables Your Dell Photo AIO Printer 944 uses a Universal Serial Bus - Dell 944 All In One Inkjet Printer | User's Guide - Page 59
panel display, write down the exact message. Setup Problems Computer Problems Verify that your printer is compatible with your computer. The Dell Photo AIO Printer 944 supports Windows 2000 and Windows XP. Make sure you turned on both your printer and your computer. Check the USB cable. l Ensure - Dell 944 All In One Inkjet Printer | User's Guide - Page 60
for the Dell printer. Also, do not install the Dell printer drivers multiple times from your printer CD. Printer Problems Ensure that the printer power cable is firmly connected to the printer and the electrical outlet. Determine if the printer has been held or paused. 1. In Windows XP, click Start - Dell 944 All In One Inkjet Printer | User's Guide - Page 61
For more information, see Replacing Ink Cartridges. Error XXXX If the LCD displays Error followed by a 4-digit number, an Contact Customer Support. For more information, go to advanced error has occurred. support.dell.com or refer to the printer Owner's Manual. No Computer Ensure your computer - Dell 944 All In One Inkjet Printer | User's Guide - Page 62
or media card is allowed. Please remove all device(s) and card(s). More than one memory card or device is inserted in the printer. Replace the ink cartridge. For more information, see Replacing Ink Cartridges. Remove all memory cards and devices. Improving Print Quality If you are not satisfied
-
 1
1 -
 2
2 -
 3
3 -
 4
4 -
 5
5 -
 6
6 -
 7
7 -
8
-
9
-
10
-
11
-
12
-
13
-
14
-
15
-
16
-
17
-
18
-
19
-
20
-
21
-
22
-
23
-
24
-
25
-
26
-
27
-
28
-
29
-
30
-
31
-
32
-
33
-
34
-
35
-
36
-
37
-
38
-
39
-
40
-
41
-
42
-
43
-
44
-
45
-
46
-
47
-
48
-
49
-
50
-
51
-
52
-
53
-
54
-
55
-
56
-
57
-
58
-
59
-
60
-
61
-
62
 |
 |

Dell™ Photo All
-In-One Printer 944 User's Guide
Click the links to the left for information on the features and operation of your printer. For information on other documentation included with your printer, see
Finding Information
.
To order ink or supplies from Dell:
1.
Double-click the icon on your desktop.
2.
Visit Dell's website:
www.dell.com/supplies
3.
Order Dell printer supplies by phone. Refer to the
Owner's Manual
for the correct phone number for your country.
For the best service, make sure you have the Dell printer Service Tag available. See
Express Service Code and Service Tag number
.
Notes, Notices, and Cautions
Information in this document is subject to change without notice.
© 2005 Dell Inc. All rights reserved.
Reproduction in any manner whatsoever without the written permission of Dell Inc.
is strictly forbidden.
Trademarks used in this text:
Dell
, the
DELL
logo,
Dell Picture Studio
, and
Dell Ink Management System
are trademarks of Dell Inc.;
Microsoft
and
Windows
are registered trademarks
of Microsoft Corporation.
Other trademarks and trade names may be used in this document to refer to either the entities claiming the marks and names or their products. Dell Inc. disclaims any
proprietary interest in trademarks and trade names other than its own.
Model 944
May 2005
SRV HC345
Rev. A00
NOTE:
A
NOTE
indicates important information that helps you make better use of your printer.
NOTICE:
A
NOTICE
indicates either potential damage to hardware or loss of data and tells you how to avoid the problem.
CAUTION:
A CAUTION indicates a potential for property damage, personal injury, or death.