Dell B2360DN Mono Laser User Guide - Page 131
Large jobs do not collate, Unexpected breaks occur, Step 1, Settings, General Settings, Timeouts
 |
View all Dell B2360DN Mono Laser manuals
Add to My Manuals
Save this manual to your list of manuals |
Page 131 highlights
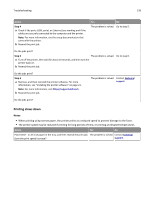
Troubleshooting 131 Large jobs do not collate Action Yes No Step 1 a From the Finishing menu on the printer control panel, set Collate to (1,2,3) (1,2,3). b Resend the print job. The problem is solved. Go to step 2. Did the job print and collate correctly? Step 2 a From the printer software, set Collate to (1,2,3) (1,2,3). Note: Setting Collate to (1,1,1) (2,2,2) in the software overrides the setting in the Finishing menu. b Resend the print job. The problem is solved. Go to step 3. Did the job print and collate correctly? Step 3 The problem is solved. Reduce the complexity of the print job by eliminating the number and size of fonts, the number and complexity of images, and the number of pages in the job. Contact technical support. Did the job print and collate correctly? Unexpected page breaks occur Action Step 1 Adjust the print timeout settings. a From the printer control panel, navigate to: Settings > General Settings > Timeouts > Print Timeout b Select a higher setting and then, depending on your printer model, Yes No The problem is solved. Go to step 2. select or Submit. c Resend the print job. Did the file print correctly? Step 2 a Check the original file for manual page breaks. b Resend the print job. The problem is solved. Contact technical support. Did the file print correctly?
-
 1
1 -
2
-
3
-
4
-
5
-
6
-
7
-
8
-
9
-
10
-
11
-
12
-
13
-
14
-
15
-
16
-
17
-
18
-
19
-
20
-
21
-
22
-
23
-
24
-
25
-
26
-
27
-
28
-
29
-
30
-
31
-
32
-
33
-
34
-
35
-
36
-
37
-
38
-
39
-
40
-
41
-
42
-
43
-
44
-
45
-
46
-
47
-
48
-
49
-
50
-
51
-
52
-
53
-
54
-
55
-
56
-
57
-
58
-
59
-
60
-
61
-
62
-
63
-
64
-
65
-
66
-
67
-
68
-
69
-
70
-
71
-
72
-
73
-
74
-
75
-
76
-
77
-
78
-
79
-
80
-
81
-
82
-
83
-
84
-
85
-
86
-
87
-
88
-
89
-
90
-
91
-
92
-
93
-
94
-
95
-
96
-
97
-
98
-
99
-
100
-
101
-
102
-
103
-
104
-
105
-
106
-
107
-
108
-
109
-
110
-
111
-
112
-
113
-
114
-
115
-
116
-
117
-
118
-
119
-
120
-
121
-
122
-
123
-
124
-
125
-
 126
126 -
 127
127 -
 128
128 -
 129
129 -
 130
130 -
 131
131 -
 132
132 -
 133
133 -
 134
134 -
 135
135 -
 136
136 -
137
-
138
-
139
-
140
-
141
-
142
-
143
-
144
-
145
-
146
-
147
-
148
-
149
-
150
-
151
-
152
-
153
-
154
-
155
-
156
-
157
-
158
 |
 |
