Epson FX 1170 User Manual - Page 40
Changing Tractor Position, installed, remove it by grasping the fins on both sides
 |
View all Epson FX 1170 manuals
Add to My Manuals
Save this manual to your list of manuals |
Page 40 highlights
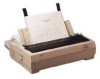
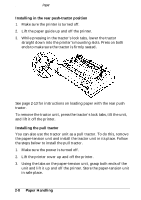
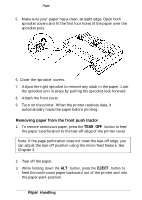
Using Continuous Paper Note: Make sure you align your paper supply so paper can feed smoothly into the printer. If you want to feed paper through the bottom paper slot, use a printer stand that has a large enough opening for the paper to feed without obstruction. Changing tractor positions Before installing the tractor in a different position, remove it from its current position by pressing the blue lock tabs while you lift it out. Installing in the front push-tractor position 1. Make sure the printer is turned off. 2. Open the front cover. If the optional front sheet guide is installed, remove it by grasping the fins on both sides and pulling it straight out of the printer. 3. Push the tractor into the printer's mounting slot as shown below. See page 2-10 for instructions on loading continuous paper with the front push tractor. To remove the tractor unit, press the tractor's lock tabs, tilt the unit up, and lift it out of the printer. Paper Handling 2-7
-
 1
1 -
2
-
3
-
4
-
5
-
6
-
7
-
8
-
9
-
10
-
11
-
12
-
13
-
14
-
15
-
16
-
17
-
18
-
19
-
20
-
21
-
22
-
23
-
24
-
25
-
26
-
27
-
28
-
29
-
30
-
31
-
32
-
33
-
34
-
 35
35 -
 36
36 -
 37
37 -
 38
38 -
 39
39 -
 40
40 -
 41
41 -
 42
42 -
 43
43 -
 44
44 -
 45
45 -
46
-
47
-
48
-
49
-
50
-
51
-
52
-
53
-
54
-
55
-
56
-
57
-
58
-
59
-
60
-
61
-
62
-
63
-
64
-
65
-
66
-
67
-
68
-
69
-
70
-
71
-
72
-
73
-
74
-
75
-
76
-
77
-
78
-
79
-
80
-
81
-
82
-
83
-
84
-
85
-
86
-
87
-
88
-
89
-
90
-
91
-
92
-
93
-
94
-
95
-
96
-
97
-
98
-
99
-
100
-
101
-
102
-
103
-
104
-
105
-
106
-
107
-
108
-
109
-
110
-
111
-
112
-
113
-
114
-
115
-
116
-
117
-
118
-
119
-
120
-
121
-
122
-
123
-
124
-
125
-
126
-
127
-
128
-
129
-
130
-
131
-
132
-
133
-
134
-
135
-
136
-
137
-
138
-
139
-
140
-
141
-
142
-
143
-
144
-
145
-
146
-
147
-
148
-
149
-
150
-
151
-
152
-
153
-
154
-
155
-
156
-
157
-
158
-
159
-
160
-
161
-
162
-
163
-
164
-
165
-
166
-
167
-
168
-
169
-
170
-
171
-
172
-
173
-
174
-
175
-
176
-
177
-
178
-
179
-
180
-
181
-
182
-
183
-
184
 |
 |
