Epson FX 1170 User Manual - Page 78
Using the TEAR OFF button, TEAR OFF, READY
 |
View all Epson FX 1170 manuals
Add to My Manuals
Save this manual to your list of manuals |
Page 78 highlights
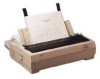
Tear Off 1. Print on continuous paper loaded on the front or rear push tractor (as described in Chapter 2). When you finish printing, the printer advances the final p&ted page's perforation to the tearoff position. 2. Tear off all printed pages. Note: If the perforation does not meet the tear-off edge, you can adjust the tear-off position using the micro-feed feature as described on page 3-15. I 3. When you resume printing, the printer automatically feeds the paper back to the loading position and begins printing. You can leave tear-off mode on even when you are using single sheets because tear-off mode is disabled when you move the paperrelease lever to the single-sheet position. When you are using the pull-tractor, you need to set the tear-off mode to invalid in the default setting mode. Using the TEAR OFF button You can use the TEAR OFF button to advance continuous paper to the tear-off position even if the tear-off mode is set to invalid in the default-setting mode. Just follow the steps below: 1. Make sure printing has finished. 2. Press the TEAR OFF button. The printer advances the paper's perforation to the tear-off edge and the READY light blinks. 3. Tear off all printed pages. Note: If the perforation does not meet the tear-off edge, you can adjust the tear-off position using the micro-feed feature as described in the next section. Using the Printer 3-19
-
 1
1 -
2
-
3
-
4
-
5
-
6
-
7
-
8
-
9
-
10
-
11
-
12
-
13
-
14
-
15
-
16
-
17
-
18
-
19
-
20
-
21
-
22
-
23
-
24
-
25
-
26
-
27
-
28
-
29
-
30
-
31
-
32
-
33
-
34
-
35
-
36
-
37
-
38
-
39
-
40
-
41
-
42
-
43
-
44
-
45
-
46
-
47
-
48
-
49
-
50
-
51
-
52
-
53
-
54
-
55
-
56
-
57
-
58
-
59
-
60
-
61
-
62
-
63
-
64
-
65
-
66
-
67
-
68
-
69
-
70
-
71
-
72
-
 73
73 -
 74
74 -
 75
75 -
 76
76 -
 77
77 -
 78
78 -
 79
79 -
 80
80 -
 81
81 -
 82
82 -
 83
83 -
84
-
85
-
86
-
87
-
88
-
89
-
90
-
91
-
92
-
93
-
94
-
95
-
96
-
97
-
98
-
99
-
100
-
101
-
102
-
103
-
104
-
105
-
106
-
107
-
108
-
109
-
110
-
111
-
112
-
113
-
114
-
115
-
116
-
117
-
118
-
119
-
120
-
121
-
122
-
123
-
124
-
125
-
126
-
127
-
128
-
129
-
130
-
131
-
132
-
133
-
134
-
135
-
136
-
137
-
138
-
139
-
140
-
141
-
142
-
143
-
144
-
145
-
146
-
147
-
148
-
149
-
150
-
151
-
152
-
153
-
154
-
155
-
156
-
157
-
158
-
159
-
160
-
161
-
162
-
163
-
164
-
165
-
166
-
167
-
168
-
169
-
170
-
171
-
172
-
173
-
174
-
175
-
176
-
177
-
178
-
179
-
180
-
181
-
182
-
183
-
184
 |
 |
