Epson FX 1170 User Manual - Page 45
Removing Paper From the Front Push Tractor, Paper
 |
View all Epson FX 1170 manuals
Add to My Manuals
Save this manual to your list of manuals |
Page 45 highlights
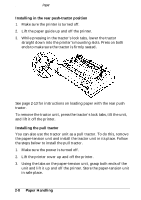
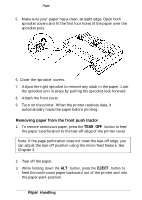
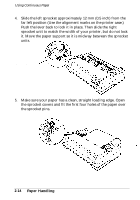
Using Continuous Paper 5. Make sure your paper has a clean, straight edge. Open both sprocket covers and fit the first four holes of the paper over the sprocket pins. 6. Close the sprocket covers. ,;Yi,_:' 7. Adjust the right sprocket to remove any slack in the paper. Lock the sprocket unit in place by pulling the sprocket lock forward. 8. Attach the front cover. 9. Turn on the printer. When the printer receives data, it automatically loads the paper before printing. Removing paper from the front push tractor 1. To remove continuous paper, press the TEAR OFF button to feed the paper's perforation to the tear-off edge of the printer cover. Note: If the page perforation does not meet the tear-off edge, you can adjust the tear-off position using the micro-feed feature. See Chapter 3. 2. Tear off the paper. 3. While holding down the ALT button, press the EJECT button to feed the continuous paper backward out of the printer and into the paper-park position. 2-12 Paper Handling
-
 1
1 -
2
-
3
-
4
-
5
-
6
-
7
-
8
-
9
-
10
-
11
-
12
-
13
-
14
-
15
-
16
-
17
-
18
-
19
-
20
-
21
-
22
-
23
-
24
-
25
-
26
-
27
-
28
-
29
-
30
-
31
-
32
-
33
-
34
-
35
-
36
-
37
-
38
-
39
-
 40
40 -
 41
41 -
 42
42 -
 43
43 -
 44
44 -
 45
45 -
 46
46 -
 47
47 -
 48
48 -
 49
49 -
 50
50 -
51
-
52
-
53
-
54
-
55
-
56
-
57
-
58
-
59
-
60
-
61
-
62
-
63
-
64
-
65
-
66
-
67
-
68
-
69
-
70
-
71
-
72
-
73
-
74
-
75
-
76
-
77
-
78
-
79
-
80
-
81
-
82
-
83
-
84
-
85
-
86
-
87
-
88
-
89
-
90
-
91
-
92
-
93
-
94
-
95
-
96
-
97
-
98
-
99
-
100
-
101
-
102
-
103
-
104
-
105
-
106
-
107
-
108
-
109
-
110
-
111
-
112
-
113
-
114
-
115
-
116
-
117
-
118
-
119
-
120
-
121
-
122
-
123
-
124
-
125
-
126
-
127
-
128
-
129
-
130
-
131
-
132
-
133
-
134
-
135
-
136
-
137
-
138
-
139
-
140
-
141
-
142
-
143
-
144
-
145
-
146
-
147
-
148
-
149
-
150
-
151
-
152
-
153
-
154
-
155
-
156
-
157
-
158
-
159
-
160
-
161
-
162
-
163
-
164
-
165
-
166
-
167
-
168
-
169
-
170
-
171
-
172
-
173
-
174
-
175
-
176
-
177
-
178
-
179
-
180
-
181
-
182
-
183
-
184
 |
 |
